


October 28, 2017
– Is the Jdiag Elite J2534 compatible withNissan Consult III Plus 2017 the latest software?
– Yes, definitely. It works perfect with Nissan consult III Plus software, already tested with many Nissan cars.
So, how to setup Jdiag Elite J2534 to work with Nissan consult 3 Plus?
Here you go.
The main steps…
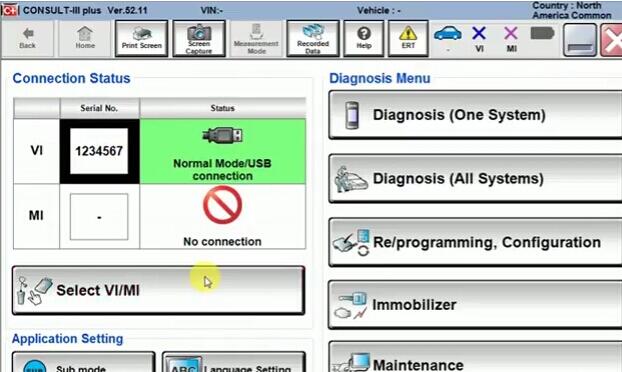
OpenConsult iii Plus Software on Desktop
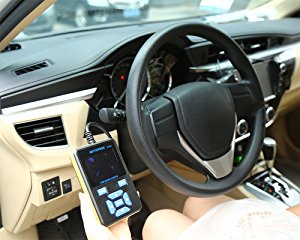
Connect JDiag Elite to the laptop USB and OBDII cable to the OBDII port on the car
Choose JDiag hardware
Choose the signal module to read out information
Then work with it
Then the details for you…
Open Nissan Consult 3 Plus software
Connect JDiag Elite J2534 device to the laptop USB and OBDII cable to the OBDII port on the car
Select VI/MI in Consult 3 Plus ver.52.11
Select VI and click on Connect
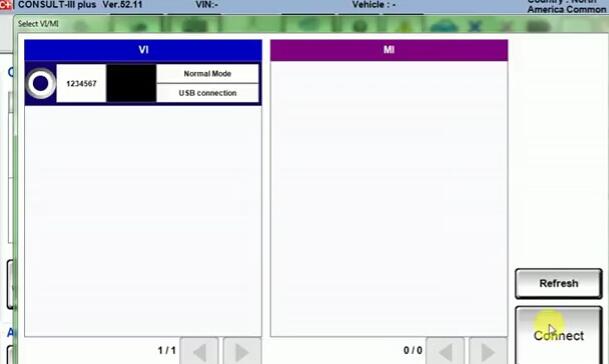
Then Close

You’ll see the connection status: VI: Normal module/USB connection
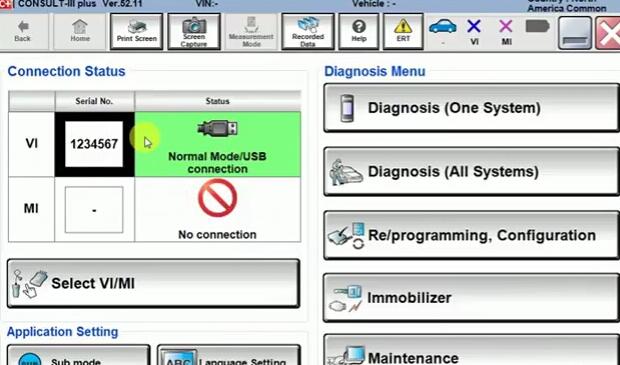
Start Diagnosis (one system)
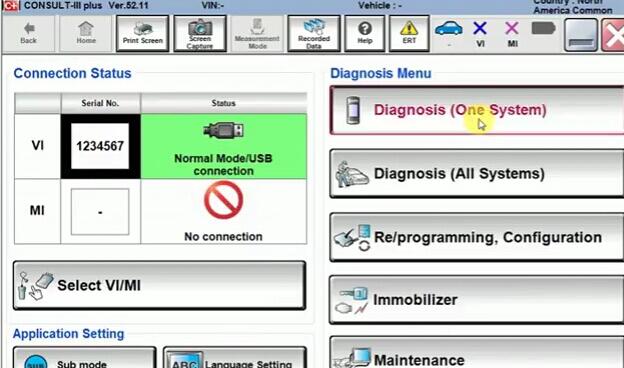
Choose a module to read out info
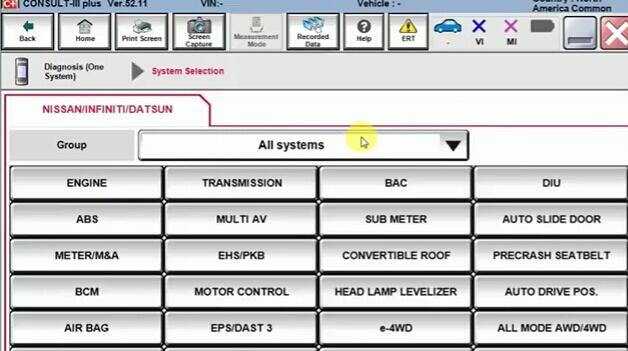
Also, you can choose by the car type
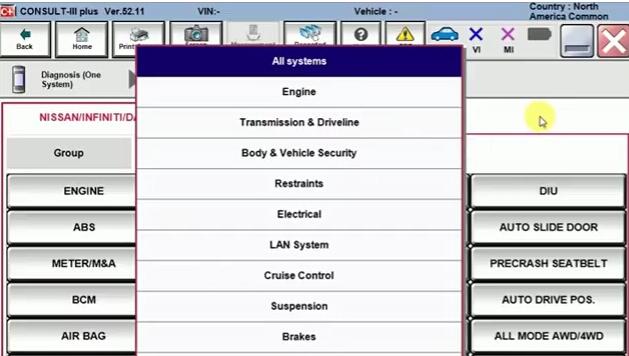
Back and start Diagnosis (all system)

Consult 3 plus Nissan car list
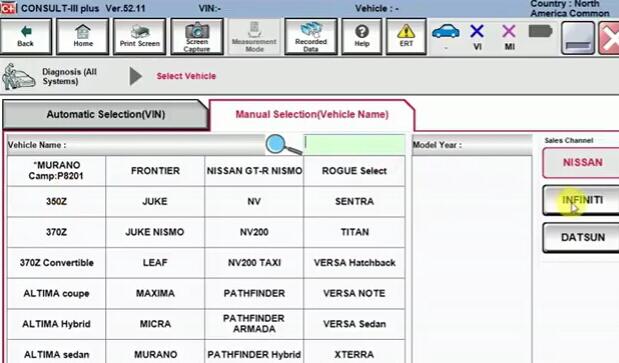
Consult 3 plus Infiniti car list

Manual selection
Choose a model and the model year
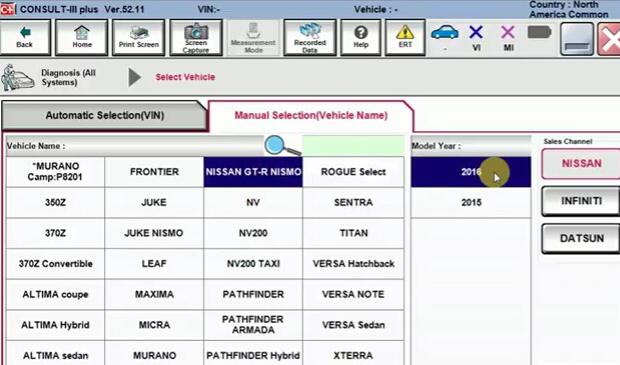
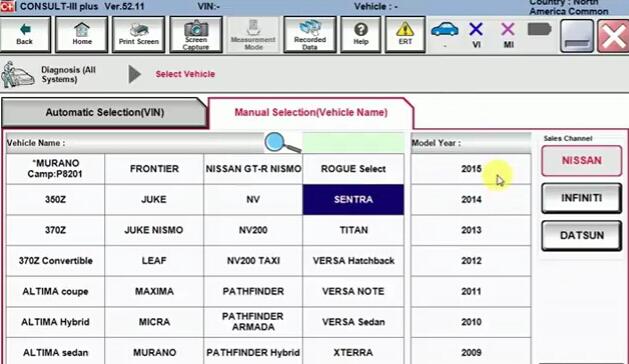
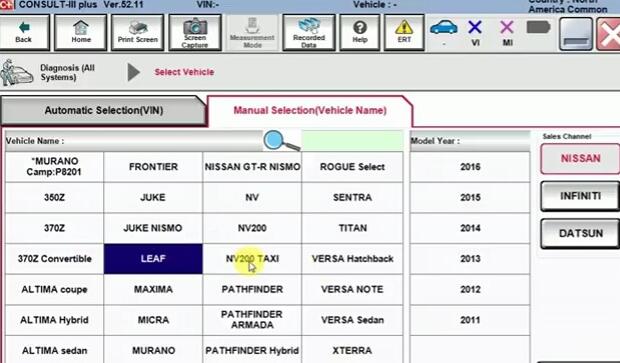
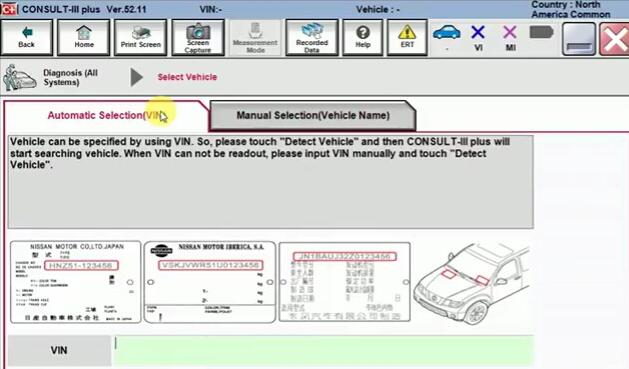
Automatic selection
Enjoy!
Posted by: obd2tool at
03:14 PM
| No Comments
| Add Comment
Post contains 208 words, total size 6 kb.
October 20, 2017

FEATURES & BENEFITS
1.Reads & Clears codes on Engine,Transmission(A/T),ABS,Airbag(SRS) system
2.Support for all 10 test modes of OBDII
3.Auto module search
4.Enhanced OBDII Mode 6
5.Supports vehicles1996 & newer ( OBDII & CAN)
6.Retrieves generic P0,P2,P3 & U0 codes ,along with manufacturer specific P1,P3 & U1 codes- both permanent & pending
7.Read & Clear Check Engine Lights
8.Turn off MIL & reset monitors
9.Displays DTC definitions right on the screen
10.View freeze frame data & I/M Readiness monitor status
11.Display live PCM data stream & O2 Sensor test Data
12.Graph ,record ,& replay data in full color
13.3.5″ TFT color display
14.Code cause / solutions tips guide users to the root cause of trouble codes faster ,saving diagnosis and repair time
15.Rerieves vehicle information ( VIN,CIN and CVN)
16.Multilingual menua wiht DTC definitions in English,Spanish & French
17.Internet updateable & upgradeable
18 Print data via PC
Please note :
*All Launch tools must be registered and updated immediately upon purchase to be guaranteed all of the above latest functionality
There are also some videos on Youtube you can take as a reference , if you dont’ know how to do it ,please contact us,
we will offer professional technical support .
Vehicle Coverage
Asia Car Models:
Suzuki, Honda, Mitsubishi, Nissan, Toyota, Mazda, Hyundai, Kia, Subaru, Infiniti, Lexus, Accura, Isuzu.JPISUZU
AUSTFORD
HOLDEN
USA Car Models:
USA Ford, GM, Chrysler.
European Car Models:
Mercedes Benz, BMW, VW, Opel, Volvo, Fiat, Landrover, Seat, Skoda, Audi, Porsche, Saab, Jaguar.SMART(SMART) SPRINTER
Specification
· Screen:3.5â€, 320*480 TFT LCD true color display
· Input voltage:9-18V
· Connection:standard 16 PIN OBD diagnostic interface
· Working temperature:0-50°C
· Storage ambient temperature:-20 to 70°C
· Dimension:136*73*22(mm)
· Weight:<750g
Packing list
1pc x Launch Car Creader CRP123
1pc x OBDII cable
1pc x USB Cable
1pc x USB Sticker
1pc x User Manual
1pc x Carrying paper box
http://crp123crp129.blogspot.com/
Posted by: obd2tool at
05:25 PM
| No Comments
| Add Comment
Post contains 317 words, total size 4 kb.
October 08, 2017
While the use of theOBD2 on the car has become traditional, what has failed to get to most people is the car OBD 2 installation process. Seeming tedious as it is to so many motorists, it can be one of the easiest things to perform around the car.
How to install an OBD 2 deviceThe OBD 2 is of different nature and the one with most cars is the one to be connected at the OBD 2 port. However, because of its computerized nature, the OBD 2 in essence works with different programs which must in most cases be installed within the car computer system.
Saving yourself the agony of the whole thing may require that you identify the diverse applications which the OBD 2 is compliant. For instance, the torque, the windows and the other several applications including the android installation processes which may precede the Car Scanner.
How to install the OBD 2 on different applications?
As each of the OBD 2 scan tools are made by different manufacturers, they have different compatibility issues. Installing the specific OBD software on the car computer memory is quite important. You may need to follow these steps;
Locate the OBD 2 port-get to know where theProfessional Diagnostic Tool is located. This is usually found somewhere below the drivers’ seat. In some older car versions, the dashboard would be better if you checked. After that, you also need to know the type of software t be installed and where. Some of these OBD 2 tools may be installed within the phone through the wireless
Turn on the car engine-if the car is switched off, switching it on may help bring to life the car computer system. Connect the OBD scan tool to be installed and initiate the process by pressing Ok on the keypad. Leaving the car engine on is an important process while installing the OBD 2 device.
Run the device software-The system is bound t run itself on the computer screen, run it and allow it to bring the interface, click add, when prompted to and click ok on the computer screen. At this point, the system is set and ready for use.
Video: How to Install an OBD2 Device – Track Your Mileage, Fuel Costs And More
However, the different applications on the computers may present different interfaces. The windows installation process will require that the user clicks next until prompted to click finish; the system is ready for use.
Choose the interface-If thecar key programming to be installed is Bluetooth in nature, what the user needs to know is how to initiate a search for the nearby Bluetooth devices which the computer memory may be detecting. Go to the Bluetooth settings and click, set the wireless network connection and check for the devices which are detected.
When the device pairs on the computer screen, this will then require the user to just click next until the area where the user has the prompt for finish. However, if it is on the phone, select the device to be paired only when notified. This may need to be performed at least twice if the device is of android nature.
Enter password-for security, most of the OBD 2 device software asks for the insertion of a password which is to be used only by the authorized user. For the Bluetooth devices, the pairing code is what is used in most cases.
The user passkey may come with the specific OBD 2 device within the user manual. It calls for the thorough perusal f the manual before use. When the whole installation process is done, the car engine computer is OBD 2 compliant and rearing to go.
Use the OBD 2 device to check the status of your car– the usual user process will take effect by just connecting the device through the LOBD 2 connection port and then getting the readings, or pairing at every instance you wish to use the Bluetooth device.
It is worth noting that the installation of theCar ECU Programmer on the computer is not an end in itself. Some cars have peculiar ways of working and may reject the OBD 2 which you have installed.
This may prompt a new installation process. What is important is that the system needs to be tested at the time of installation before the user rests pretty.
https://bm.cari.com.my/home.php?mod=space&uid=2249422&do=blog&id=79624
Posted by: obd2tool at
02:02 AM
| No Comments
| Add Comment
Post contains 735 words, total size 5 kb.
32 queries taking 0.0248 seconds, 147 records returned.
Powered by Minx 1.1.6c-pink.

