


December 23, 2017
This blog will show you how easy it is to program immobiliser keys for 2012 VE Holden Commodoreusing the Autel MaxiDAS DS708.
No connection to GM or Holden required. No special codes required. Just plug the tool in and follow the simple on screen instructions.
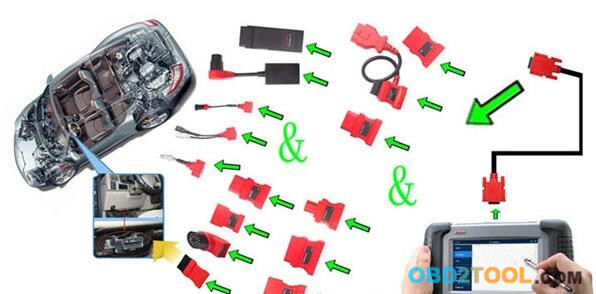
Device:
Autel MaxiDAS DS708
Vehicle:
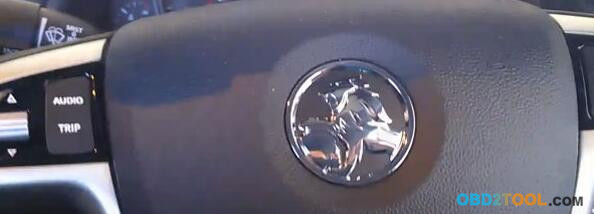
2012 VE Holden Commodore
How to connect to vehicles?
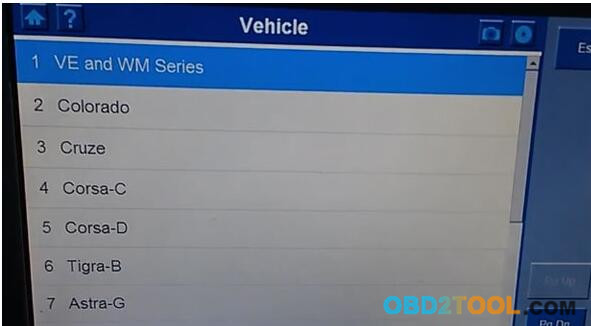
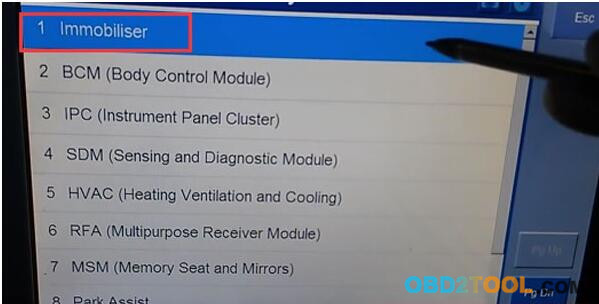
Choose vehicle model "VE and WM Seriesâ€
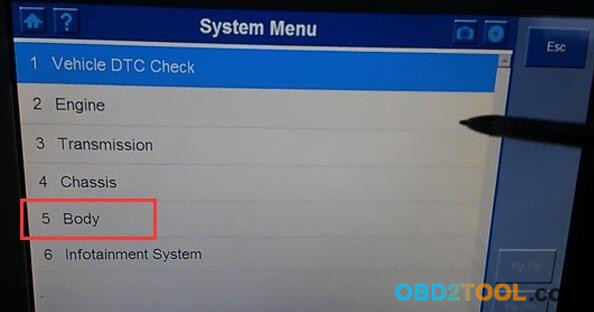
In System Menu, choose "Bodyâ€
Then choose "immobilizerâ€
"Programmingâ€
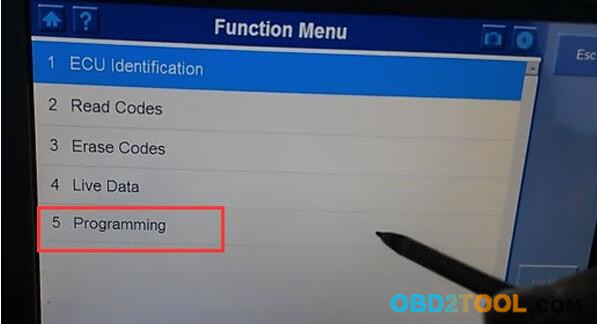
Then MaxiDAS DS708 will establish vehicle communications

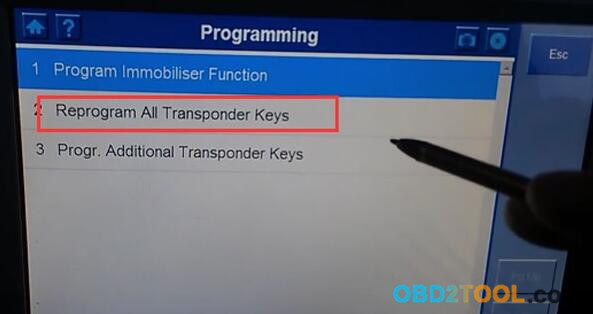
Choose "Reprogram All Transponder Keysâ€
MaxiDAS DS708 Link to Immobilizer…
MaxiDAS DS708 Link to ECM…
MaxiDAS DS708 Link to AudioSystem…
Autel Scanner MaxiDAS DS708 Link to BCM…
MaxiDAS DS708 Link to IPC…
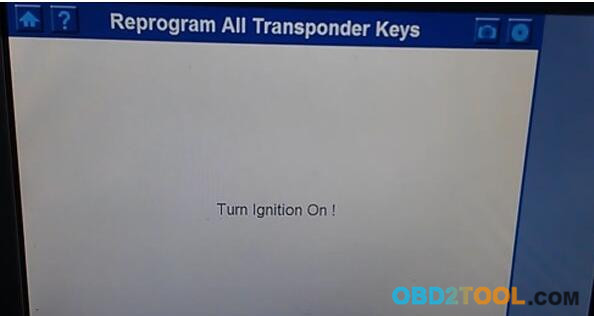
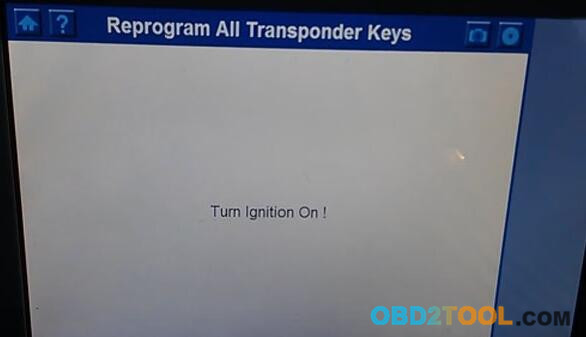
Then "Turn Ignition offâ€
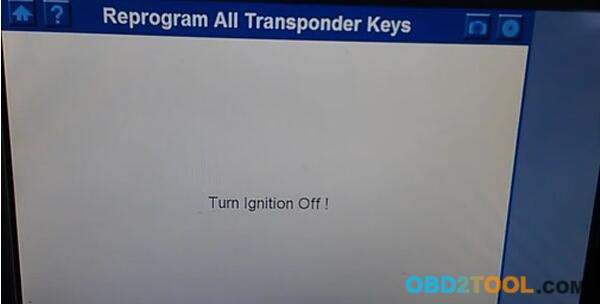
Wait for 10 seconds…
"Turn Ignitino onâ€
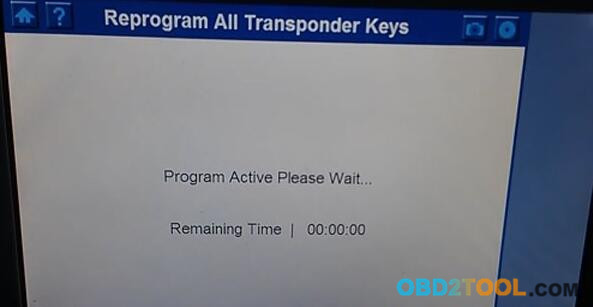
Program Active…
And "turn ignition offâ€

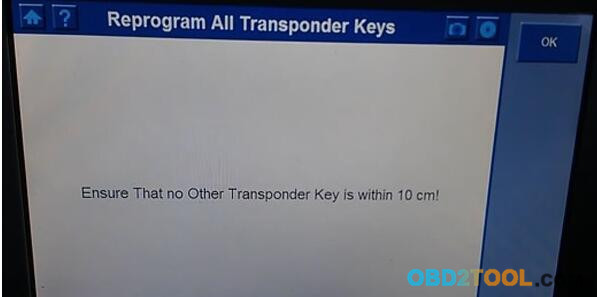
Ensure that no other transponder keys is within 10CM!
And "turn ignition onâ€
Done! A transponder key has been programmed!
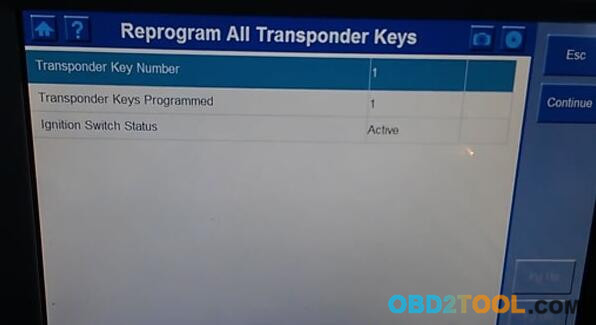
If you want to program another one, click on "Continueâ€
Turn ignition off
Insert the second key and click on OK

Turn ignition on
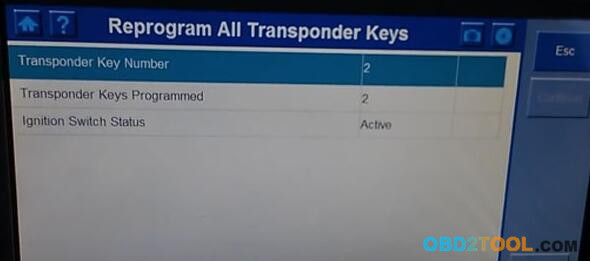
Done! Number of transponder keys is 2.
Total procedure only cost within 5 minutes, this is one function of Autel MaxiDAS DS708, if you want more information about it, pls visit:
http://www.obd2tool.com/goods-6882-AUTEL+MaxiDAS+DS808+Kit+Android+Tablet+Diagnostic+Tool.html
Posted by: obd2tool at
01:57 PM
| No Comments
| Add Comment
Post contains 218 words, total size 6 kb.
December 12, 2017
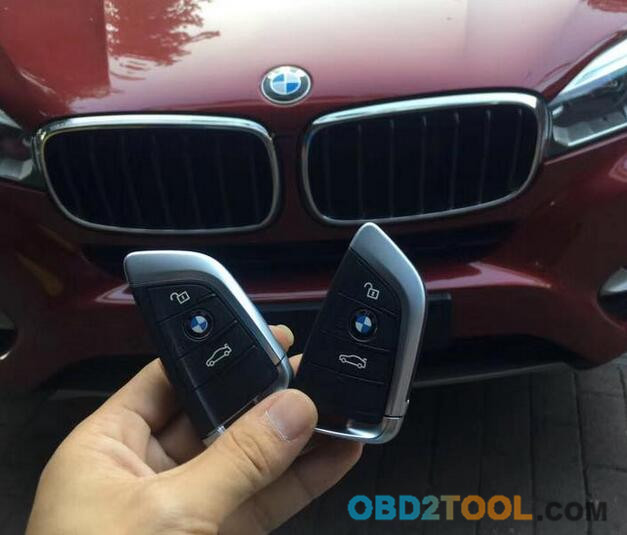
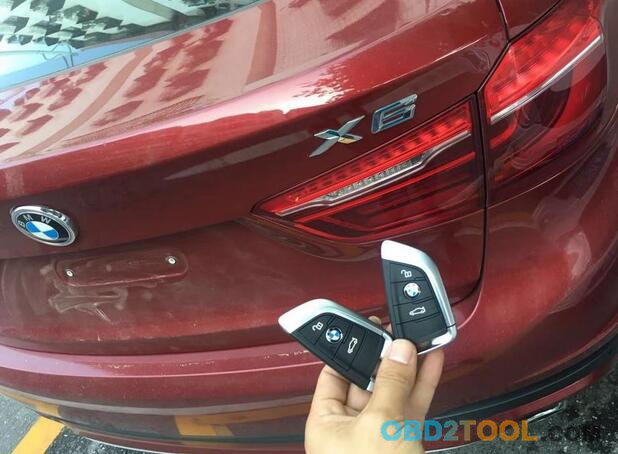
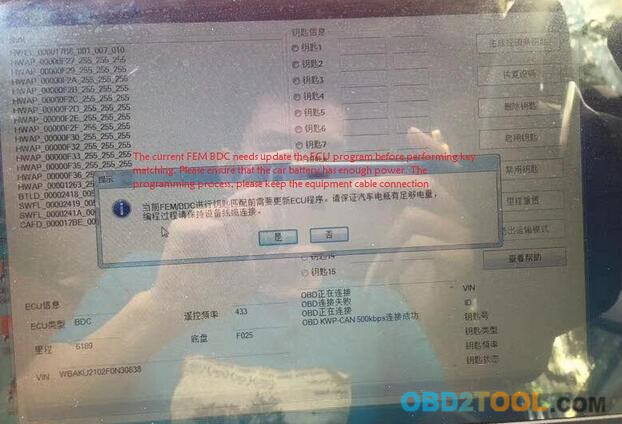
CGDI Prog BMW MSV80 Key Programmer new test: successfully did/program BMW BDC key to the new model X6.
Attach photos here: (Technicians use the software in Chinese; have translated into English. Wish you have fun here)

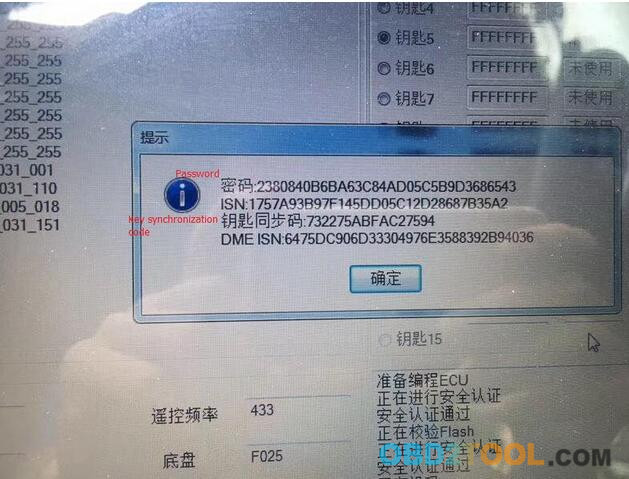
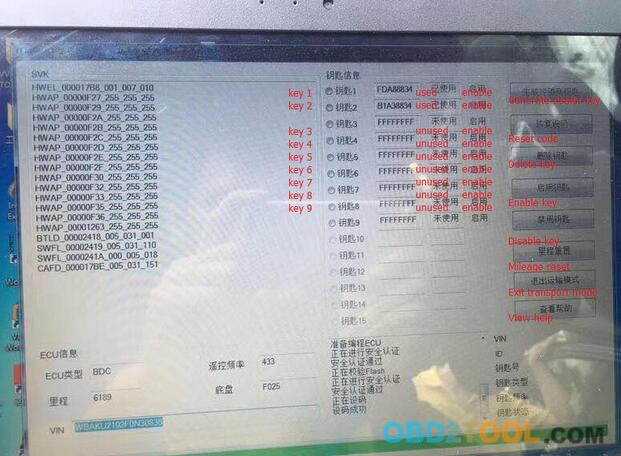


How to use CGDI Prog to program BMW X6 BDC key? The main steps:
Check all connection
Run Automotive Key Programmer CGDI PROG BMW software
Go to FEM/BDC key match
update the ECU program
remove the FEM BDC
read and save data from EEPROM chip on FEM BDC computer board
read the original car EEPROM data file
reading the chip data
save data
write the calculated new data to the EEPROM chip
then put the FEM BDC back into the car
Write EEPROM
Check the BDC connection
write the calculated new data to the EEPROM chip
then put the FEM BDC back into the car
The ECU is being programmed…
Again, write EEPROM
Again, write EEPROM
remove the FEM BDC
then use the CGDI BMW Programmer to write the original car EEPROM data back to EEPROM chip and FEM BDC back into the car
Coding is successful!!!!
Job’s done.
http://obd2tool.blog.free.fr/index.php?post/2017/12/12/CGDI-Prog-MB-Mercedes-Key-Programmer
Posted by: obd2tool at
06:30 AM
| No Comments
| Add Comment
Post contains 195 words, total size 3 kb.
December 05, 2017
1. Preparation & Connections
Note: To make sure the tool is running the latest available software, it is advisable to check for updates on a frequent
basis. Refer to Section 2 "Register & Update†for details.
1. Preparation
1. Turn the vehicle ignition on. 2. Throttle should be in a closed position.
2. Vehicle Connection
1. Locate vehicle’s DLC socket: The DLC (Data Link Connector or Diagnostic Link Connector) is typically a standard 16-
pin connector where diagnostic code readers interface with a vehicle’s on-board computer. It is usually located 12
inches from the center of the steering wheel, under or around the driver’s side for most vehicles.
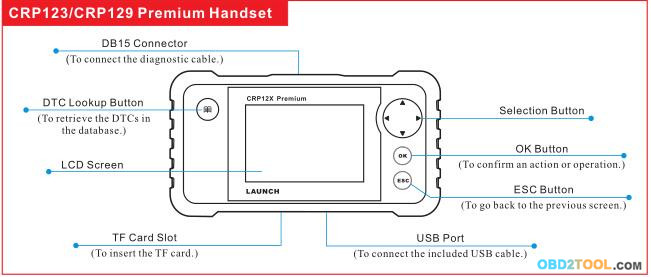
2. Connect the diagnostic cable into the vehicle’s DLC socket.
3. Plug the other end of diagnostic cable into the DB15 connector of the tool and tighten the captive screws.
2. Register & Update
Prerequisite conditions:
1. Go to http://launchtechusa.com and click "QUICK LINKS†–>"CRP123 Premium/ LAUNCH CRP129 Premium Scanner Update†to download and install it on the computer.
2. System requirements: Windows XP, Windows 7, Windows 8,Windows 10 operating system.There are 2 methods available to update your tool. You may choose one of the following to proceed.
Method 1: Via TF Card
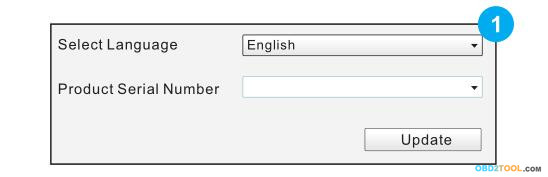
1. Launch the update tool, a screen similar to Figure 1 will appear:
2. In Figure 1, type in the Product Serial Number (located at the back of the tool).
Note: Once the Serial Number is entered, "Restore System†will become activated, which is used to restore system if a new TF card is replaced.
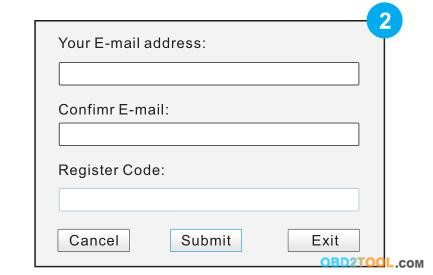
3. Click [Update] to jump to the registration page. Enter the following information and click [Submit] (refer to Figure 2).
(If you need the Register Code, please refer to steps 4~7.)
(If you have the Register Code, directly proceed to step 8.)
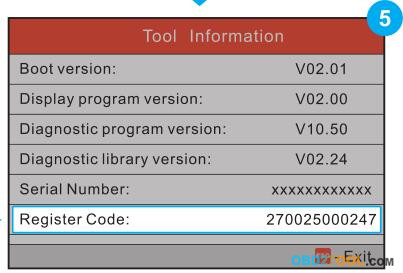
4. The Register Code can be found in your tool. Connect one end of the
supplied USB cord to your tool, and the other end on the computer.
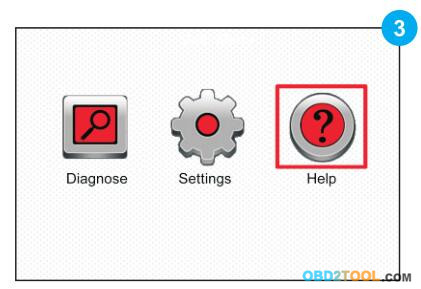
5. After the tool has powered up and entered the main menu screen,move the highlight bar on the "Help†icon (See Figure 3) and press [OK].
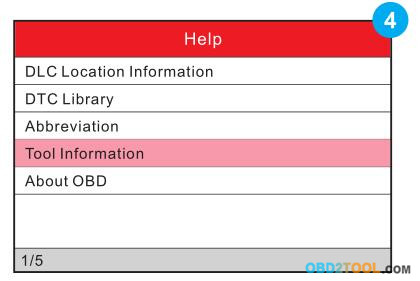
7. The Register Code shown in Figure 5 is the Register Code needed in step 3.(Return to step 3 and input the Register Code and then proceed)
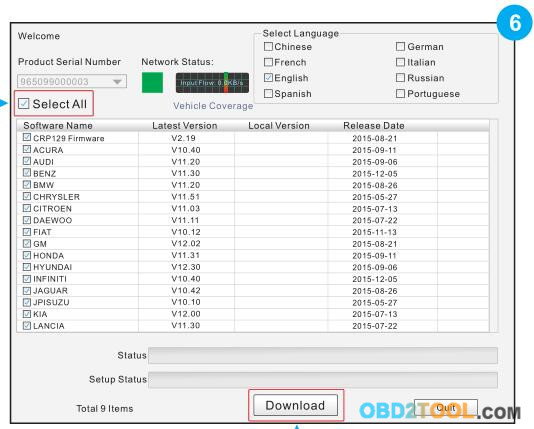
8. Install the TF card from the tool into the supplied USB TF card adaptor and insert into the USB port of the computer.
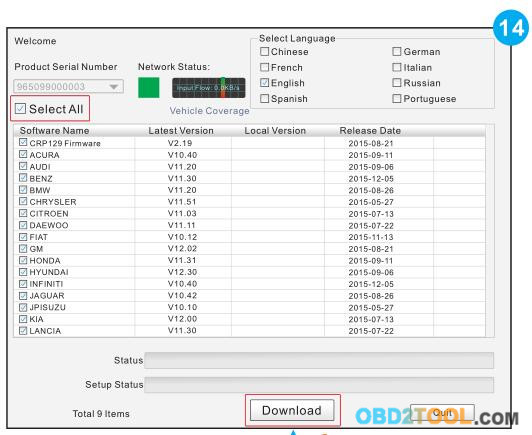
9. Reopen the update tool, select the updates you would like to perform or click "Select Allâ€, and then click [Download] to start downloading. See Figure 6.
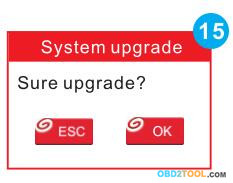
10.Once all steps are complete,reinsert the TF card into the tool and
power the tool via USB cableor via OBD II cable. A dialog box(Note: If
only diagnostic software is updated and no firmware package is
downloaded in Figure 6, this box will not appear) prompting you to
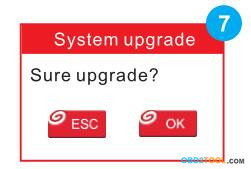
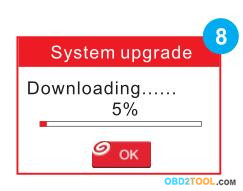
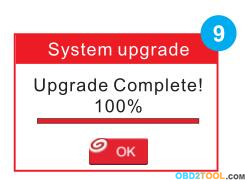
upgrade will pop up on the screen (See Figure 7 & Figure ![]() , select
[OK].
, select
[OK].
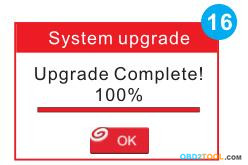
11.The registration process is now complete, your Launch X431 Scanner is now ready for use. See Figure 9.
Method 2: Via USB Cable
Note: Make sure the PC has an Internet connection.
1. Connect one end of the USB cable to the USB port of PC, and the other end to the tool.
2. If a newer version is found, a screen similar to Figure 10 will appear.
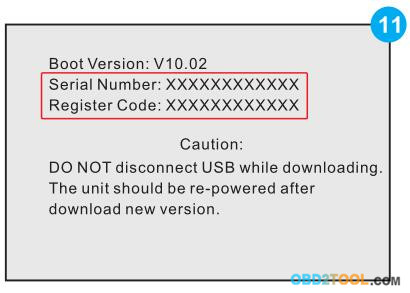
3. Press [OK] to configure thisCRP 129P as a USB device. See Figure 11. Note: The Serial Number and Register Code shown in this figure are needed for inputting in Steps 4-6.)

4. Launch the update tool, a screen similar to Figure 12 will appear.
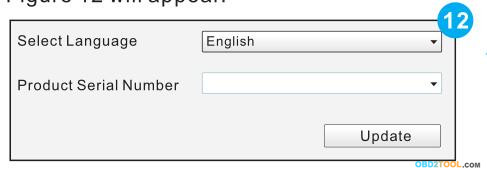
5. Type in the Product Serial Number.
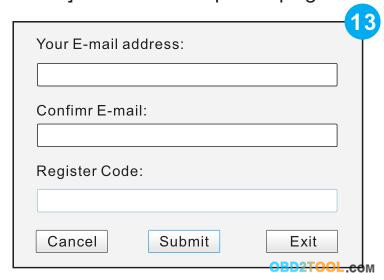
6. Click [Update] to jump to Figure 13. Input the following information and click [Submit] to enter the update page.
7. Select the updates you would like to perform or click "Select Allâ€, and then click [Download] to start downloading.
See Figure 14.
8. Once all steps are complete, restart your tool. It will prompt you to upgrade, click [OK] to start updating. It may take several minutes to finish the update.
9. The update process is complete, your tool is now ready for use
http://emilyzhang88.weebly.com/2133823458/crp123-crp129-premium-quick-start-guide
Posted by: obd2tool at
09:15 AM
| No Comments
| Add Comment
Post contains 697 words, total size 8 kb.
Ak500 Prog2 Mercedes Key Programming Tool new released, AK500 Prog2 Super Key Programmer For Mercedes Benz Key Programming Without Remove ESL ESM ECU.AK500 prog2 Mercedes Key Programming support read and write "Key-less go†Mercedes Benz Key.AK500 Prog2 Key programmer can replace AK500 Key Programmer as well.
Language:English
Operating System:Windows XP
Why Choose AK500 Prog2 Mercedes Key Programming Tool?
- AK500 Prog2 support through OBD port active Key-less function.
- AK500 Prog2 Mercede Key Programmer support Benz read and write "Key-less go†Key.
- MB AK500 Prog2 Internal Benz original factory key generator.
- MB AK500 Prog2 support NEC fast renew, Motorola MCU safe read and write.
- MB AK500 Prog2 key programmer Support infrared read and write NEC key and Motorola MCU key.
- MB AK500 Prog2 Key Programmer Support Benz ECU’s flash(29F400 and 29F800) generate key data. Need use STAR 2000 to do ECU coding
- MB AK500 Prog2 Mercedes Key Programming tool No need to choose the MCU type of EIS. When load EIS file, recognize EIS file, and generate key file. If your MCU is HC705,software will automatically suggest "load next EIS file of HC705â€
AK500P Prog2 Supported Car Models:
Mercedes-Benz:W220/W220″Keyless Go†W208/W210/W220/W203/W215/W230/W209/W219/W211/W230/W215 EEPROM(M95xxx)Volkswagen
Audi:MPC(MPC555/556,MPC561/562,MPC563/564),external Flash(MB58BW016,29BL802C,AM29BDD160,S29CD016,DE28F800 etc.) and external EEPROM(M95xxx)


http://cheapobd2tool.com/2017/11/27/mb-ak500-prog2-mercedes-key-programming-tool/
Posted by: obd2tool at
02:33 AM
| No Comments
| Add Comment
Post contains 204 words, total size 3 kb.
December 01, 2017
Paid one Autel Maxidas DS808 scanner and service reset tool on OBD2TOOL and was asked to provide an objective review on its operation and capabilities. I was interested to see how things had developed for Autel, as my previous experience of Autel diagnostic equipment was the first generation, Autel Maxidas DS708.
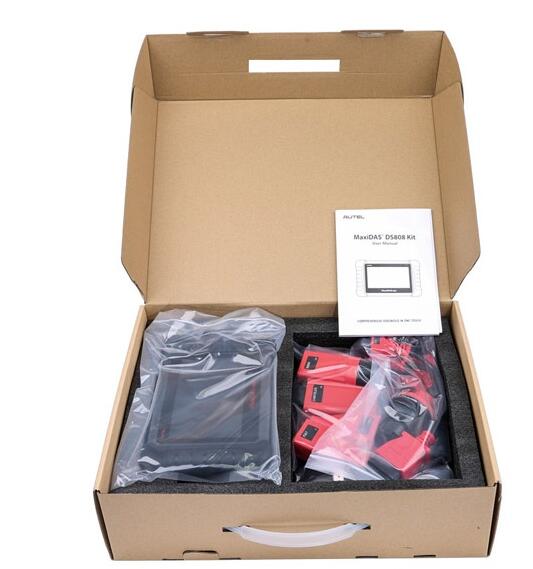
1.First impression to the full package
When Autel MaxiDAS DS808 arrived at me, the carry case looked something differently as the Autel DS808. Inside the case the host hardware was a compact, smart, rugged, android tablet. This was partnered by many good quality diagnostic adapters including those non-standard 16pin connectors, as well as a thick user manual on how to operate this machine.
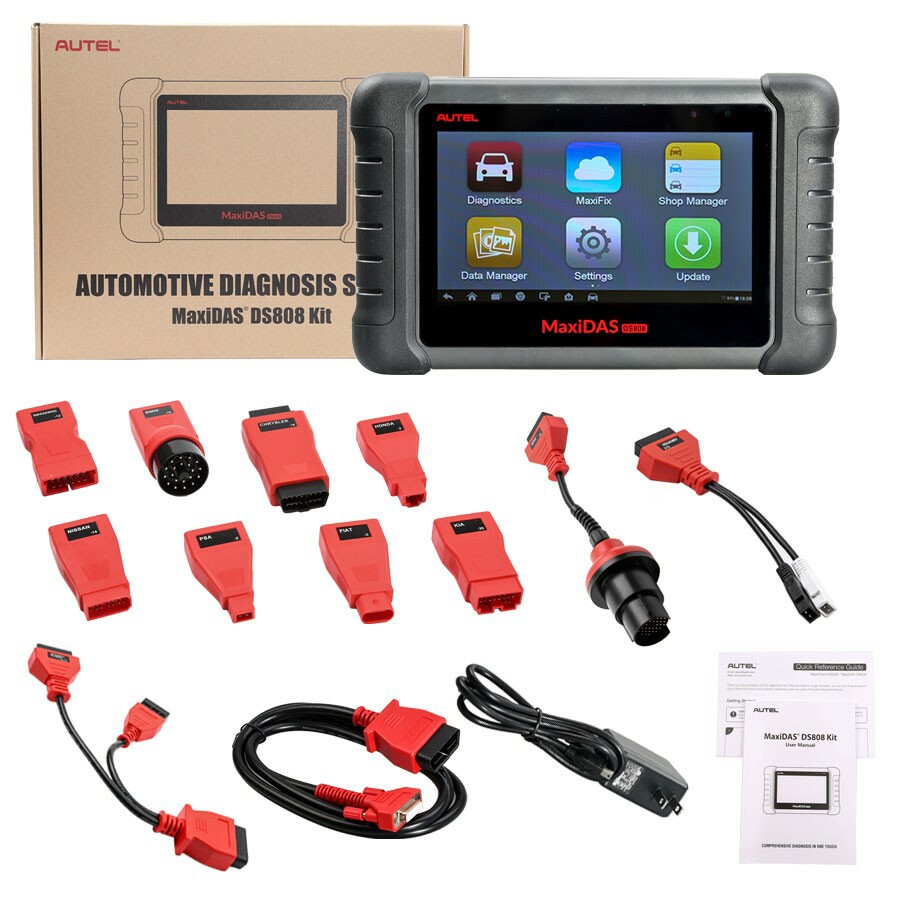
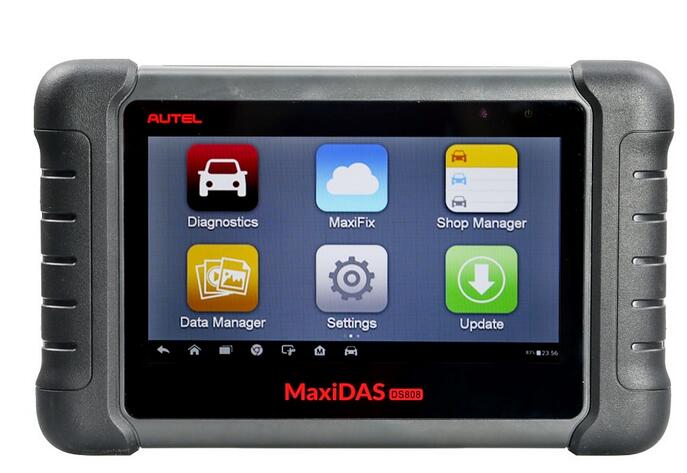
2.Autel Maxidas DS808 tablet
The Autel Maxidas DS808 tablet was light and compact and was very comfortable in hand. For such a compact package, the Power Sources is optional incl.: Internal Battery Pack, vehicle power, external power supply by connecting the packed power adapter. For the battery life it has a large capacity 3.7 V/3200 mAh lithium-polymer battery. Besides its new processor (Cortex-A9 processor (1.5 GHz), 7.0†LCD Capacitive Touchscreen and the Ambient Light Sensor which can detect ambient brightness when it is inside the workshop, thanks to the screen finish and a good quality display (see Figure2).
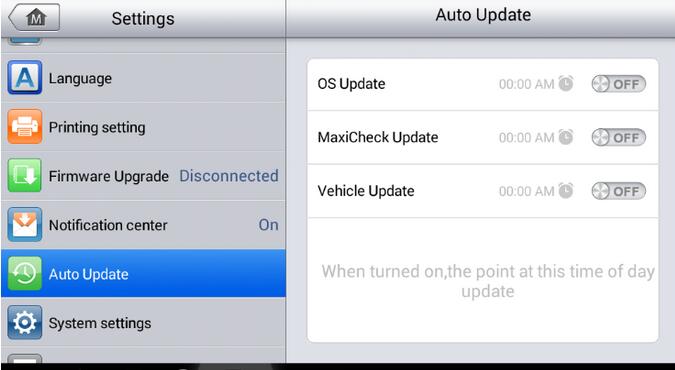
3.Feeling on general use – quick and smart to operate and update
The software look and feel are both very good in terms of layout and size and the touch screen operation worked flawlessly in conjunction with its large, clear icons. Ds808 was quick to get going from the initial power up to operate. The response in moving through the menus and executing tasks was immediate.
Downloading and running updates speed (which depends on the internet connection speed) was reasonable. The ‘services/update’ section of the software on the Autel DS808 notifies the user of pending updates, and it’s a ‘click and go’ procedure to set the updates running. And During general use I found that the Wifi communication connected stably when I used it.
4.Autel DS808 performance:
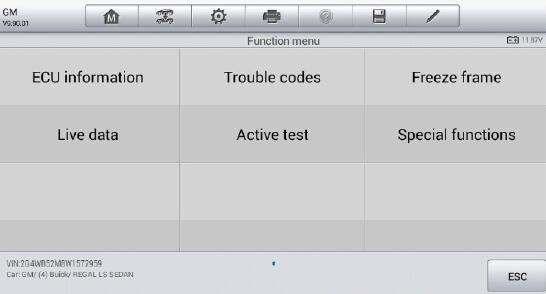
The maxidas ds808 review has wide and comprehensive system coverage, covers all of the prevailing makes and models. A detailed report of software coverage was beyond the scope of my brief. However, I did use the Autel Maxidas DS808 for a typical range of general workshop tasks (ECU information, trouble codes, freeze frame, live data, active test and special functions) on a typical range of workshop makes and models.
Also the "auto detect VIN†and "manually input VIN†are user-friendly design.


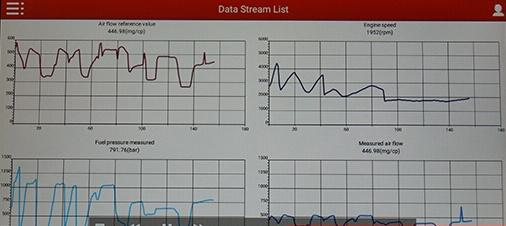
5.Graphing a live data stream:
One of the features I believe that a diagnostic scan tool should have is graphing a live data stream. The reason that this is so important is to enable the vehicle technician to examine the relationships between the various sensors, actuators and calculated values. This is critical for intermittent fault finding and for vehicle problems which don’t set diagnostic trouble codes. In this respect the Autel Maxidas DS808 did a good job. The live data is selected from an array of available parameters and then graphed. The graphed data can be shown as separate graphs or combined in a job graph. The scales are auto ranging and they can be reset to align them to the current operating conditions.
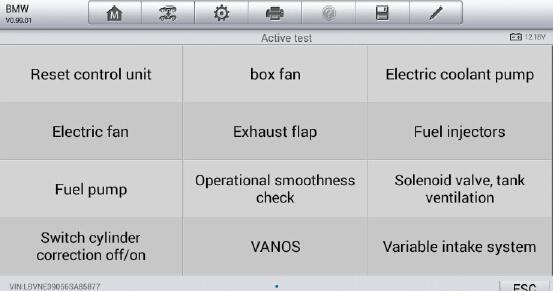
6.Many special functions
Another nice feature is its special functions, especially when it compares with maxidas ds708. These functions perform various component adaptations, allowing you to recalibrate or configure certain components after making repairs or replacement.
The main menu displays the supported special functions for the test vehicle. Follow the on-screen instructions to complete the desired function. When the operation is done, an execution status message such as Completed, Finished or Successful, displays. Tap the ESC button to exit the function.
The most commonly performed service functions include: Oil Reset Service, TPMS Programming Service, EPB Service, ABS/SRS Services, SAS Calibration Service, DPF Regeneration Service
By following the on-screen instructions to select appropriate execution options, enter correct values or data, and perform necessary actions, the system will guide my through the complete performance for various service operations.
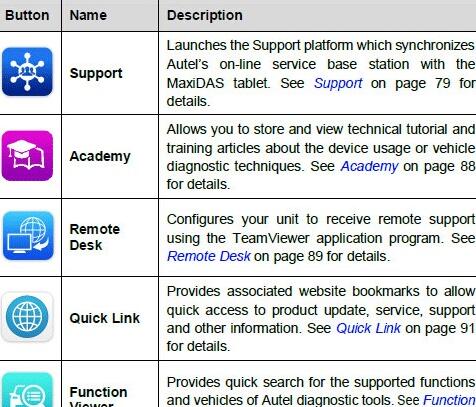
Using ds708 many years, so I quickly find there are several applications are newly developed, they are AutoVIN Technology, MaxiFix Cloud-based information system, Shop manager. Valueing the user experience is the Company soul, I think Autel Company do a good job. I try these new applications one-by-one, and prove what they claim in the following table.
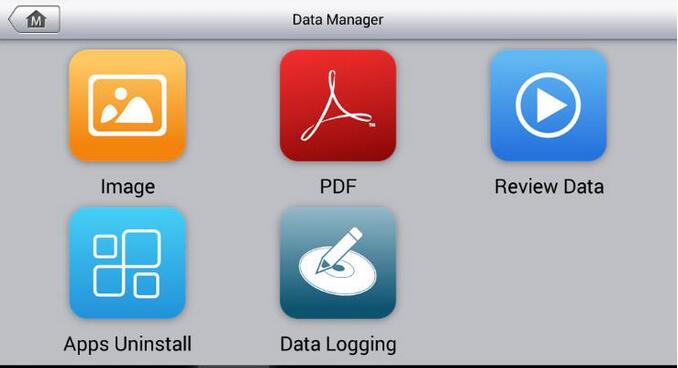
7.Data logging reports: submit via wifi and print
Autel Maxidas DS808 is allowed to submit Data Logging Reports in diagnostics.The reports are saved to the internal memory (which is a not insignificant 32 GB, depending on the hardware specification). As the tablet is equipped with WIFI, these can be emailed to the office or directly to the customer.
The Data Manager application is used to store, print, and review the saved files. Most operations are controlled through the toolbar.
The reports are able to be saved in PDF format
In the toolbar buttons, you could see the "Printâ€, click it and go. Printing the reports directly is a little more challenging. In my case, I had to install a separate PDF viewer, and to realize the wireless data printing function, I need to install the printer driver program by following the instruction. This made getting the reports off the device a little long winded. My opinion is that it would be more convenient if the print button could be configured to call other installed printer drivers.
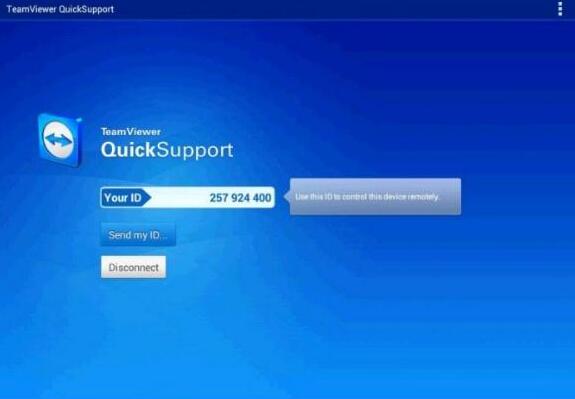
8.TeamViewer Quick Support program:
The "Remote Desk†app is remarkable, it launches the TeamViewer Quick Support program, it is a simple, fast and secure remote control screen. I could use it to receive ad-hoc remote support from Autel’s support center, colleagues, or friends, by allowing them to control my MaxiDAS tablet on their PC. Therefore I need not phone call any more. TeamViewer ID would be the phone number. Make sure the Display Tablet is connected to the Internet before launching the Remote Desk application.
Conclusion:
I think highly of Autel MaxiDAS DS808 Kit, I highly recommend it to the small repair shop. It is rugged, running fast, easy to use, light and add many special functions comparing ds708.
http://autelscantools.blogspot.com
Posted by: obd2tool at
03:49 AM
| No Comments
| Add Comment
Post contains 1042 words, total size 11 kb.
32 queries taking 0.0638 seconds, 151 records returned.
Powered by Minx 1.1.6c-pink.

