August 30, 2020
How to use Launch X431 proS mini to activate the PCM Aux input on 2018 Porsche 991.2 ?
Car model and year: 2018 Porsche 991.2
Purpose: activate the PCM Aux input
Porsche diagnostic scanner:
with Launch X431 V+ Pros Mini
was able to activate the Aux setting without any problems.
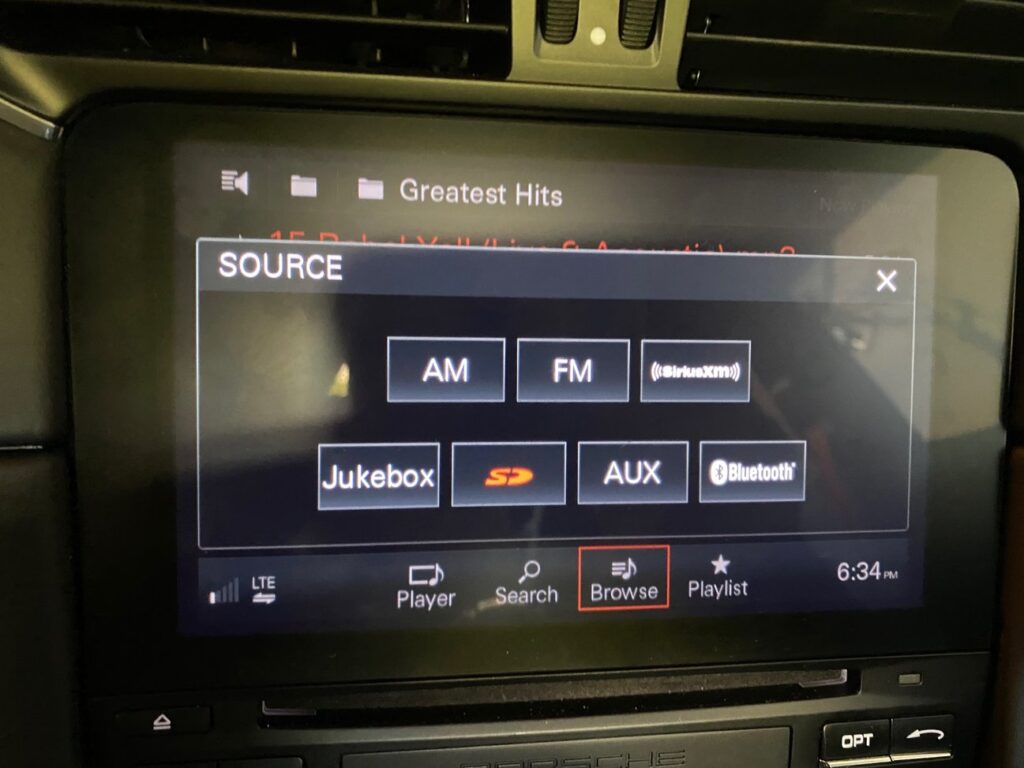
Look at the screenshots for X431 ProS Mini activating the Aux input on PCM 4.0
First go to the system PCM/CDR. Search for "Auxâ€. Select Aux_IN
Change Aux_IN to "Onâ€
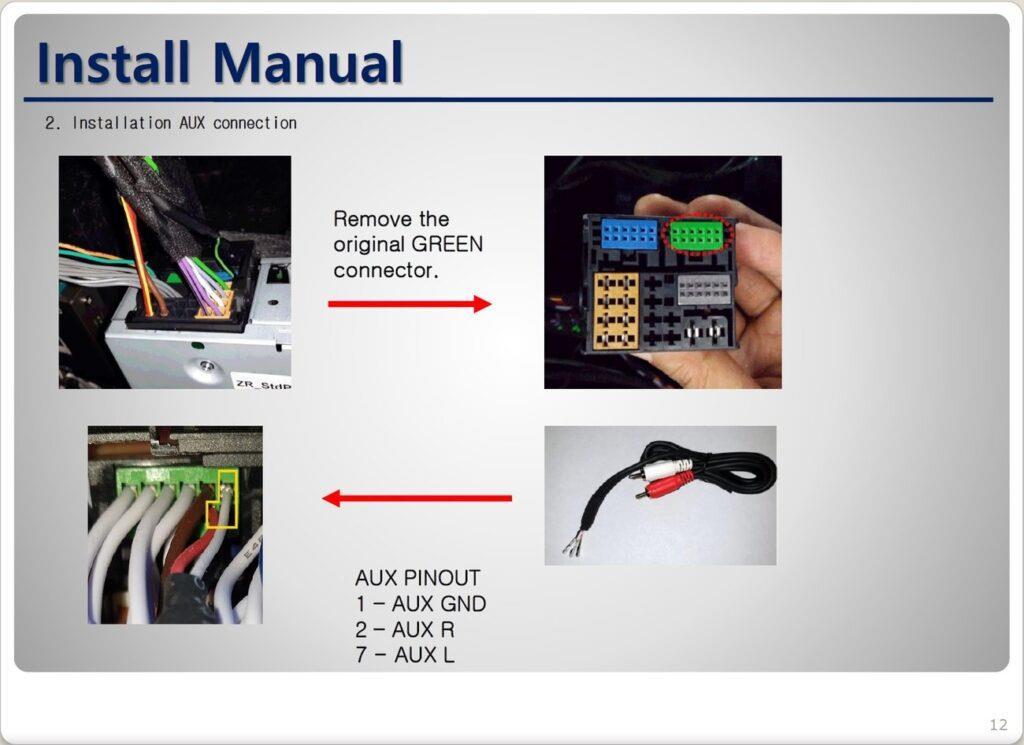
I also added a Aux cable to the green connector on the back of my PCM. It connects to Pins 1 (Ground), 2 (Right) and 7 (Left).
Enjoy!
Posted by: obd2tool at
03:08 AM
| No Comments
| Add Comment
Post contains 118 words, total size 2 kb.
I have Chevrolet Corvette, looking for a scan tool that doesn’t break the bank that will help to determine why I get no crank and some other seemingly related issues.
The year of engine / PCM:
The entire project is a transplant of a running and driving 2014 Camaro SS A8 into a 70 Chevelle Malibu. The only things I gave up were the ABS, seat belts, airbags, sunroof and HUD. All the original parts and harnesses, except the door latches and lights.
What I tried to do:
I got my cheap vxdiag gm scanner to give me some codes and I now may know what is happening. The shop foreman at a local dealership told me that the absence of the fuel pump from the wiring harness (and therefore the CAN bus) wouldn’t cause a no crank condition. However, the codes only talk about the CAN bus failing and the fuel pump response and so now I suspect that the absence of the pump is the cause of no crank cause, or at least it’s contributing to the issue.
The reason the fuel pump and tank are not installed is that I was waiting until I was ready to actually start the engine. The wiring harness for the fuel pump/tank was cut and an 8′ section was crimped, soldered and heat shrunk into the area under the back seat; that was where the harness went through the floor which was close to the Camaro tank.
Although I verified the splices, twice, my concern was that I didn’t want to test the new wiring with gas in the tank and I thought that sooner or later I would plug the pump in without the tank; I guess the time is now. We’ll see if the codes change – maybe tomorrow.
BTW, if you run your pump without gas in the tank or hanging from the rear end, be sure to only let it run for a few seconds. It actually uses the fuel as a lubricant.
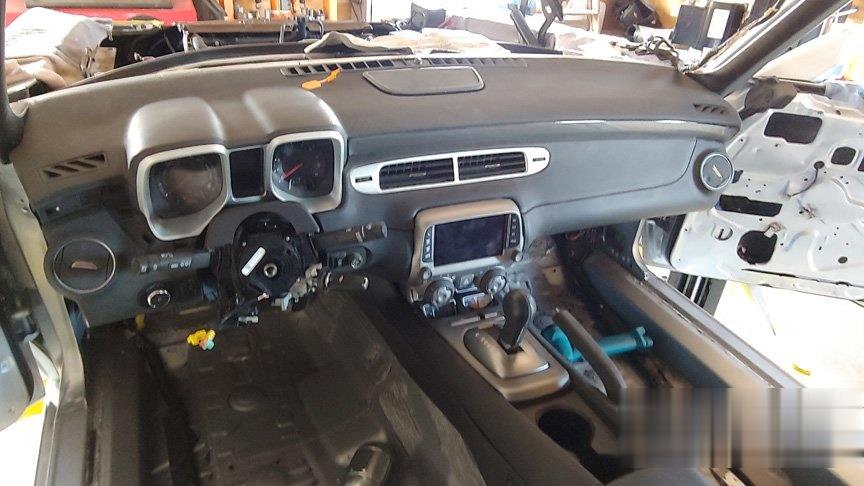
I would just like the ECM to talk to the OBD2 scanner and fire up the starter motor. The rest of it will come later. I plugged in an OBD2 scanner and all I could get was "ECM (or is it ECU) not respondingâ€. I assume that means the BCM is responding. But I don’t know for sure since the BCM is compartmentalized; some of the BCM stuff does work, like the exterior lights, radio and NAV. Since I know that some of the BCM stuff is not working I suspect that I may have a missing ground under the dash cover. Don’t look forward to taking that all apart. Couple of pics of the current state of the dash below.
Have checked every fuse Might be time to unplug all the cables and check for bent pins.
I’ve isolated the problem to the GMlan/CAN bus and found an open in the circuit; I can see both 120 ohm resistors but only from two different points in the circuit. From contacts 6 & 14 on the odb2 connector, you should read 2 120 ohm resistors in parallel or 60 ohm; I only see the one resistor at the end of the line, the one at Fuel Pump Control Module when connected to the ODB2 pins.
From pins 14 and 26 on the ECBM, I can see the one built into the ECM, but only from the Electronic Brake Control Module (EBCM). On ECBM pins 15 and 27 I see 20 ohms which is very confusing.
Continuity thru the FPCM and EBCM is solid. This is a requirement for testing; when the circuit is dry (battery disconnected) you need to be able to test the circuit.
The attached drawing with its notes is originally one I found on LS1tech or on Camaro5, and I’m not absolutely sure it’s for a late model gen5, but it is an update from the early gen5 drawing. My notes are from my testing.
I could not find two of the modules the drawing shows – Headlamp Leveling Control Module (believe this vehicle didn’t have it – see TR6/TR7) and the Automatic Transmission Assembly.
Thanks to @ Dano523 for his advice:
Tech IIclone, and if you have a laptop, then this will fit the bill.
VXDIAG VCX Nano Multiple GDS2 and TIS2 WEB Diagnostic/Programming System
Hence is a MDI clone that comes with Tech2win, and works just like the same tool that the dealers use. Better yet, since it is a MDI clone, will work not only on older GM cars, but the latest GM cars as well. Hence C6 and older vets uses Tech2win software. while the c7 and up cars us GDS2 instead (which is comes with both /will run both as well.
I have both vxdiag vcx nano gm wifi version and vxdiag vcx nano gm usb version, and the glitch with the Wifi version, is you have to have it connect to the car and car on for it to power up.
So every time you turn the car off, then back on, you have to go back and restart Tech2win to reconnect the nano to Tech II software.
Also, I like to have the Nano connected to Tech2win before connecting the the car, So when I use the Wifi unit, just use it USB cable style to solve the connect/reconnect problems.
To add, when using the nano with Tis2000 and even TDS, need the laptop to stay wifi connected to the internet, and not an easy way to pull off by connecting to wifi Nano and the Wifi internet at the same time on most machines.
Posted by: obd2tool at
02:36 AM
| No Comments
| Add Comment
Post contains 951 words, total size 7 kb.
August 11, 2020
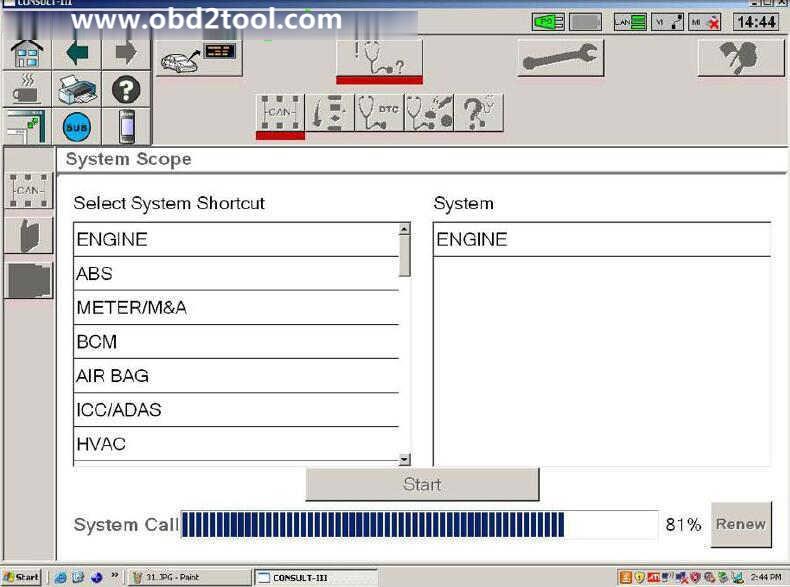
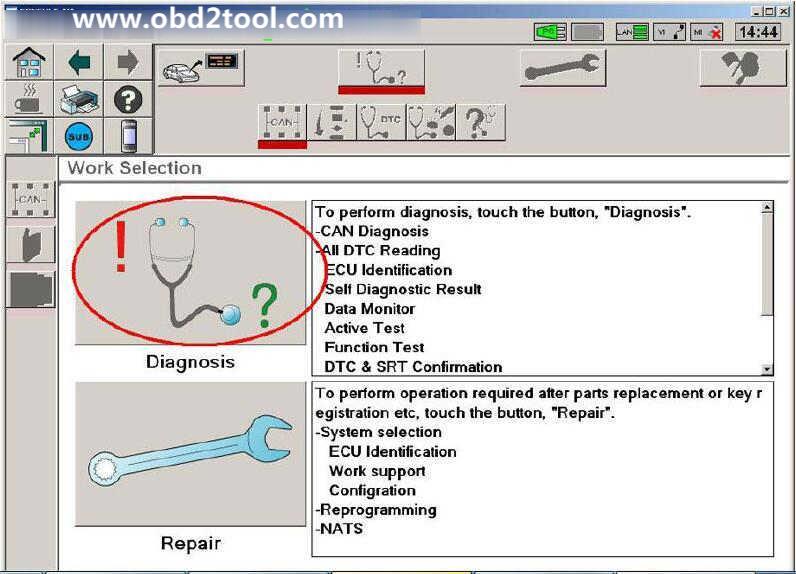
This article show a guide on how to use Nissan Consult 3 Plus to diagnose/read trouble codes for Infiniti FX35/FX45 2003.
Diagnosis Procedures:
1.Open "CONSULTIII†on the desktop.
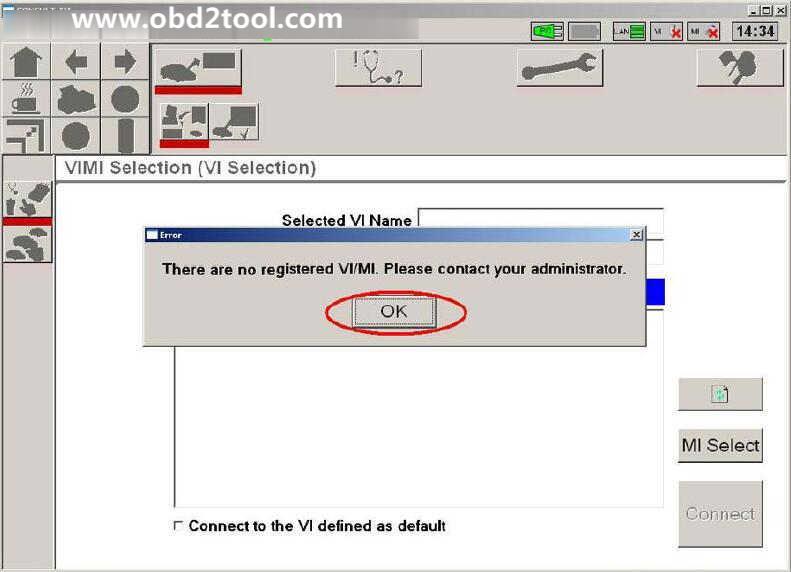
2.A window pops up reading "There is no registered VI/MI. Please contact your administrator.†Click "OKâ€.
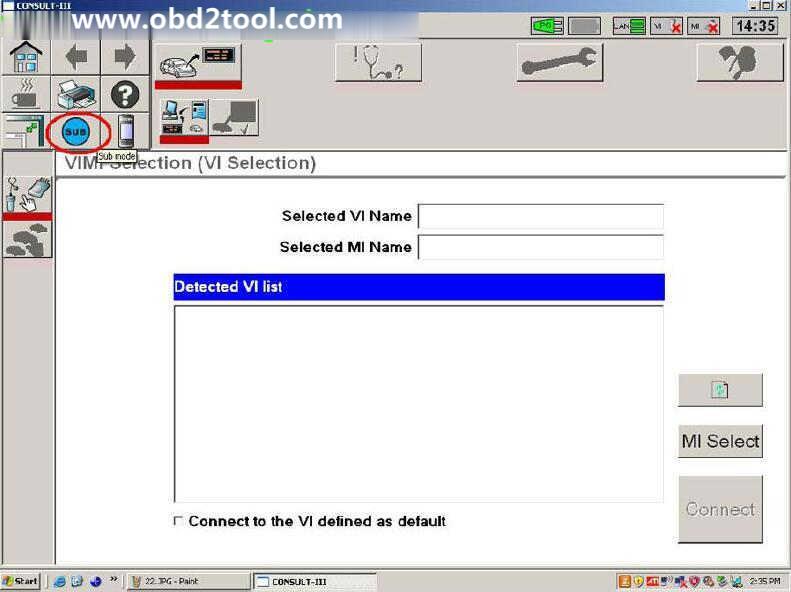
3.Click "Sub modeâ€
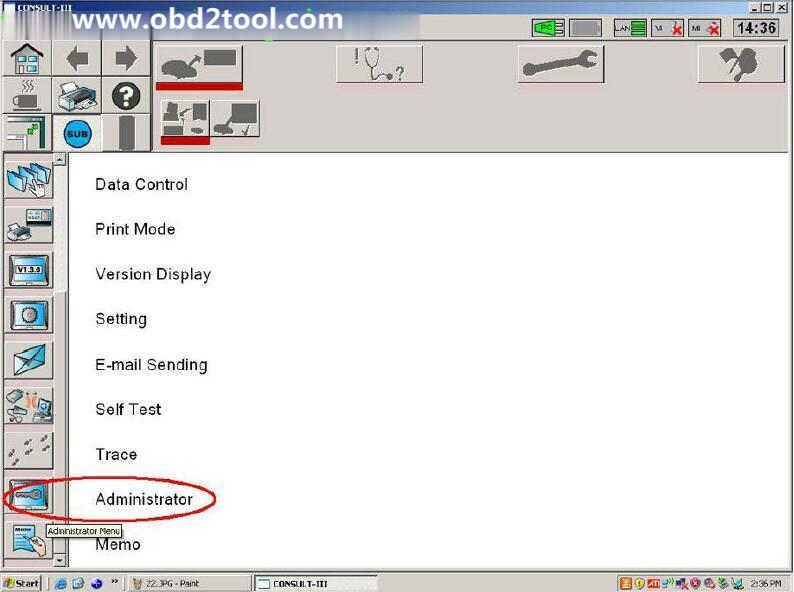
4.Click "Administrator Menu†on the left menu list.
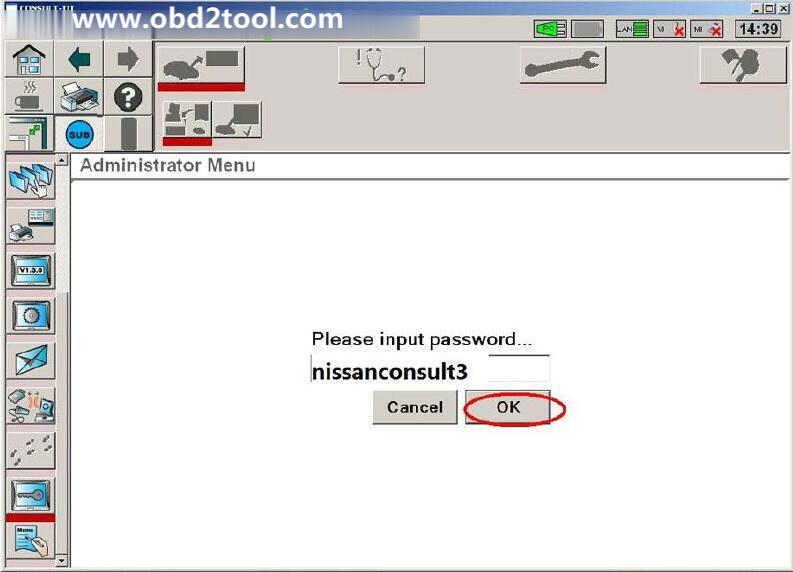
5.Please input password… "nissanconsult3â€, then click "OKâ€.
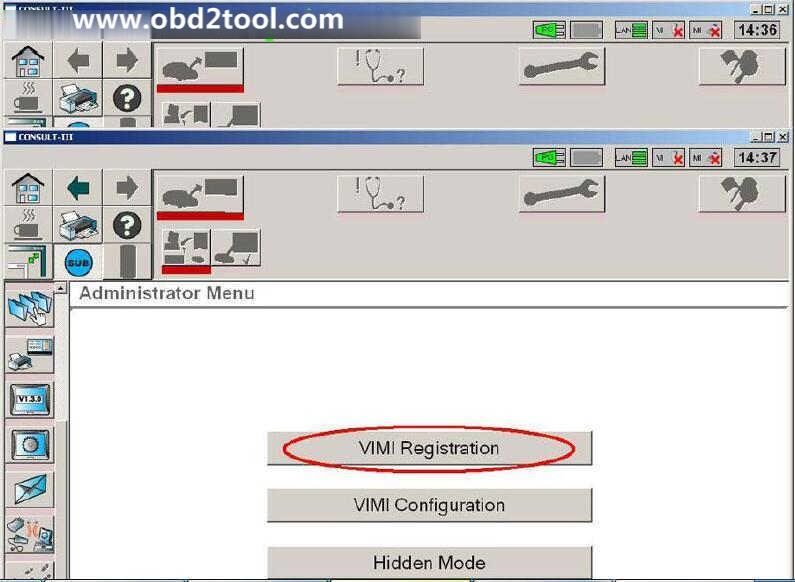
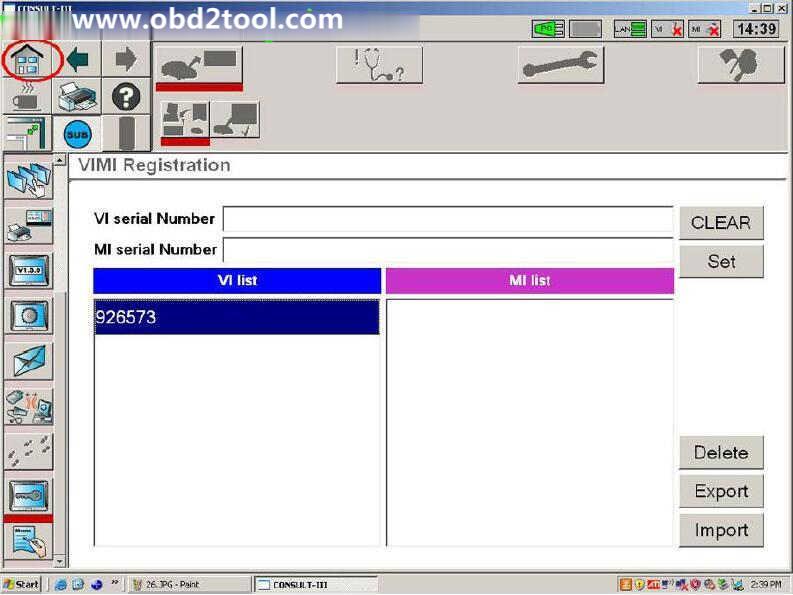
6.Click "VIMI Registrationâ€
7.Input "VI serial Number†and then click "Setâ€.
8.You can see the VI serial number under "VI listâ€
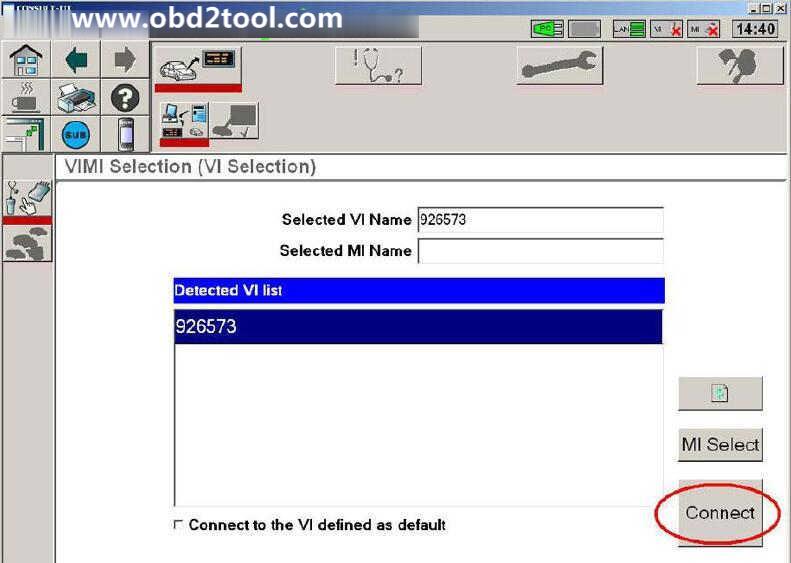
9.Detected VI list, click "Connectâ€.
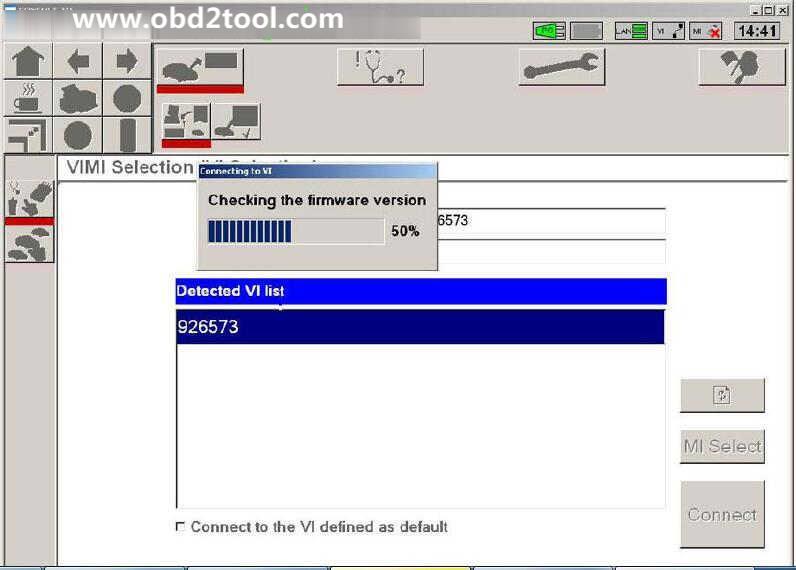
10.Checking the firmware version.
11.Select Vehicle Name and Model Year, then click "Selectâ€.
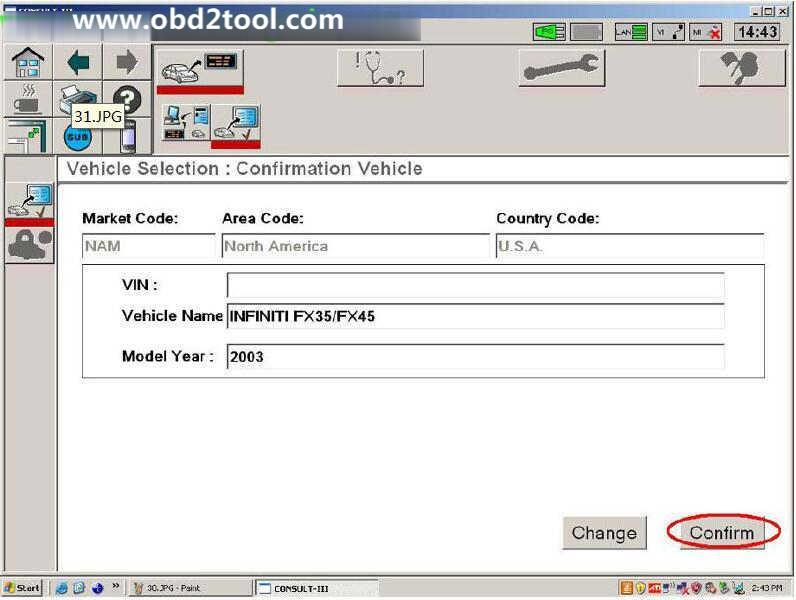
12.Click "Confirm†to confirm the information: Market Code, Area Code, Country Code, Vehicle Name and Model Year.
13.Select System.
14.Select Diagnosis
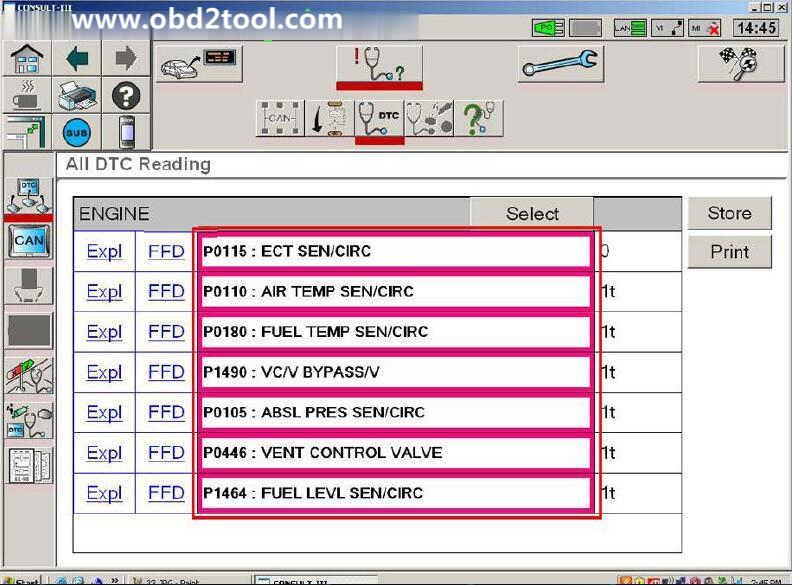
15.Read out trouble codes.
Now it show the diagnostic trouble code as below,and you need to check the problem according to the DTCs,after then clear them.
Posted by: obd2tool at
08:05 AM
| No Comments
| Add Comment
Post contains 159 words, total size 8 kb.
What Nissan Consult 3 Plus?
Nissan Consult 3 Plus is a diagnostic software special for Nissan,support all the models of the Nissan and Infiniti from 1996 up till now, with all Consult II & III functions.It can support all Nissan car,Infiniti carand Nissan GTR.
Nissan Consult 3 Plus Functions List:
Supports ECM reprogramming on most 1999 model year and later and some TCM and ABS/VDC reprogramming.
Supports blank ECM and TCM programming.
Supports ECM reprogramming on most 1999 model year and later and some TCM and ABS/VDC reprogramming.
Supports blank ECM and TCM programming. September 2013 Nissan and Infiniti began the phase-in of "blank†service part ECMs and TCMs. Depending on the model and model year, replacement modules come WITHOUT software. When the replacement module is installed in an applicable vehicle for any reason, it will need to be programmed.
Optional Security Card-Type A Kit must be approved security professional to purchase
Nissan Consult 3 Plus Specifics:
PC Based: PC Require
Model Year Coverage: The Consult-III Plus is required for all 2013 and newer Nissan and Infiniti vehicles. In addition, the Consult-III Plus is required for all: 2011 and newer Nissan LEAF, Quest, and Murano CrossCabriolet vehicles; 2012 and newer Nissan GT-R and NV vehicles; and 2012 and newer Infiniti M and M Hybrid vehicles. The Consult-III Plus software is continuously being updated to accommodate new vehicles as well as older model years dating back as far as 1996.
PC Recommended: Nissan Specific, Panasonic Toughbook
Software License:https://www.nissan-techinfo.com/
Nissan Consult 3 Plus Support Car Models:
Diagnostics:for all Nissan,Infiniti,GTR
Immo and Smart key:for all Nissan,Infiniti,GTR
Nissan GTR: for Nissan GTR Diagbostics and Immobi
Electromobiles car:for Nissan Electromobiles car Diagbostics and Immo
Nissan and Infiniti from 1996 up till now
Note:Consult III Plus – 1996MY up
Nissan Consult 3 Plus Support Languages:
English, Portuguese (Newly Add), French, German, Spanish, Italian, Japanese, Russian, Finnish, Greek, Chinese(Simplified), Chinese(Traditional)
Nissan Consult 3 Plus Installation OS Requirement:
Operating System Environment
* Windows: Windows? 2000, Windows XP, Windows Vista, Windows 7, 8 or 8.1
* Mac: Macintosh 8.x, 9.x, OS X
* Disk Storage: 10 MB available hard-drive space
* Display Resolution: 800 x 600 pixels (1024 x 768 recommended)
Nissan Consult 3 Plus Installation Guide:
The installation methods of different Consult 3 may be similar,if there here is no version that you have or you have higher version,please try to install it referring to these method by yourself.
How to Install Nissan Consult 3 III Plus Diagnostic Software
Nissan Consult 3 Plus Free Download:
Nissan consult 3+ plus V83.11.00:
https://mega.nz/#!D9ZRnaSL!Y6rksoTqF1rbpx2-tIvliYFN5RcQSb6s-WwKqBGByZI
Nissan Consult 3+ Plus V81.11.00
https://mega.nz/#!ukhgRSYJ!DXM22QAbQDo-b4Di9e6tyxy2SE4fKVogLmKCv6QzZUA
Nissan consult3 plus V75.20 free download:
https://mega.nz/#!WYYmiQ6J!QDCblZBomUBfEkTUEHd9ZCHWzV0cUKM-_3fT0nW7scg
Nissan Consult 3 Plus V72.13 free download
https://mega.nz/#!EVBC1I6a!mwvSkwf4SKqBN0oYDAhpvWJNFPHdWSKHKGaKgXknkSw
Nissan Consult 3 Plus V71.11.00 & 71.20.00 from 05.2017
https://yadi.sk/d/GsZoo_VD3KxqER
Posted by: obd2tool at
07:25 AM
| No Comments
| Add Comment
Post contains 463 words, total size 5 kb.
32 queries taking 0.0182 seconds, 149 records returned.
Powered by Minx 1.1.6c-pink.


