


October 15, 2020
Tutorial: How to add a new smart key with Autel IM608 and XP400 on BMW 320i 2013
What will you learn?
1.Equipment you will need to execute this procedure
2.Defining what FEM/BDC means and identifying their differences
3.Review the location and components inside the FEM/BDC module
4.Precautions before attempting to add a key with IM608
5.Step-by-step procedures on how to add a key with IM608
What you need?
Autel MaxiIM IM608 auto key programmer
XP400 key programmer
BMW FEM/BDC test platform
One original BMW smart key
One new/blank smart key

What you should know?
-This is an advanced level procedure.
-Only F chassis are supported
-Check first to see if any keys have been added before via OBD
-Need to remove FEM (front Electronic module) /BDC (Body Domain Controller) module from vehicle
-Before we attempt to add a key, we need to "Jailbreak†the FEM or BDC only one time. After that you can add additional key by OBD.
-We will be using the "Smart mode†function that is a sequence of step by step guided instructions
-Adding the key can be done via Bench or OBD
Before we take out the module, disconnect the negative battery terminal that’s all you need to do. Not the positive, the negative battery terminal.
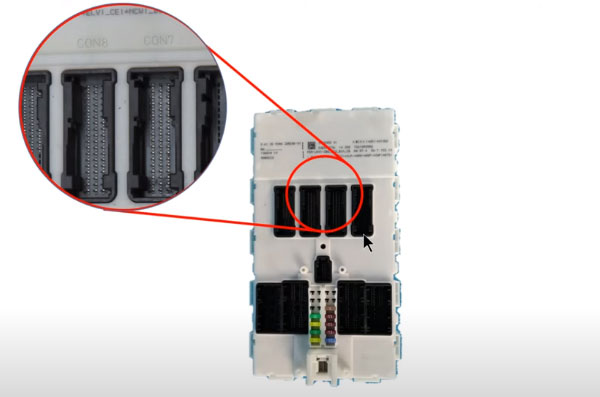
After that, you can see where the FDM is located on the right passenger side.
Pay attention to the location marked, that’s kind of embedded onto the cover, we’re going to need this later on we need to know it says connection seven connection eight, we’re gonna need to know this later to complete the connections with the test programmer.
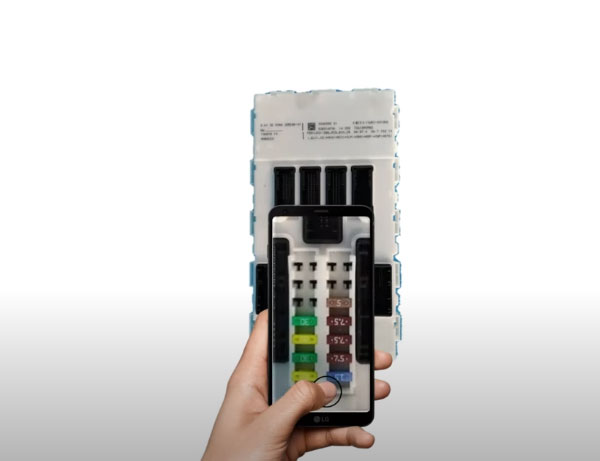
Take a picture of the fuses, because once we take off everything we have to put it all back together and we have this we know exactly where to put it back
If it’s a FEM system, the chip will be labeled M95128
If it’s a BDC system, it’s going to be M95256
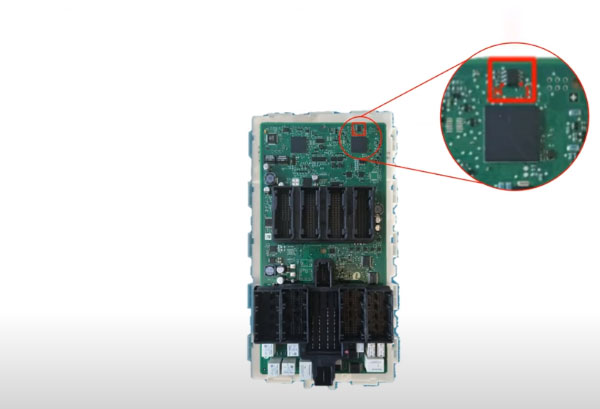
You can see the chip number using a varnish removal ointment with a fiberglass pin to clean it off, so you can get a good secure read.
Step-by-step guide to add a key with MaxiIM IM608:
Step 1: Connect all the devices according to the following wiring diagram
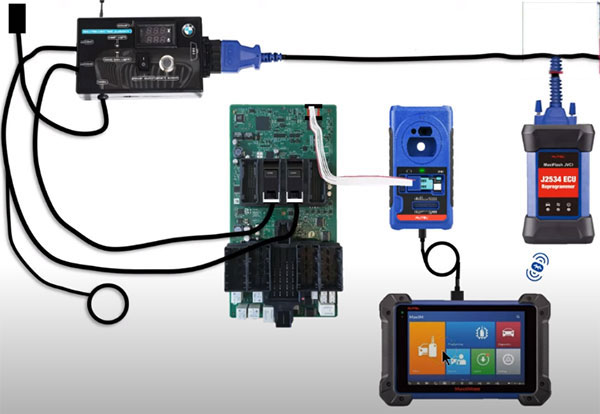
Note: Don’t connect Autel XP400 to the vehicle directly, otherwise it will cause the device to burn out. If damaged, you need to send it back to fix and pay for the fix cost.
Step 2: Enter IMMO function
Accept the disclaimer
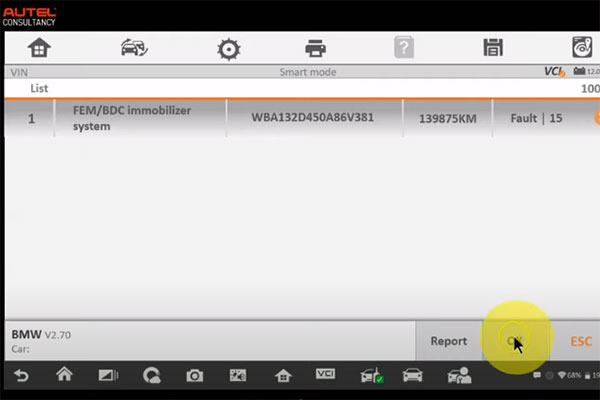
Select [BMW]-> [Smart mode]
It will automatically scan the immobilizer system, engine system, transmission system.
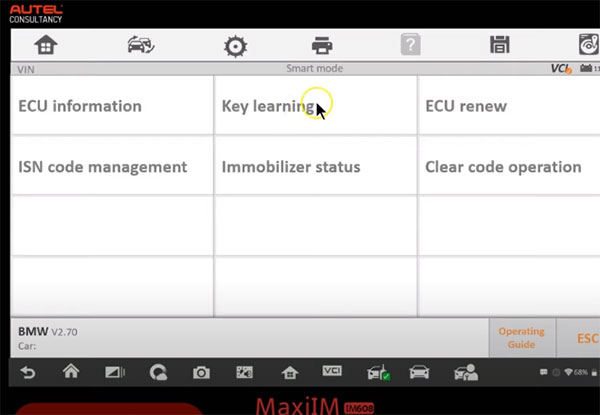
Step 3: Select [Key learning]
Note: This process requires networking to obtain data, please setup the network to ensure that it is connected to WiFi and keep this state during the whole process.
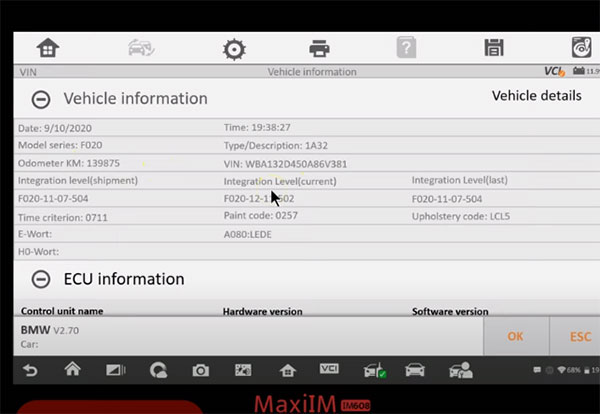
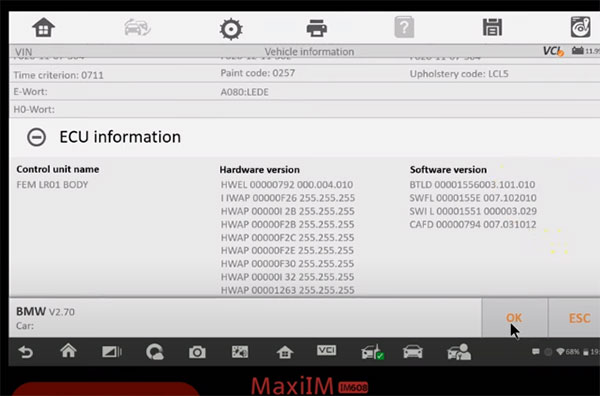
Detect vehicle and ECU info successfully
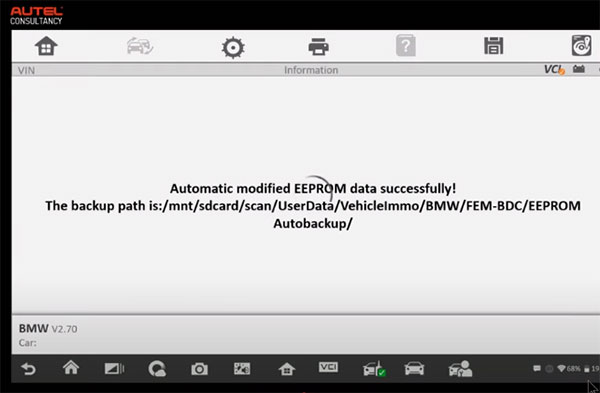
Step 4: It will backup coding files automatically.
Step 5: Then going to modify EEPROM data automatically! Please pay attention the following prompts.
-Please disassemble the EEPROM chip and connect the programmer
-The FEM module is chip M95128 and the BDC module is M96256.
-If you operate the EEPROM with clamp, you should turn off the +12V power first.
Press "Diagram†to check EEPROM diagram or press "OK†to continue

Step 6: It will backup EEPROM data and write the modified EEPROM data automatically
Write EEPROM data successfully
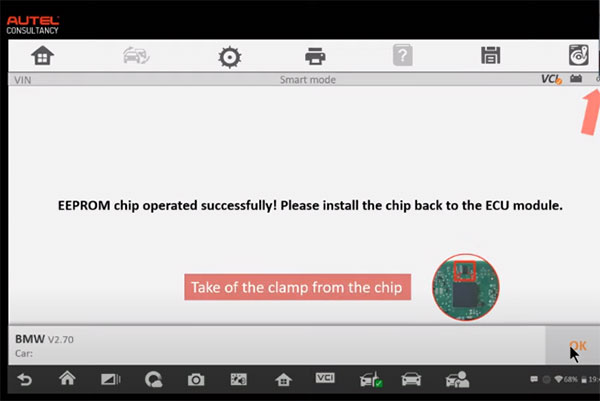
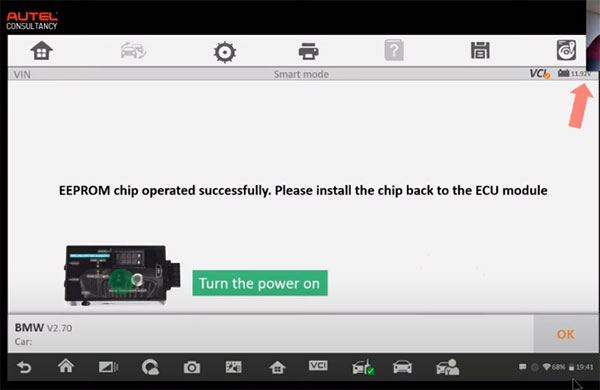
Step 7: EEPRM chip operated successfully, then you can install the chip back to the ECU module
-Take off the clamp from the chip
-Turn the power on
Step 8: Start to program the key, please make sure the supply voltage exceeds 13V and is stable.
-Make sure the vehicle power is OK.
-Make sure the OBD diagnostic cable is correctly connected.
-Make sure the power icon on the top right corner of the diagnostic tool correctly displays the voltage.
Downloading file…
Step 9: Then restore EEPROM data automatically
-Put the clamp on the chip
Restore the EEPROM successfully
-Install the chip back to the ECU module
-Turn the power on
Step 10: Restore coding file
Step 11: Learn key
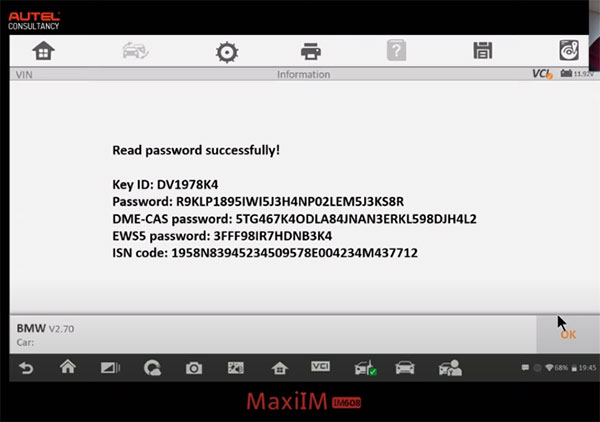
-Before the key can be written and cleared, the password must be read out and the corresponding key position must be selected firstly
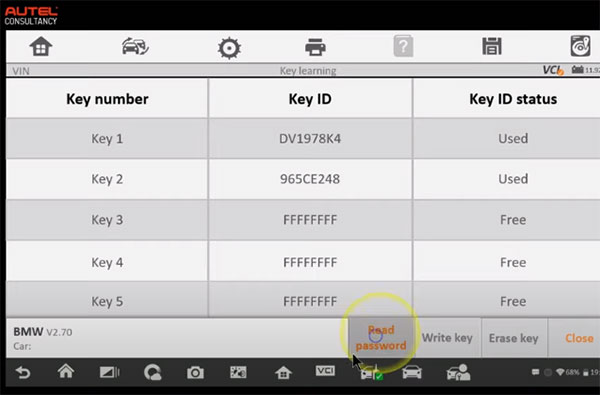
Put the working key to start coil as close as possible
Read password successfully
Step 12: Back to key learning to select [Write key]
-Put the new key close to start coil. Key frequency 315Mhz
There are four steps to learn key:
-Authenticate key info
-Write data into key
-Reset ECU
-Verify key info
Write the key successfully
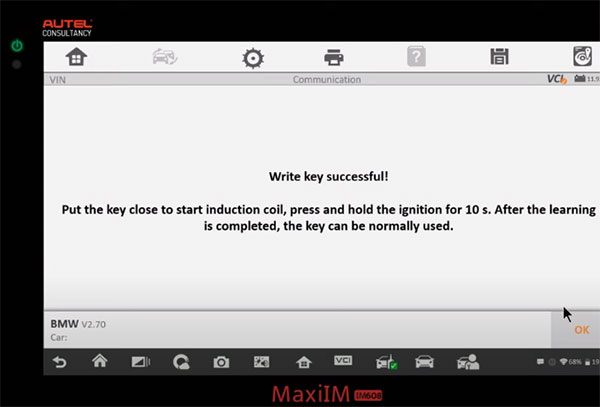
Finally, put the new key close to start induction coil, press and hold the ignition for 10s.
After the learning is completed, the key can be normally used.
Fyi…
Autel IM608 Pro is the upgrade version of Autel IM608. It comes with the same Touchscreen Android tablet and works with XP400 Pro and supports more functions and car models.
Posted by: obd2tool at
08:15 AM
| No Comments
| Add Comment
Post contains 819 words, total size 11 kb.
Here offer the newest Autel IM508/IM608 VAG IMMO function list.
Something important to know!
1.For VW IMMO IV:
Go to Volkswagen–>Advanced Mode–>IMMO 4 Instrument CAN pay per use, 10 dollars for key adding and all key lost by OBD.
As long as it is VAG IMMO IV, no matter what year and model of the vehicle are. (Note: except for illegal vehicle data)
2.IMMO IV+MQB key support key adding and all key lost. (support the latest PASSAT, Jetta, support latest Passat, Beetle after year 2017, Multivan, Tiguan, Sharan key adding and all key lost by OBD)(Note: Except for illegal vehicle data)
3."MQB Instrument for VW and Audi†support all Continental VDO, Johnson JCI instrument, full liquid crystal MQB instrument;MQB instrument all key lost (latest model with 49 or 5C key chip type is not supported.) Skoda supports all Continental VDO and full liquid crystal MQB instrument,Doesn’t support Johnson control instrument(JCI). Adding key for free, all key lost is not supported.
4."Fail to enter the service mode or fail to read IMMO data†normally this problem can be solved by going to "advanced modeâ€. If it can’t be solved, please contact the technical support.
| VAG Function lists (IMMO III, IMMO IV,IMMO IV+MQB key, IMMO V) | |||||
| Models | Instrument type | add key | all key lost | replace component | Remark |
| Lavida | VDO CDC32xx+24C32before 2013 IMMO III and half | read engine by OBD | Need engine to support this function, manually input cs code. | supported | Instrument type:VDO CDC32xx+24C32. If cannot read instrument, select expert mode—>CAN instrument—>auto detection—> read engine IMMO data—>search for 7th byte |
| 2013-2014IMMO IV | read instrument by OBD | dump mode with instrument/modify the vehicle IMMO data by OBD | engine/instrument | 1.After 2015 VDO NEC+24C64 2014 instrument can be done with smart mode, expert mode and manual selection.2.Go to "advanced modeâ€â€“>â€IMMO 4 Instrument CAN†to perform key adding and all key lost by OBD. | |
| Lavida/Gran Lavida/Lang | year after 2015;IMMO 4 Instrument CAN | read instrument by OBD | (advanced mode pay-per-use)read instrument by OBD | engine/instrument | 1.After 2015 VDO NEC+24C64 2014 instrument can be done with smart mode, expert mode and manual selection. |
| Jetta | 1999~2006IMMO III | unsupported(remove immobilizer box) | unsupported(remove immobilizer box) | unsupported | |
| 2006~2010IMMO III | read instrument by OBD/engine | Same as key adding | engine/instrument | ||
| 2010~2013IMMO III and half | supported(need to get PIN code from dealer) | supported(need to get PIN code from dealer) | supported | Jumper wire connects engine to get IMMMO data.(direct method) | |
| 2013~2014 IMMO IV Instrument | read instrument by OBD | OBD modify the vehicle IMMO data by OBD | engine/instrument | ||
| year after 2013 IMMO IV Instrument CAN | read instrument by OBD | Go to "advanced modeâ€â€“>â€IMMO 4 Instrument CAN†to perform key adding and all key lost by OBD. | unsupported | ||
| SAGITAR | Before 2010 IMMO III and half | read instrument by OBD | read instrument by OBD | supported | Instrument type:VDO CDC32xx+24C32 if can not read instrument,select expert mode—>CAN instrument—>auto detection—> read engine IMMO data—>search for 7th byte |
| 2011~2014 IMMO IV | read instrument by OBD | dump mode with instrument/modify the vehicle IMMO data by OBD | engine/instrument | ||
| After 2015 IMMO 4 Instrument CAN | read instrument by OBD | Go to "advanced modeâ€â€“>â€IMMO 4 Instrument CAN†to perform all key lost by OBD. | unsupported | ||
| Santana 2000/3000 | Before 2009 IMMO III | 1.read immobilizerby OBD2.read engine by OBD(need engine to support this function) | Same as key adding | engine/instrument | |
| Santana | After 2009 IMMO III and half | 1.read immobilizer/engine(need immobilizer &engine to support this function)2.remove immobilizer (dump mode) | same as key adding | supported | |
| 2013~2014 IMMO IV | read instrument by OBD | Go to "advanced modeâ€â€“>â€IMMO 4 Instrument CAN†to perform key adding and all key lost by OBD or dump mode. | engine/instrument | ||
| After 2015 IMMO IV | read instrument by OBD | Go to "advanced modeâ€â€“>â€IMMO 4 Instrument CAN†to perform key adding and all key lost by OBD. | engine/instrument | ||
| Golf 4 | Before 2009 IMMO III | read instrument by OBD/engine | Same as key adding | engine/instrument | |
| Golf 6 | 2009~2013 IMMO IV | read instrument by OBD | Same as key adding | engine/instrument | 1.After 2015 VDO NEC+24C64 2014 instrument can be done with smart mode, expert mode and manual selection.2.Go to "advanced modeâ€â€“>â€IMMO 4 Instrument CAN†to perform key adding and all key lost by OBD. |
| POLO | Before 2011 IMMO III | 1.read immobilizerby OBD2.read engine by OBD | Same as key adding | supported | |
| 2011~2014 IMMO IV | read instrument by OBD | Go to "advanced modeâ€â€“>â€IMMO 4 Instrument CAN†to perform key adding and all key lost by OBD/dumpe mode with instrument | engine/instrument | ||
| After 2015 IMMO IV | read instrument by OBD | go to "advanced modeâ€â€“>â€IMMO 4 Instrument CAN†to perform key adding and all key lost by OBD. | unsupported | ||
| Passat | Before 2012 IMMO III | 1.read immobilizer by OBD2.read engine by OBD | Same as key adding | supported | |
| 2012~2015 IMMO IV | read instrument by OBD | dump mode with instrument/modify the vehicle IMMO data by OBD | engine/instrument | ||
| Bora | before 2008 IMMO III | 1.read immobilizerby OBD2.read engine by OBD | Same as key adding | supported | |
| 2009~2014 IMMO IV | read instrument by OBD | dump mode with instrument/Go to "advanced modeâ€â€“>â€IMMO 4 Instrument CAN†to perform key adding and all key lost by OBD. | engine/instrument | ||
| After 2015 IMMO IV | read instrument by OBD | Go to "advanced modeâ€â€“>â€IMMO 4 Instrument CAN†to perform key adding and all key lost by OBD. | engine/instrument | . | |
| Passat B6/CC | 2006~2016 Comfort module | 1.read engine by OBD2.connect to the gateway | dump mode with comfort module https://www.youtube.com/watch?v=Kamu0RN-qGE | engine/comfort module | For 46 key chip, only 6bytes are needed, the 7th byte can be replaced by FF.For 48 key chip, the 7 bytes are needed. |
| Tiguan | 2010~2013 IMMO IV | read instrument by OBD | dump mode with instrument/modify the vehicle IMMO data by OBD | engine/instrument | 1.After 2015 VDO NEC+24C64 2014 instrument can be done with smart mode, expert mode and manual selection.2.Go to "advanced modeâ€â€“>â€IMMO 4 Instrument CAN†to perform key adding and all key lost by OBD. |
| After 2013 IMMO IV | read instrument by OBD | (advanced mode pay-per-use)read instrument by OBD | before 2014 support engine/instrument | 1.After 2015 VDO NEC+24C64 2014 instrument can be done with smart mode, expert mode and manual selection.2.Go to "advanced modeâ€â€“>â€IMMO 4 Instrument CAN†to perform key adding and all key lost by OBD. | |
| Touran | VDO CDC32xx+24C32 Before 2011 IMMO III and half | 1.read instrument by OBD2.read engine by OBD(need engine to support this function)+search for 7th byte | 1.read instrument by OBD2.modify the vehicle IMMO data by OBD(need engine to support this function)
3.dump mode with instrument |
supported | |
| 2012~2015 IMMO IV | read instrument by OBD | dump mode with instrument/modify the vehicle IMMO data by OBD | engine/instrument | 1.After 2015 VDO NEC+24C64 2014 instrument can be done with smart mode, expert mode and manual selection.2.Go to "advanced modeâ€â€“>â€IMMO 4 Instrument CAN†to perform key adding and all key lost by OBD. | |
| Touareg | 2003~2010 KESSY | 1.read engine by OBD(need engine to support this function)+search for 7th byte2.dump mode with KESSY | dump mode with KESSY | engine/KESSY(some are unsupported) | |
| 2011~2017 IMMO V | Read BCM2 by OBD | currently unsupported | currently unsupported | ||
| Phaeton | Before 2012 KESSY | 1.read engine by OBD(need engine to support this function)+search for 7th byte2.dump mode with KESSY(some are unsupported) | remove the chip of KESSY(some are unsupported) | engine/KESSY(some are unsupported) | |
| Sharan | 2001~2010 IMMO III | 1.read instrument by OBD2.read engine by OBD(need engine to support this function) | same as key adding | supported | |
| 2011~2015 IMMO IV | read instrument by OBD | dump mode with instrument/modify the vehicle IMMO data by OBD(need engine to support this function) | engine/instrument | 1.After 2015 VDO NEC+24C64 2014 instrument can be done with smart mode, expert mode and manual selection.2.Go to "advanced modeâ€â€“>â€IMMO 4 Instrument CAN†to perform key adding and all key lost by OBD. | |
| Caddy | 2005~2009 IMMO III and half | 1.read instrument by OBD2.read engine by OBD(need engine to support this function)+search for 7th byte | 1.same as key adding2.dump mode with instrument
3.modify the vehicle IMMO data by OBD(need engine to support this function) |
supported | |
| Beetle | 2003~2011 IMMO III | read engine by OBD(some need to do with dump mode(Currently no supported)) | same as key adding | supported | |
| 2012~2015 IMMO IV | read instrument by OBD | Go to "advanced modeâ€â€“>â€IMMO 4 Instrument CAN†to perform key adding and all key lost by OBD. | engine/instrument | 1.After 2015 VDO NEC+24C64 2014 instrument can be done with smart mode, expert mode and manual selection.2.Go to "advanced modeâ€â€“>â€IMMO 4 Instrument CAN†to perform key adding and all key lost by OBD. | |
| Atlas | After 2016 IMMO V | Read BCM2 by OBD | After 2015, all key lost is unsupported | currently unsupported | |
| Multivan | 2014~2016 IMMO IV | read instrument by OBD | dump mode with instrument/modify the vehicle IMMO data by OBD | some are supported | 1.After 2015 VDO NEC+24C64 2014 instrument can be done with smart mode, expert mode and manual selection.2.Go to "advanced modeâ€â€“>â€IMMO 4 Instrument CAN†to perform key adding and all key lost by OBD. |
| after 2017 IMMO IV+MQB key | read instrument by OBD | Same as key adding | unsupported | Go to "advanced modeâ€â€“>â€IMMO 4+MQB Key†to perform key adding and all key lost by OBD. | |
| Sharan | after 2017 IMMO IV+MQB key | read instrument by OBD | Same as key adding | unsupported | Go to "advanced modeâ€â€“>â€IMMO 4+MQB Key†to perform key adding and all key lost by OBD. |
| Tiguan | after 2016 IMMO IV IMMO IV+MQB key | read instrument by OBD | Same as key adding | unsupported | Go to "advanced modeâ€â€“>â€IMMO 4 Instrument CAN†or "IMMO 4+ MQB Keyâ€to perform key adding and all key lost by OBD. |
| Passat | after 2016 IMMO IV IMMO IV+MQB key | read instrument by OBD | Same as key adding | unsupported | 1.After 2015 VDO NEC+24C64 2014 instrument, can be done with smart mode, expert mode and manual selection.2.Go to "advanced modeâ€â€“>â€IMMO 4 Instrument CAN†or "IMMO 4+ MQB Keyâ€to perform key adding and all key lost by OBD. |
| Beetle | After 2015 IMMO IV IMMO IV+MQB key | read instrument by OBD | Same as key adding | unsupported | 1.After 2015 VDO NEC+24C64 2014 instrument can be done with smart mode, expert mode and manual selection.2.go to advanced mode–>â€IMMO 4 Instrument CAN†or "IMMO 4+MQB key†to perform key adding and all key lost by OBD. |
Posted by: obd2tool at
07:53 AM
| No Comments
| Add Comment
Post contains 1644 words, total size 20 kb.
October 07, 2020
Electronic Data Link(EDL) is the dealer diagnostic PC-to-vehicle interface compatible with Service ADVISOR software. With Service ADVISOR you can view service manuals, use DTAC (Technical Assistance Center) data, make diagnostics, readings, tests and calibrations, re-program controllers
Topic 1: John deere SA possible with NEXIQ USB Link?
It is possible to install John Deere Service Advisor on your laptop, though the installation is really complicated. If you have a Lenovo Thinkpad laptop, the easiest way is to restore the main partition from the image of my computers’ c: drive. And every time i change my laptop, i just restore it.
Win7 installed and fully updated. It takes hours.
The image will not work on xp, but SA works fine. My suggestion, buy used Lenovo T400 or T500. it’s more or less 250eur in europe. Install windows 7 and then can put my image. Takes 10 minutes and u have SA working.
Topic 2: How to get Nexiq usb link china worked?
I spent a month doing research on this and i managed my Chinese XTruck
USB Link to work 90%. The thing is that Nexiq has only 2 channels while
EDL has 3. The 3rd one is Powertrain and it is used very seldom. E.g. I
reprogrammed all the controllers on 6690 premium except two, but found a
way around it opening the pld file with pldeditor and changing
Powertrain channel to Vehicle (channel 1). Lots of machines don’t even
have a 3rd Powetrain channel. Like all 5R; 6115R, 6125R, 7280R….. From
my experience only the older machines have it and still can be
programmed most of the time. Programming controllers is easy, but
diagnostics is a bit annoying. Every time you establish the connection u
have to remove the usb plug and plug it again for the readings to
appear. Connection establishment is taking a long long time and you
never see the ECU. Only all the other controllers. So all the time
something doesn’t work. If you are prepared for this here is what you
have to do:

I switched places channel 1 with channel 2 (see the pic) with my Chinese version and now it works fine, probably it was possible to do it adjusting the software settings as mentioned above, but i tried a lot, and nothing helped. Now i can connect, tried with 6125R and 5070M. Works fine!!! Except one very important thingy. After i establish the connection, all the reading give the same meaningless number. Then, I discovered accidentally, I pull out the USB cable, get the message "Connection interrupted†I put it back in, get the message "Connection resumed†and wuolla, all the readings show up immediately.
b) You don’t have to change the firmware. Both will work pretty much the same but with different issues.
P.S. For diagnostics only, there is a subprogram of SA that works
without any cable rewiring, it doesn’t have a Program Controller option,
and you still need to reinsert the usb after connection has been
established. You just need to select the right port (which is usually
1939ImplementAutoboud or 1939AppAutoboud depending on the machine) and
model. If you have SA, you will find the software at c:\Program
Files\Service ADVISOR\xvds\XJDET.exe
Just to let you know, after a year working like that, i bought anotherHeavy Duty Truck Scanner Tool EDL (recommended by a folk in the forum, much much much more than the old one)
Posted by: obd2tool at
04:11 AM
| No Comments
| Add Comment
Post contains 577 words, total size 4 kb.
The EDL3 Explorer utility opened automatically when you installed the John Deere Service Advisor EDL V3 drivers and utilities To re-open the EDL3 Explorer once it has been closed, click on the Show Hidden
Icons arrow in your PC’s System Tray.
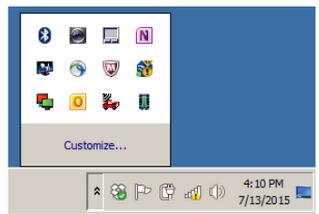
Then, double-click on the EDL3 icon 7 .
NOTE:You can also access theHeavy Duty Truck Scanner EDL3 Explorer from your PC’s Start menu. Click Start and then select All ProgramsDeere EDL3 EDL3 Explorer.
The EDL3 Explorer opens.
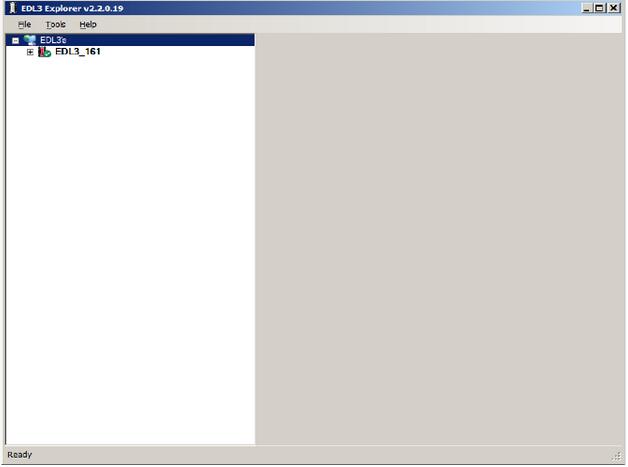
The following menu options are provided:
• File
• Tools
• Help
Each menu option includes a number of features. Each of the menu options
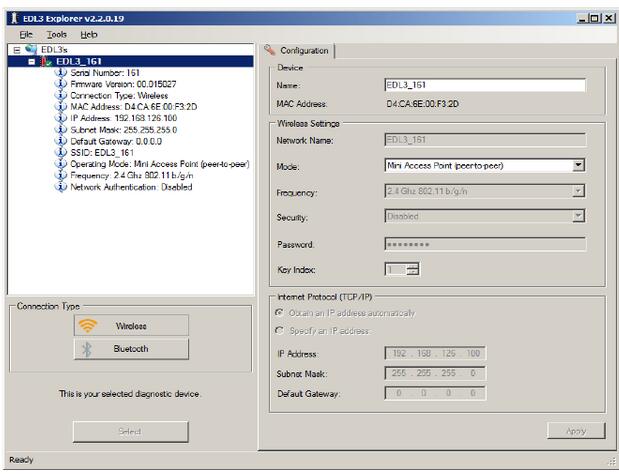
are discussed in the following sub-sections. When you click on a EDL3
in the list in the left pane, the Configuration tab is
The Configuration Tab
The Configuration tab provides the following information:
• Device:
—Name
— MAC Address
• Wireless Settings
• Internet Protocol (TCP/IP) Settings
This information can be useful when troubleshooting network connection
problems. You also use the Configuration tab when switching between the
two wireless Connection Types (i.e., Wireless and Bluetooth), or when
setting up a Wi-Fi connection in Infrastructure Mode.
To access the Configuration tab:
(1)Click on an EDL3_xxxxxx in the list in the left pane of the Explorer.
Switching Modes: Mini Access Point and Infrastructure
From the EDL3 Explorer Configuration tab, you can use the Mode drop-down
menu under Wireless Settings to switch between Mini Access Point and
Infrastructure modes.
NOTE:For a graphic depiction of a typical Infrastructure Mode setup, see

Settings: Mode Drop-down Menu
NOTE:You can also use the Reset Button to switch from Infrastructure
Mode back to Mini Access Point Mode (the Wi-Fi default). Just push and
hold the button until the wireless LED changes color from orange to
white (about 3 seconds).Once, you have selected Infrastructure from the
drop-down menu, additional fields in the Wireless Settings portion of
the screen are available.
The following Wireless Settings fields are available:
• Network Name
• Frequency (used to switch between 2.4 and 5 GHz)
• Security (WEP, WPA/WPA2)
• Password
• Key Index (only available with the WEP security selection)
NOTE:The settings for connecting to your company network may differ from
one installation to another. To ensure network security, your
Information Technology (IT) administrator will need to oversee the
installation and specify the appropriate configuration parameters.
The Internet Protocol (TCP/IP) portion of the screen is also available
to you to enter the required settings. There are two options:
• Obtain an IP address automatically (i.e., a dynamic IP address)
• Specify an IP address (i.e., a static IP address that does not change)
— IP Address
— Subnet Mask
— Default Gateway
NOTE:You will need to obtain this information (i.e., IP Address, Subnet
Mask) from the designated IT person or network administrator for your
location. Depending on how your local network is configured, you may
also need to enter Default Gateway information.
The File Menu
The File menu has one feature, Exit. You use the Exit feature to close the EDL3 Explorer.
To exit the EDL3 Explorer:
(1)Select File from the EDL3 Explorer menu bar.

(2)Select Exit.
The EDL3 Explorer closes.
The Tools Menu
The Tools menu provides the following features:
•Ping
•Options
Ping
The Ping feature uses the PING protocol to check for the presence of a device on the network.
To check for a device:
(1)Select Tools from the EDL3 Explorer menu bar.
(2)Select Ping.

(3)Enter the IP address of the device you want to locate (e.g., 192.168.123.107).
(4)Click Start.
The EDL3 Explorer searches for the device and, if found, displays the reply.
(5)Click Stop.
(6)Click the Close button on the dialog box.
Options
The Options feature provides the following features, which are presented as check boxes:
• Start EDL3 Explorer when Windows starts (pg. 50)
• Show New EDL3 Notification (pg. 51)
Start EDL3 Explorer when Windows Starts
You use this feature to manage when the EDL3 Explorer opens.
The default is to not open the EDL3 Explorer when Windows starts.
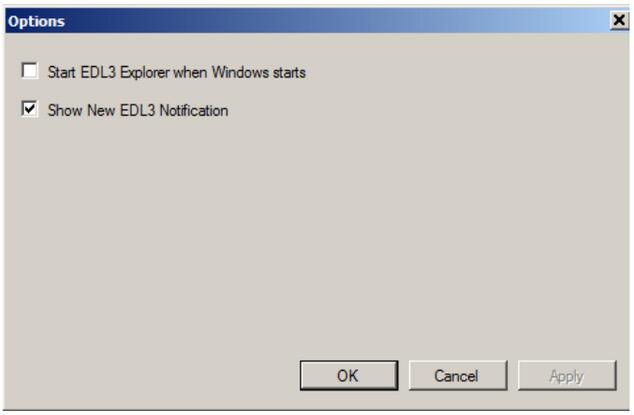
To change the default, click on the check box to add the check mark. Then click OK.
Show New EDL3 Notification
You use this feature to manage when to display the New INLINE7 notification message box.
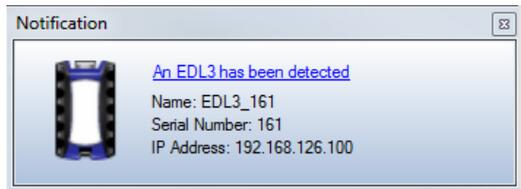
The default is to display the notification message box whenever a new EDL3 is detected.
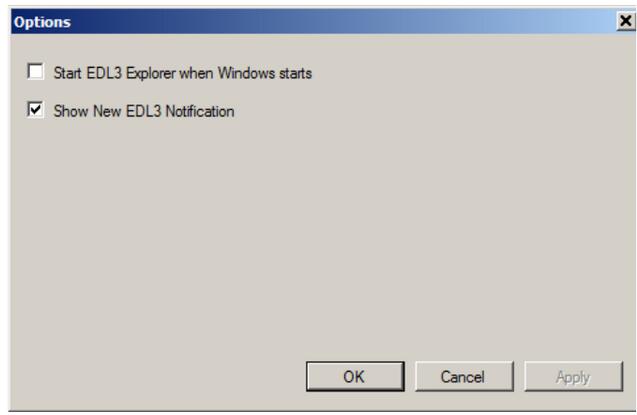
To change the default, click the box to remove the check mark. Then click OK.
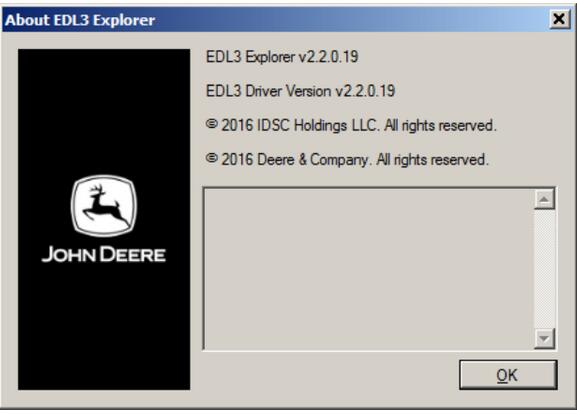
The Help Menu
The Help menu has one feature, About. You use the About feature to display information about the EDL3 Explorer.
To access the Help menu:
(1)Select Help from the EDL3 Explorer menu bar.
(2)Select About.
Posted by: obd2tool at
04:02 AM
| No Comments
| Add Comment
Post contains 772 words, total size 9 kb.
32 queries taking 0.1325 seconds, 149 records returned.
Powered by Minx 1.1.6c-pink.

