


February 14, 2021
Today I would like to share with you an article about using ESYSPLUS to activate (swipe to hide) the start-stop memory function of BMW G38:
So what is BMW’s start-stop memory function? Before the start-stop memory is activated, the start-stop function will automatically turn off after each flameout. You need to press the start-stop function button again in the next ignition to turn on the start-stop function. After activating the start-stop memory through the ESYSPLUS swipe hide, the start-stop function of the vehicle will remain in the state (closed/opened) before the vehicle was turned off (last time).
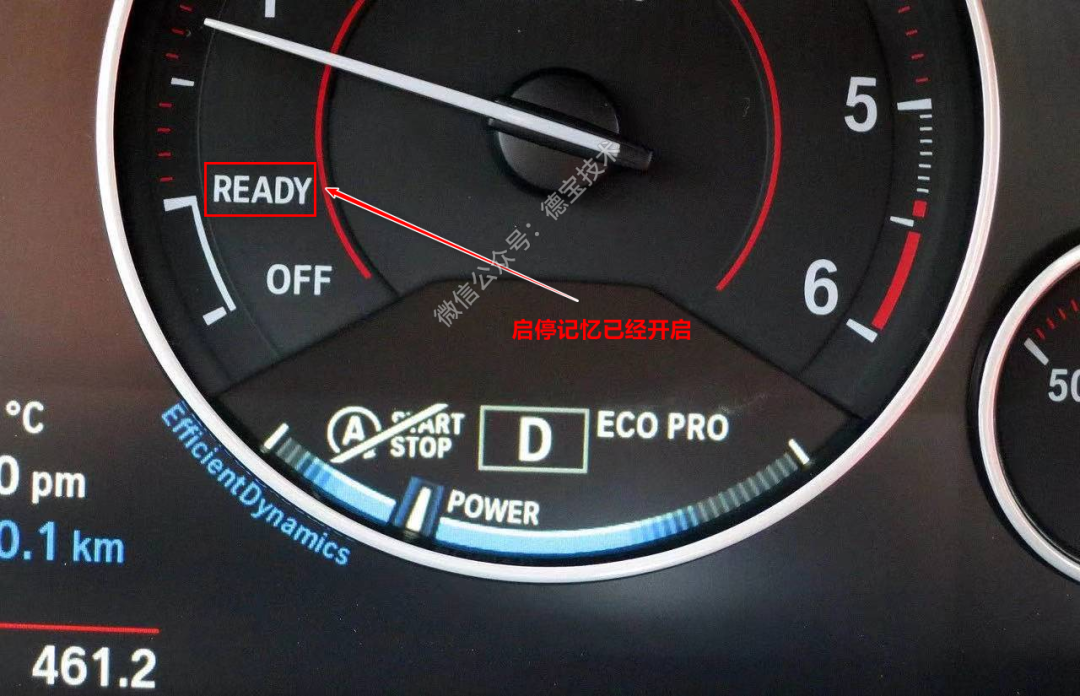
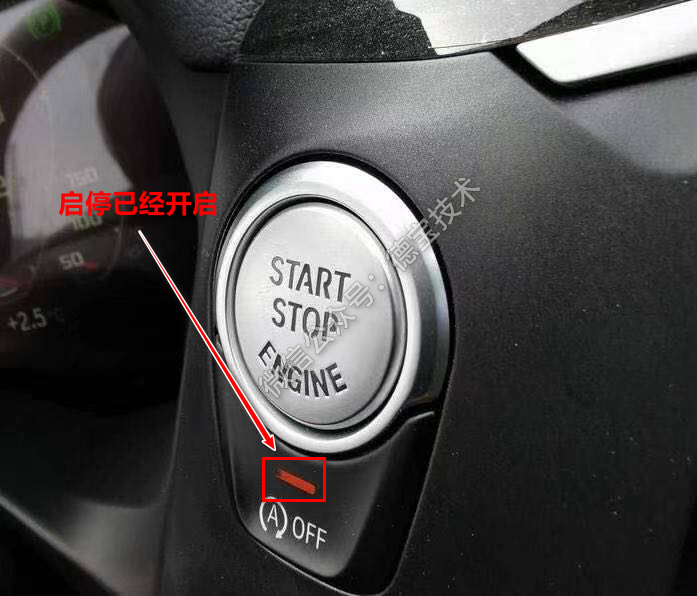
After the start-stop function is turned on: a yellow light will light up at the button position of the start-stop switch, and the indicator will display READY.
Enter today’s topic: Let’s activate the start-stop memory function of
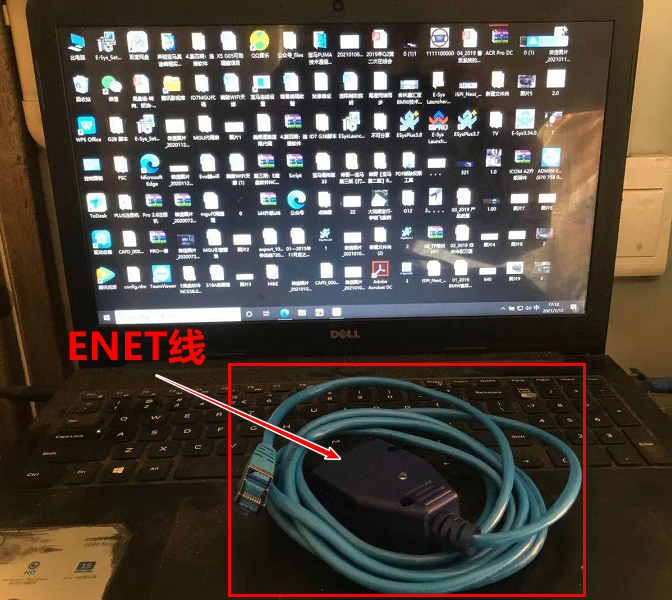
this BMW G28. Prepare a computer with ESYSPLUS (software version: 3.7
or 3.![]() and ENET (OBD) cable installed. The following picture (my
computer is a bit messy, no wonder):
and ENET (OBD) cable installed. The following picture (my
computer is a bit messy, no wonder):
1. The vehicle is connected to the battery charger, and the key is turned on (one-key start: short press the start button three times to enter the programming mode) or simultaneously open the door (driving side) and turn on the turn signal. Purpose: to prevent the vehicle from sleeping.
2. Use the ENET cable to connect the computer and the car. The small end of the ENET cable is plugged into the computer’s network port, and the larger end is plugged into the OBD port of the vehicle.
3. Open ESYSPLUS and connect cars.
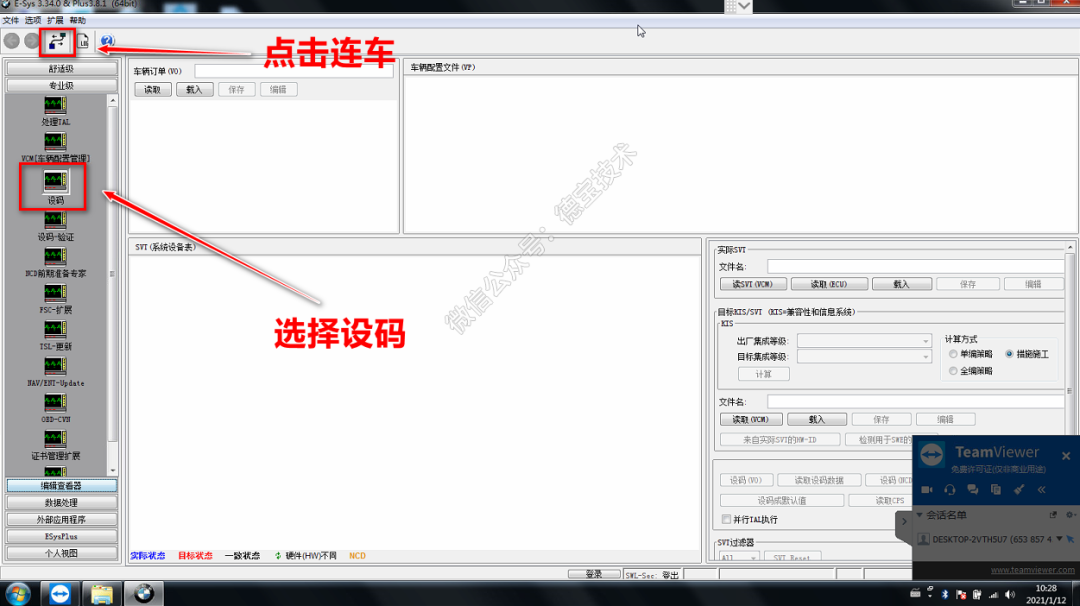
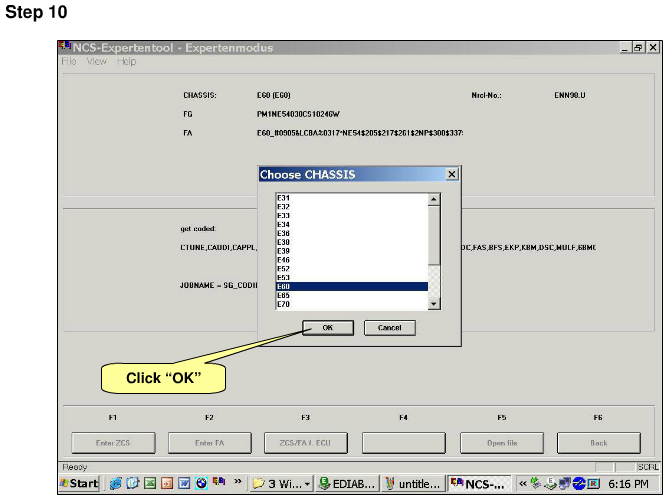
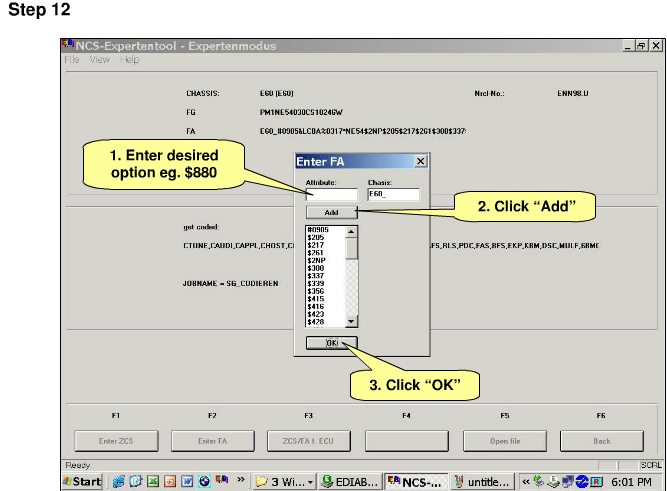
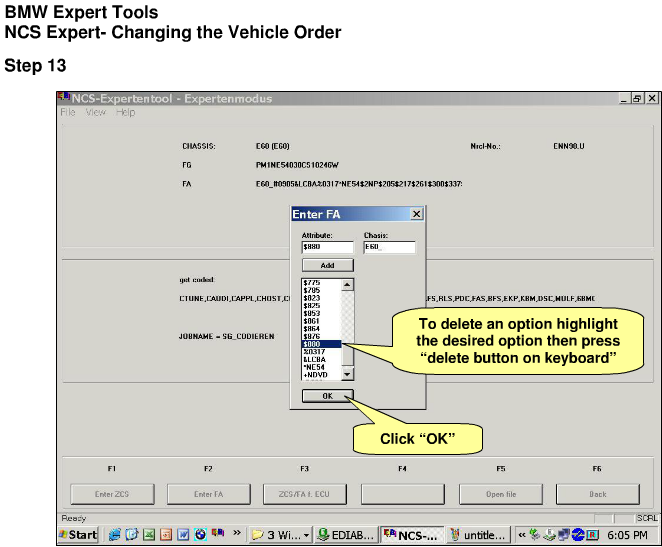
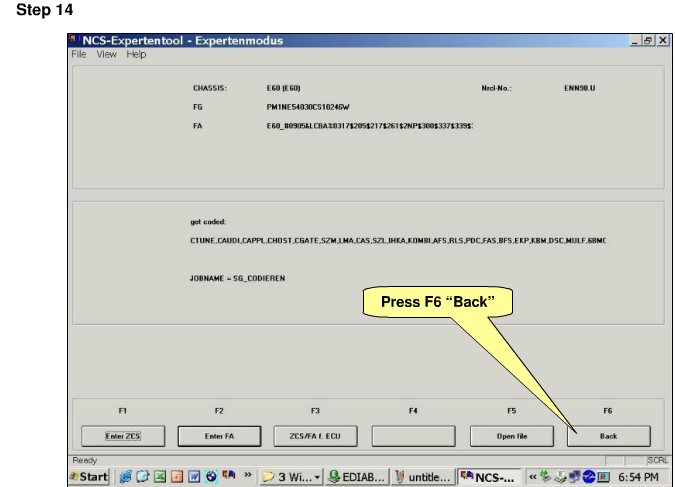
4. Choose model: Today our model is G38, and we choose model S51C (local connection of ENET line can directly select VIN connection that is automatically read).
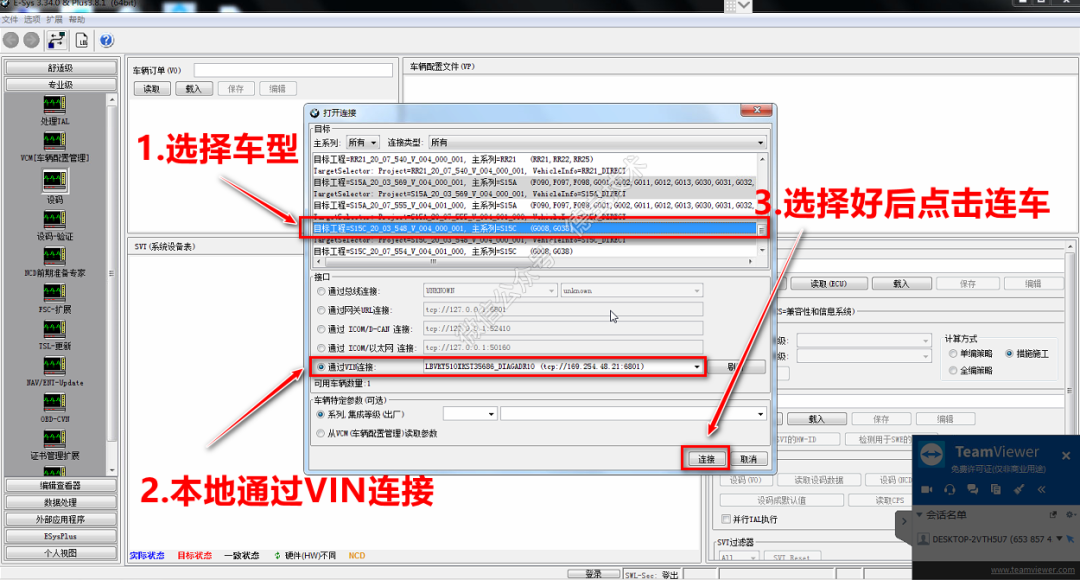
5. Make sure the model is correct, click OK

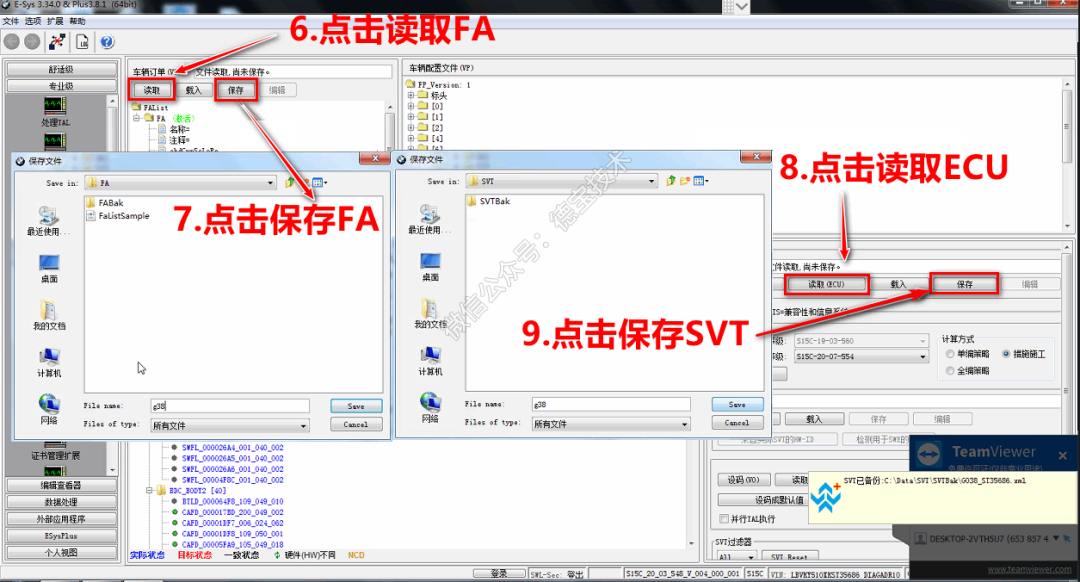
6. Click to read FA, save FA (backup), click to read ECU, click to save SVT (backup): Backup is to restore data when an accident occurs.
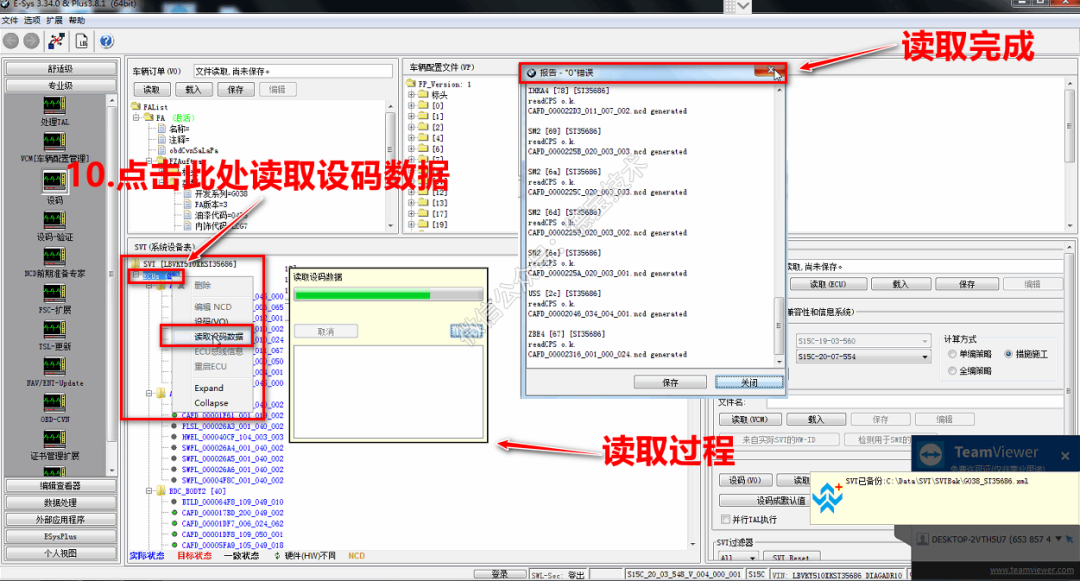
7. Read the coding data, click ECU to read. After the reading is completed, 0 errors can be performed before proceeding to the next step.
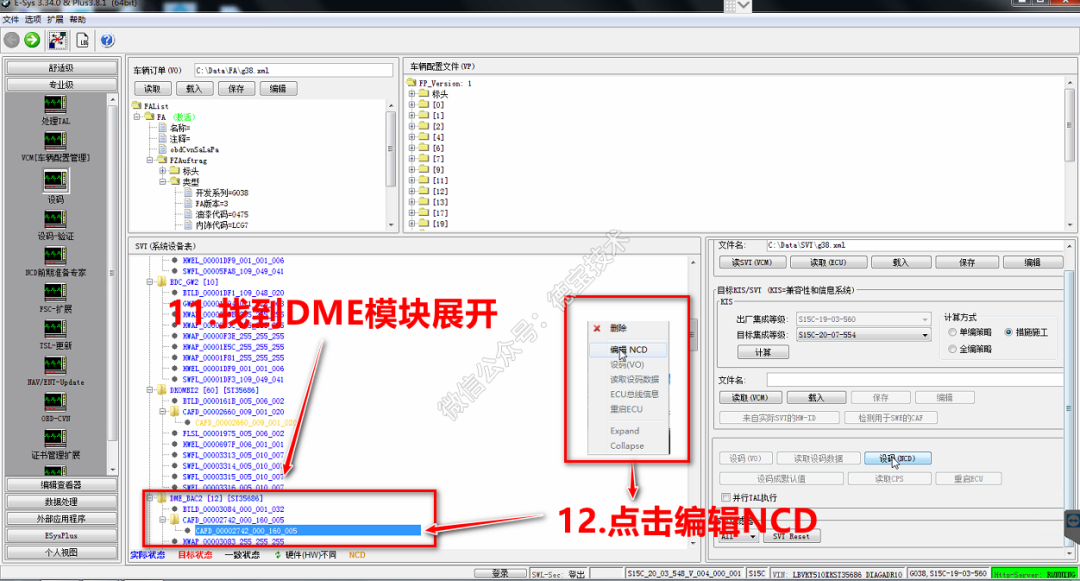
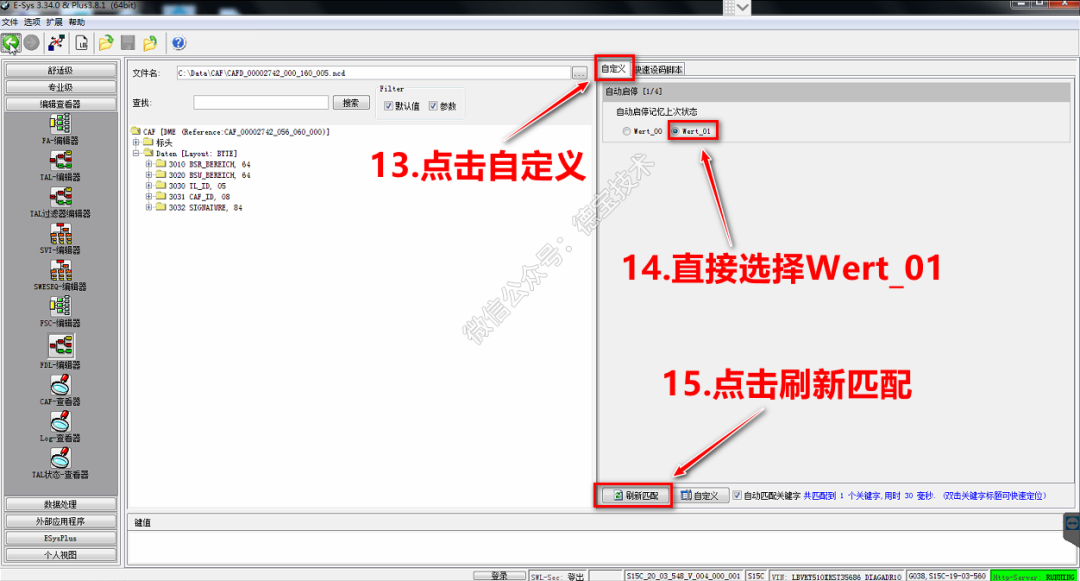
8. Find the DME module to expand, and click Edit NCD.
9. Enter this interface, because ESYSPLUS custom editor has this function, click Customize and select Wert_01 to refresh the match.
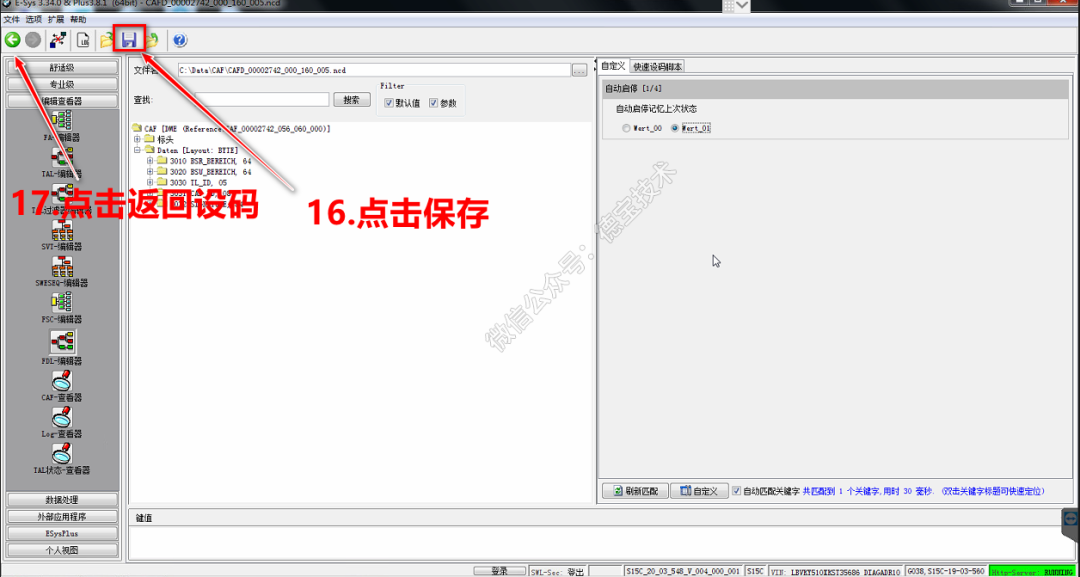
10. Click Save and click the direction arrow symbol to return to the coding interface.
11. Click NCD, the coding is completed with 0 errors.
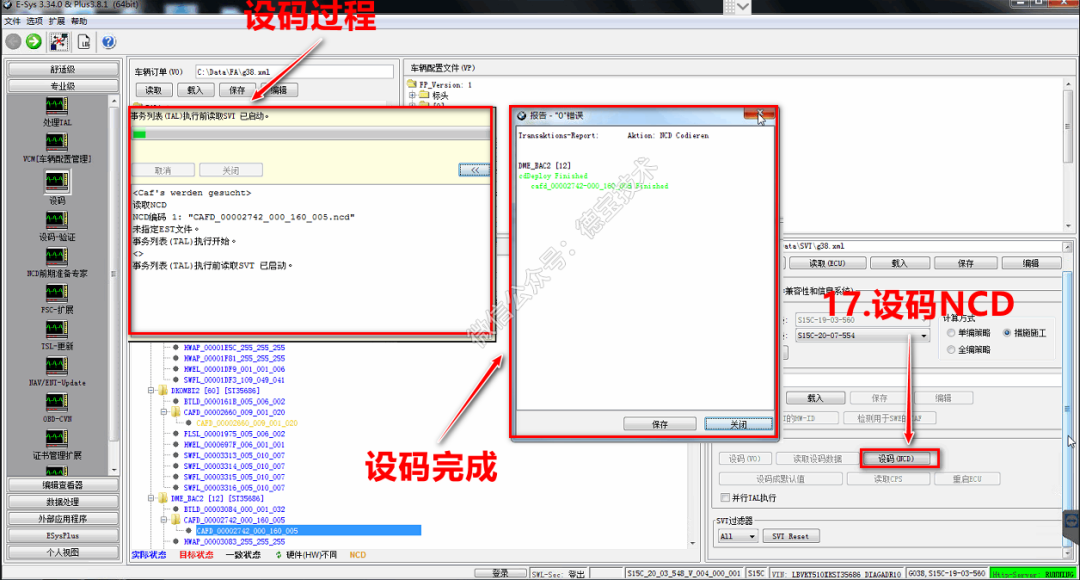
12. So far, the start-stop memory of this BMW G38 ​​is successfully brushed out, and the sense of accomplishment is back.

Summary: Brushing BMW’s hidden functions with ESYSPLUS is not complicated. It is very convenient to use code brush (manually change the code), script brush, or custom brush (similar to ESYSPRO script).
https://www.obd2tool.com/blog/2021/01/16/how-to-use-esysplus-to-activate-the-start-stop-memory-function-of-bmw-g38/
Posted by: obd2tool at
01:08 AM
| No Comments
| Add Comment
Post contains 466 words, total size 5 kb.
BMW softwares instruction:
BMW ISTA-D (Diagnostic);
BMW ISTA-P (Programming)
BMW Group ISPI (the fourth generation of BMW diagnostic software client);
E-SYS (Engineer Software for F series, available for
programming, coding, Channelization, realize hidden functions, advanced
features);
WINKFP (for E series: programming, upgrade and downgrade);
Tool32 (enter key, import codes, delete certification, advanced features of BMW series);
INPA (read vehicle information, diagnosis, read and clear trouble codes);
BMW Coding (for E series: import data, change the code or realize hidden functions);
KSD2 (offer full vehicle repairing information for diagnosis or programming);
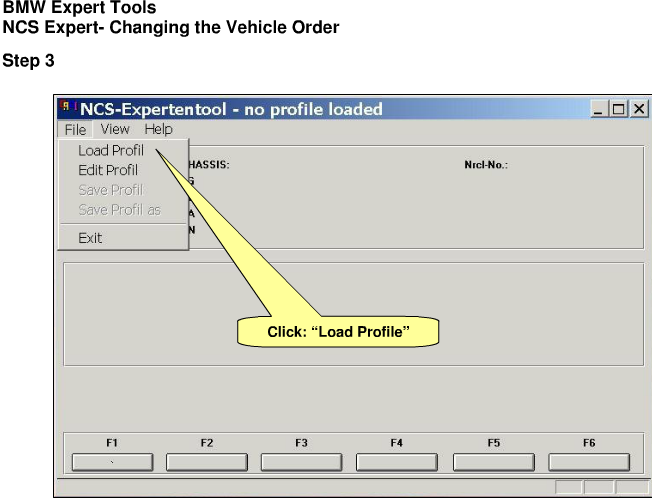
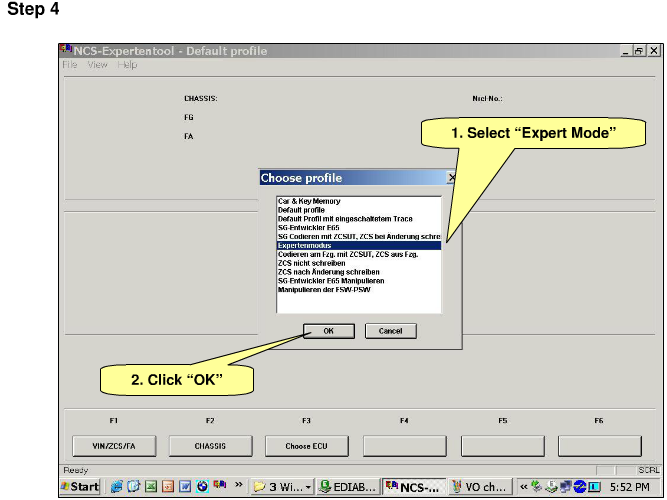
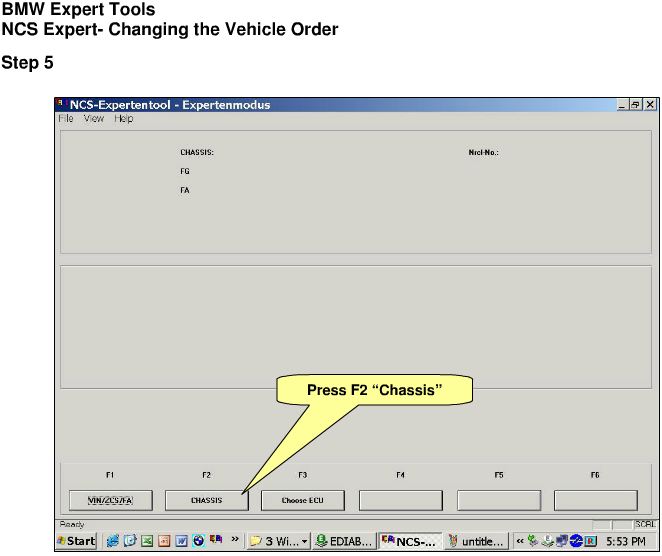
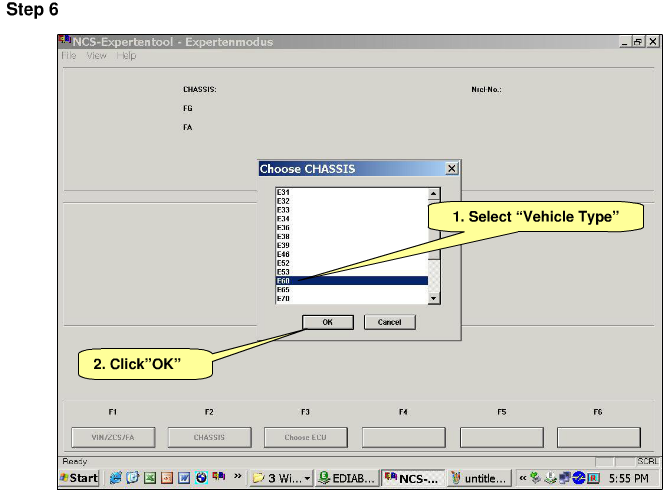
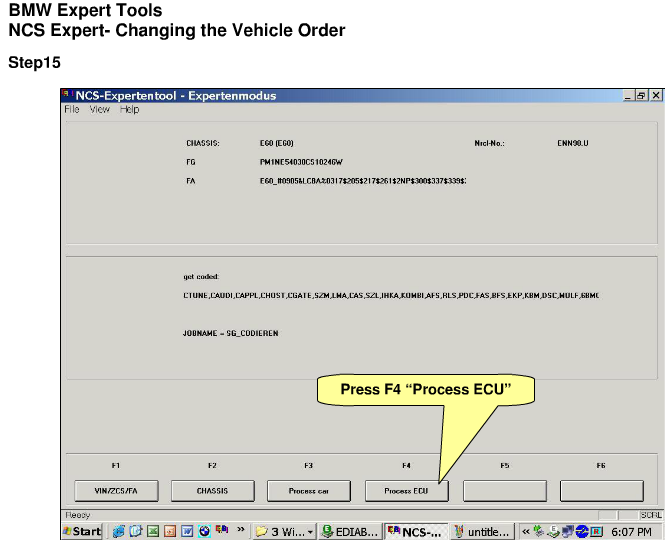
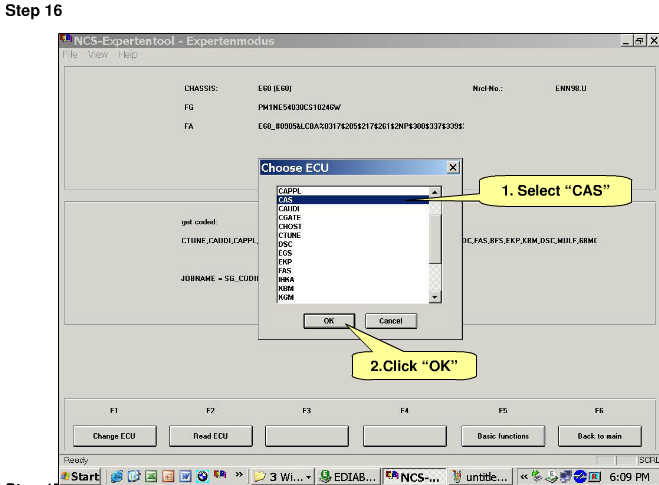
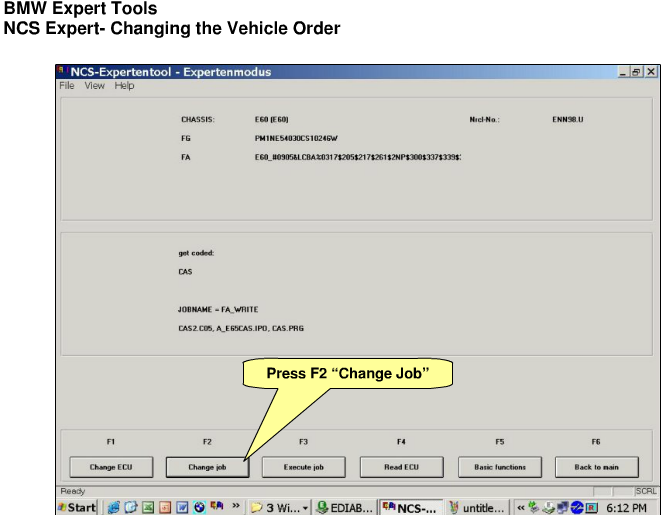
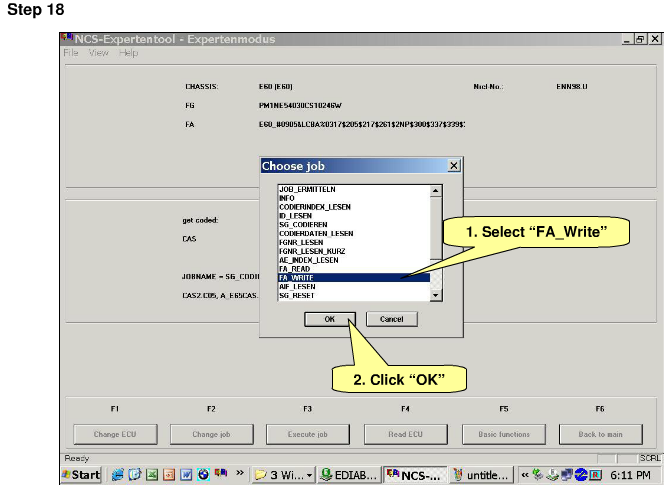
NCS-Expert tool (for E series: set codes, realize hidden functions and change settings);
Collection of videos of HOW TO CODE VIA NCS OR E-SYS OR FLASHING VIA WINKFP OR DIS OR
PROGRAM OR …..
http://mhhauto.com/Thread-BMW-E-Sys-NCS-WinKFP-Collection-Of-Videos?highlight=bmw+e-sys
BMW E-Sys – an engineering version of the software for programming, coding, electronic control units of new series BMW. Namely for Fxx series F01 / F02 / F06 / F07 / F10 / F12 / F13 / F16 / F20 / F25 / F30 and so on.
NCS Expert is simply a program used to read and write (program) parameters to a vehicle.
http://codinge90.com/ncs-expert-basic-understanding/
BMW NCS Expert – Software application distributed
with BMW Standard Tools that can communicate directly with any module on
the CAN network. NCS Expert can, among other things, read the
configuration codes from modules and write new configurations to them.
NCS Expert is simply a program used to read and write (program)
parameters to a vehicle.
http://codinge90.com/ncs-expert-basic-understanding/
Posted by: obd2tool at
12:57 AM
| No Comments
| Add Comment
Post contains 249 words, total size 5 kb.
February 04, 2021
Wiggle Test on Caterpillar ET Software
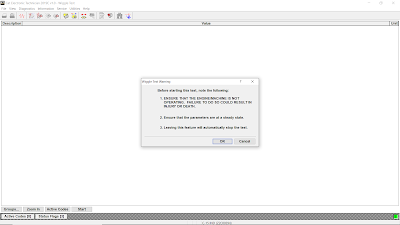
Accessing the Wiggle Test
#Purpose
The Wiggle Test function is used to determine if an intermittent wiring
problem exists. While a physical component (wiring harness, sensor,
connector, etc) is "wiggled†or moved, the test indicates which
parameter has moved beyond a predetermined range.
The Wiggle Test threshold is 10% of the starting value, meaning that anything greater or less than 10% of the original value is outside of the threshold. When a parameter goes outside of the threshold from the starting value, two things may happen:
the parameter’s row will be highlighted in red, and
the PC makes a two-second beep. This failed parameter remains highlighted until the test is stopped.
#Accessing
To run the Wiggle Test function:
1). select "Diagnostic Tests†from the "Diagnostics†– "Diagnostic Tests†menu, and then select "Wiggle Test†from the submenu.

2). The "Wiggle Test Warning†dialog box is displayed. Click "OKâ€. The Wiggle Test screen is displayed.
3). The "Select Group†dialog box displays the first time this tool is accessed.
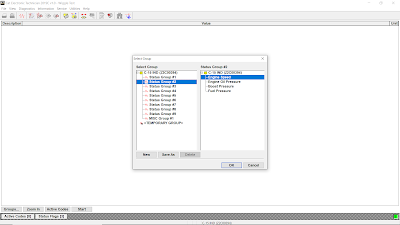
#Selecting a Group of Parameters
The Groups… button prompts the "Select Group†dialog box to be
displayed. This dialog box displays available default groups of
parameters to monitor and provides access for creating, changing, and
deleting groups. This dialog box allows a group in the service tool to
be reassigned.
The "Maintain Groups†dialog box allows parameters to be assigned to a group being created by the user. It also allows parameters to be changed the created group as well as in the "Temporary Groupâ€.
To select a group:
-Click the Groups… button. The Select Group dialog box is displayed.
-Highlight a group from the Select a group list box, and click OK. The
service tool screen displays showing the selected group and its
parameters.
-Using the up and down arrows on the keyboard, each group and its
parameters can be viewed consecutively in the "Select Group†dialog box.
If a group is created, that group can be chosen by selecting the first
letter of its name. If there is more than one group with the same first
letter, continually pressing the letter scrolls through those groups
consecutively.
#Screen Layout
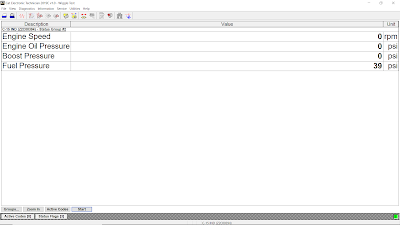
The "Wiggle Test†screen has the following areas:
a). Title Area – Located in the upper left corner of the screen, the title area displays the ECM name and the selected group.
b). Display Area – The Wiggle Test display area is in grid format and includes the following columns:
Description – Provides the name of the parameter
Value – Displays the status of the selected parameter. If the service
tool is unable to read the data, "Unavailable,†"Not Installed,†or "Not
Available†will be displayed.
Unit – Displays the parameter’s unit of measure.
c) Button – The buttons available in the Wiggle Test screen are:
Groups… as describes on #Selecting a Groups Parameters above.
Zoom In/ Zoom Out – The Zoom function allows values to be displayed in
larger text for increased visibility. Click the Zoom In button – The
size of the displayed text increases. Click Zoom Out button to return to
the normal text display mode.
Active Codes – The Active Codes dialog box displays all of the currently
active diagnostic and event codes. These codes are the same as those
found in the Active Diagnostic Codes (refer to Figure 1.1 above) and
Active Event Codes screens in the Diagnostics drop-down menu. This
dialog box displays separately from the main screen, allowing active
codes to be viewed while specific service tool functions are running.
Start/ Stop – Click this button to begin or end the Wiggle Test.


Posted by: obd2tool at
12:48 PM
| No Comments
| Add Comment
Post contains 610 words, total size 7 kb.
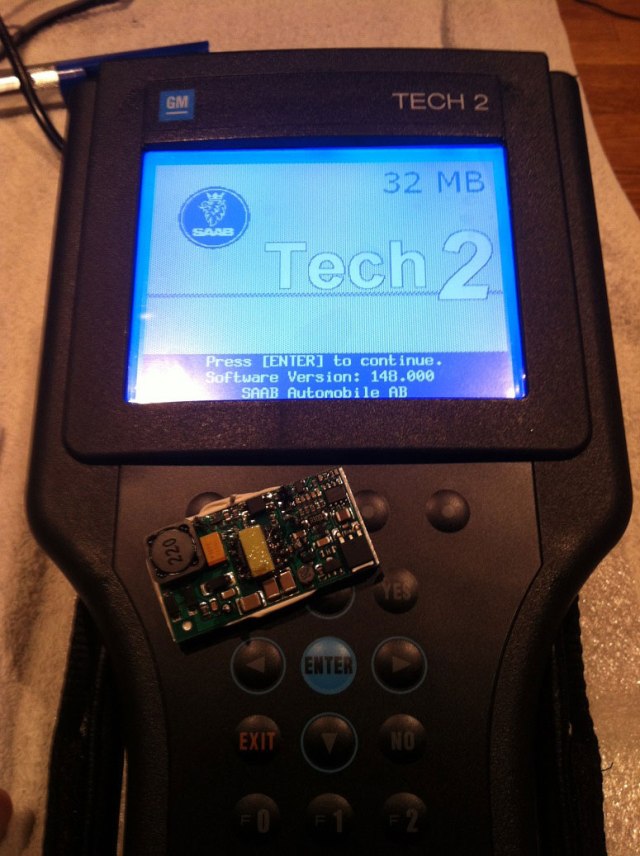
Part1.HOW TO SOLVE GM TECH II SECURITY ISSUES
Problem: I have aTech II with Saab v148.o card in it. I have tried from Globaltis(Cracked) and TIS 2000 (Hardware key) but cannot gain security access.
Tis2000 gives me the error "cannot connect with security serverâ€
Globaltis just says "error†when trying to gain security access.
I know it is communicating with the tech ii, because during the security
check the tech goes from the home screen to "downloadingâ€.
I am using a laptop with a TRENDnet TU-S9 USB to Serial Converter running XP SP3. I have java version 6 update 12 running.
The only think I’ve noticed is the when starting globaltis it states
"SAAB Automobile AB v146.00â€. I have the 148 SAAB PCIAM card, do not
know if that could be affecting it or not.
Customer solution from mhhauto forum:
Here in the forum two types of SAAB v148.000 PCMCIA was shared, one
for Tech2 hand held and one cracked for Tech2 Win. In Tech2 hand he’ll
only the one for its working. If its the right card uploaded in your
tool card then go Security and do it, try Java v 6.26, its the best for
GlobalTis or Java v7.0.
Do you have it or not installed the SAAB v148.000 PCMCIA installed and
can you connect to your SAAB car? If not you can find this PCMCIA SAAB
v148.000 for Tech2 hand held in the forum ( Not the one for Tech2win )
and use Card writer to flash you PCMCIA or MCE software, or use the
advise of Mr. techamp (try to re-flash your Tech 2 PCIMA card with
Globaltis so your hardware and software match. i believe version on
globaltis is 146.00.) and use the SAAB GlobalTis to write your PCMCIA
card, then go to your card and check if the diagnostic is possible. Then
connect again the Tech2 with the computer ->power it up ->run the
GlobalTis-> use Security, then you can do any SPS Programming in
your car
Good luck
loading..
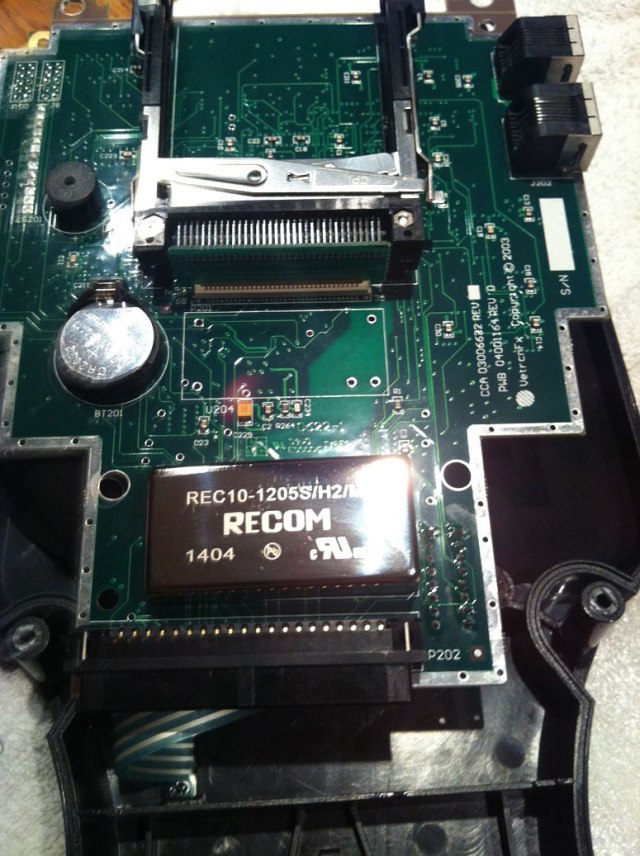
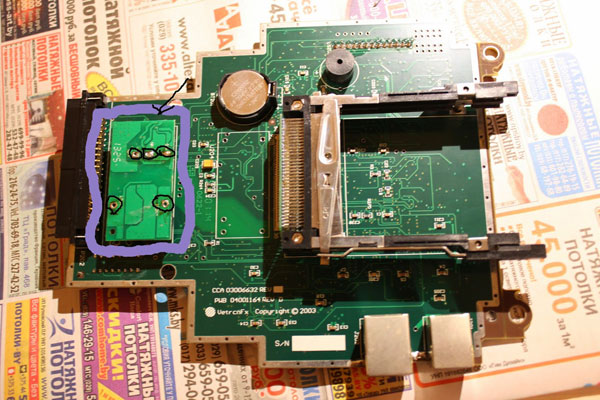
How to rework GM Tech2 PCB to make Tech2 scan tool clone boot up for use.
– Problem
Tech II clone not boot up (not turn on)
– Reason
The issue usually results from the DC to DC converter
This converter is a common internal component for the device GM TECH II
originally these come equipped with the "Meanwell SKE10A-05VT†and "BTCPower 4BE-01T-02â€
you cannot longer purchase these items because they are not being manufactured anymore
You actually can find the "Meanwell SKE10A-05†but missing the "VT†and also missing 1 pin for the soldering points.
BEWARE this model dc to dc converter WILL NOT WORK
It may help you power on your device, but the power button among other programming features won’t work.
– Solution worked!
To replace DC to DC converter can avoid unpleasant surprises.
REC10-1205S/H2/M has a 6 pin connections, "Meanwell SKE10A-05VT†and
"BTCPower 4BE-01T-02†have a 5 pin connections, is it not a problem when
you change the component.
So, sort this out.
This list is for a DC to DC converter with the following specifications:
Input: 9~18VDC
Output: 5VDC 2.0A
– GM Tech 2 PCB before the DC to DC converter replacement
– Tech2 clone worked gain after the DC to DC converter replacement
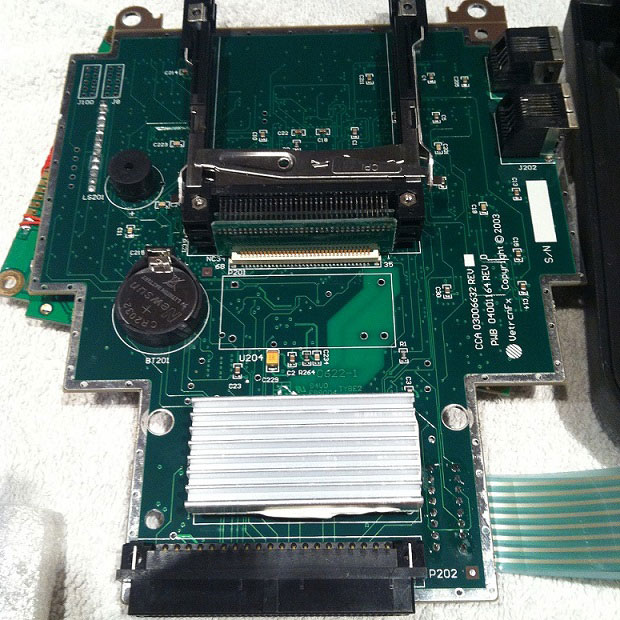
– The important note: Tech2 not boot up when the car starts
So, how to fix a reboot Tech 2 when starting the car? The square dedicated native voltage Stabilizer, black spots, this is how it is better to feed on, immediately giving to drink block, then the main Board gently giving to drink lagged behind in her legs. By means of wooden toothpicks carefully remove the solder prepared under us new voltage regulator (mornsun VRB1205LD-15W DIP).
Part 2:GM Tech2 clone C5 Corvette feedback
Feedback 1:
I bought the Tech 2 (clone, works great) for my C5 (99) just for the
Automated Bleed so I could completely flush the brake system
particularly for the EBCM !!! Have since used the crap out of it,
ECM/PCM re-learn, crank sensor re-learn etc !!!!
Also use it to exercise my ABS motor every 3 months.
Feedback 2:
C5 has the built in ability to pull vehicle specific DTC’s right in the
DIC and those can be exceptionally helful in diagnosing and correcting
common C5 issues.
There are a number of functions in addition to diagnostic trouble shooting that can be accomplished with the Tech II. and another is the ability to program out unwanted features such as F45 or F55 RPO’s ar program RPO’s into a replacement BCM.
Do recognize that the tool have extremely limited ability to change settings in either the PCM or BCM. To accomplish change you need a programming tool such as HP Tuners or EFI Live and they can change only PCM settings. They’re very easy to use,just follow the display,and look around till you get tired,,and try reading â€live data†as much as you can,it speeds up the learning curve,,and try it on as many GM cars/trucks as you can too
Tech 2 installation Question and Issue:
Question:
when I try to connect it to my car, I get
this message:
no communications with vehicle
check diagnostic link connector
check ignition
I have my key in the on position but not running, cable connection appears to be correct.
Possible reasons:
Possible Reason 1:
Are you feeding a separate 12volt to the Tech 2 or are you only using the OBD2 cable ?
I feed the 12volt from the sigaretteholder into the end of the OBD cable .
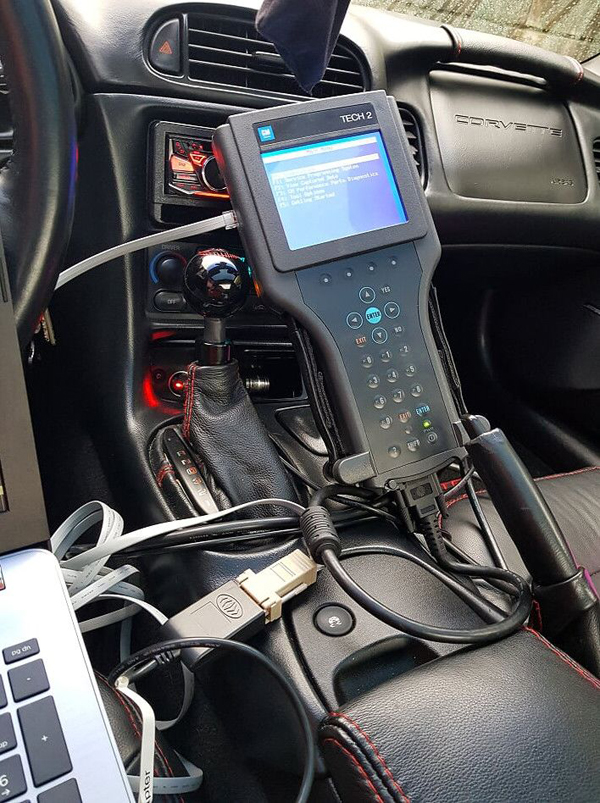
The 120VAC input 12VDC output power supply that is supplied with the
Tech2 should only be used when working offline. It can mess with the
ground reference if it is powering the TECH2 while connecting to the
vehicle.
When connecting to the vehicle the Tech2 can be powered from the DLC
(OBDII connector), cigarette lighter power cable or the battery clip
power cable.
Possible Reason 2:
If your battery gets a little low then the Tech2 will start having problems.
The Tech2 itself can be a bit of a drain. If your key is on then you
have day time running lights and accessories being powered as well. It
is better to have a battery charger connected and start with a full
charge. Try the self check with the Tech2 not connected to the car’s
OBD2 port using the AC adapter.
Possible reason 4:
The parts has defect.
Suggestion: I’d be looking for parts to repair it before sending it
back. I got mine for $200 shipped and wouldn’t like to know how much it
would cost to ship it back from the US but assume it would be at least
half of what I paid.
BTW, you can buy from obd2eshop.com shop (item NO. SP23-1) which are reliable.
GM TECH2 program out the GM Corvette F45
GM Tech2 clone scanner is tested ok to program out GM Corvette F45.
Steps:
Hook up Tech II, turn car on, make sure module in the rear is plugged in. Do not unplug the rear module.
2. Use Tech 2 to delete the F45 option (F55 does not appear on the menu screen, use F45).
3. Save new configuration.
4. Do not turn car off, do not remove Tech 2. Go to the module in the
rear of the car, unplug the grey connector (the widest one), leave any
other plug(s) in. [leave the other 1 (F45) or 2 (F55) plugged in]
5. Turn off car, leave Tech 2 plugged in.
6. Remove remaining plugs from module in the rear of car. [never plug
them back in again, if you do the F45 turns on automatically]
7. Turn car on to verify the "max speed 80 mph†is gone.
8. Unplug GM Tech 2.
9. Never plug the connectors back in.
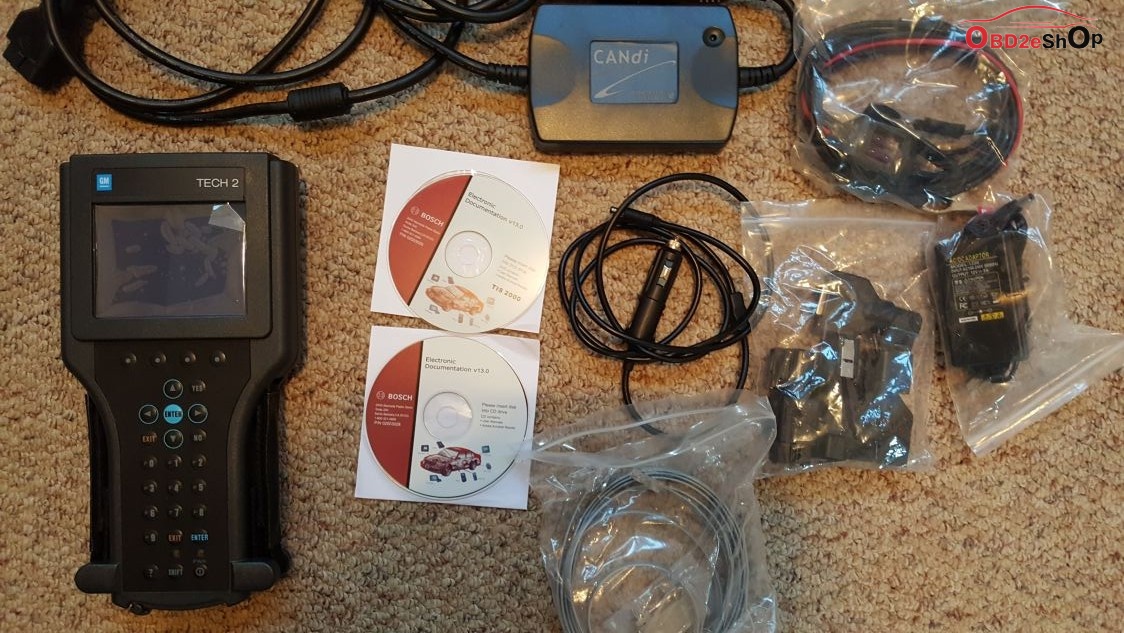
Where to have one GM Tech2
Google Search is your friend !
I bought mine from the same place. Had it in less than a week.
Took a picture of Tech2, pretty high quality of CANDI unit, cables,
along with one of the 12 volt adapters. And the data disks .. as you can
see the labels were not made with an INK JET printer …
Part3.(Solved) Tech2 Tech2Win license expired or not exist
This is how to fixProfessional Diagnostic Tool Tech2 Tech2Win license information "expired or not existâ€, including how to send licence to Tech2win from GlobalTIS
The error message and the screenshot:
Tech2Win license information
E667481: Your license has expired or does not exist!
Please perform a software download or a security access to refresh your license.
Meanwhile vehicle communication and CANdi detection is disabled.
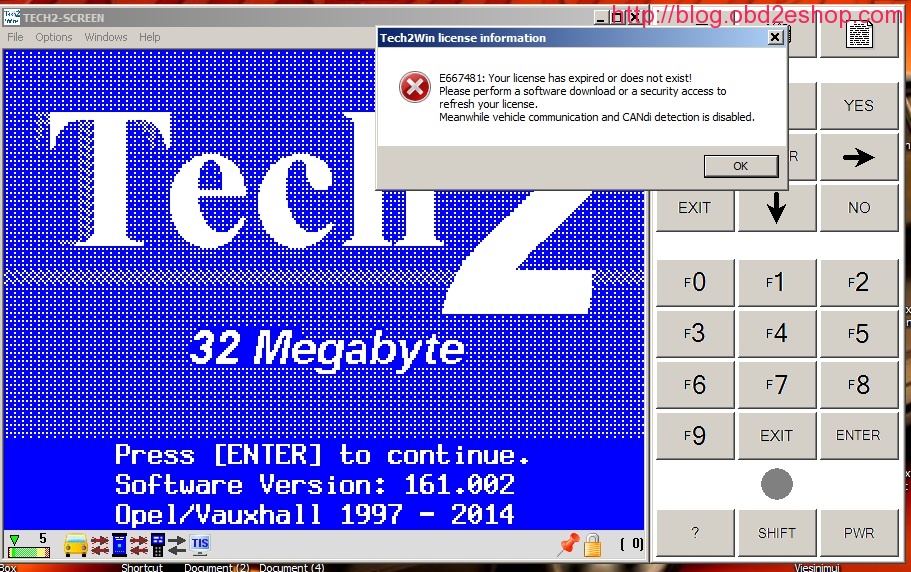
Which cable you using Probably with PassThru.
You must send permission (licence) from GlobalTIS to Tech2Win.
Digit after the lock (bottom part screen) show you how many days you
have licence to use. If you using GlobalTIS v28-32 licence will be for 1
day (24hr), after expired licence you must send again.
Instruction: how to send licence to Tech2win from GlobalTIS:
(the example from AVDI)
Run GlobalTIS.
In GlobalTIS click on Security Access (Security).
In GlobalTIS, Security click on the button Start Download. This will run Security Access wizard.
When its main window is displayed click on the button Next.
When the activation finish you will see the following window with information: "Security Access Enabled Security Access type 3â€
After a successful security access inTech2Win you can see an open lock
on the right side of thestatus bar. Inside the bracket you see the
number of days the license is valid.
When you startTech2Win again the security indicator is not displayed as long as no vehicle communication isbeing performed.
During the first communication with a vehicle the license will be
checked and theindicator displays either an open or closed lock.
Hope this helps
GM Tech2 clone Automated Bleed 2006 C6 Feedback
I just checked my Tech II clone against my 2006 C6. In the ABS
section there is an "Automated Bleed†option. In the Radio section there
is a "VIN Relearn†option. I’ve never actually used either one, but I
bet they work.
The clones are literally running the same software as the Tech II, so
they have all the same functions. There are a few caveats: the standard
clone power supply will cause the unit to reset if you run the starter
motor, apparently, though this can be fixed. Also, operating while
tethered to a PC involves a bunch of licensing hacks and other nonsense.
But you only need to do that if you want to flash the ECU firmware.
The Tech II lets you see (and individually reset) all the DTCs from all
the modules. It also has a bunch of special functions and bidirectional
capabilities.
It’s great as a standalone diagnostics tool but it isn’t intended to
modify ECU parameters like tuning software does. This is a tool for
fixing the car, not modifying it.
Part4:GM Tech2 (SP23-1) Test Results: Yes & No
GM Tech2 Yes:
GM trucks 1999 and 2013 climate control
H2 Hummer
2003 Chevy Silverado 2500 6.0l 4L80E
diagnose the scan bus, modules and ABS system to determine
2004 Chevy Tahoe LT.
2000 model Holden Jackaroo – isuzu trooper.
GM Chevrolet Corvette after 1996
Crankshaft position sensor relearn procedure
2006 Chevrolet Silverado (truck)
2011 Cadillac SRX yes for programming new or Reprogramming used Liftgate Control Module.
Saab 2003 93 Linear
2003 Chevy 2500HD Duramax w/Allison Trans
GM 99 gmc sierra.
Reprogram theft deterrent on 03 corvette
Diagnose GMC truck with 2008 Isuzu diesel engine c7500 7.8; reset code for the DPF: Confirmed.
2008 saab 9-7x 5.3
Program keys for an 03 Saab 9-3 (Ok for 2003 year, the software is 1998 – 2012)
CASE Re-Learn: confirmed
2000 Chevy Tahoe: tune the fan since these vehicle has a fan cluthch.
Gm light SUVS like the Escalade or Trailblazer: yes
Clear BCM DTC’s
Navigate To Vehicle Control Systems Menu
Select Module Setup
Select BCM Menu
Select BPP Sensor Calibration Procedure
Can test if injectors is good or bad, supports monitor the pressure: Yes
GM Tech2 No:
2008 Saturn Astra
Doesn’t come with dongle crack
2004 Volvo V40: ABS and SRS control system
GM Tech 2 (SP23-1) hasn’t recom rec10, it can’t change for the updated dc to dc converter.
Can’t support 1997 saab.
GM tech 2 error:
Possible reason and solution:
Plugged the SD card into the wrong slot, try another one, it will work.
Q: CanGM Scanner GM Tech2 support the GM after 2007 year? Does it need to work with the other tools?
A: It depends on what car models, the software is not the same.
Q: 1996 Oldsmobile Aurora, click "Yes†to clear the DTC codes, but it failed.
A: Only after the car is repaired, can the DTC codes be erased.To be continued…
Posted by: obd2tool at
12:45 PM
| No Comments
| Add Comment
Post contains 2115 words, total size 18 kb.
January 16, 2021
Received your new key programming table and before programming new keys, you must register it & update the new guys first. Then how to update? This post will give you the right guide.
Update Autel IM508/IM608 at times allows you to download the latest released software. The updates can improve the MaxiIM applications’ capabilities, typically by adding new tests, new models, or enhanced applications to the database.
Autel IM508/IM608 Tablet automatically searches for available updates for all of the MaxiIM software when it is connected to the Internet. Any updates that are found can be downloaded and installed on the device.
The following describes to you how to update to the MaxiIM IM508/IM608 System.
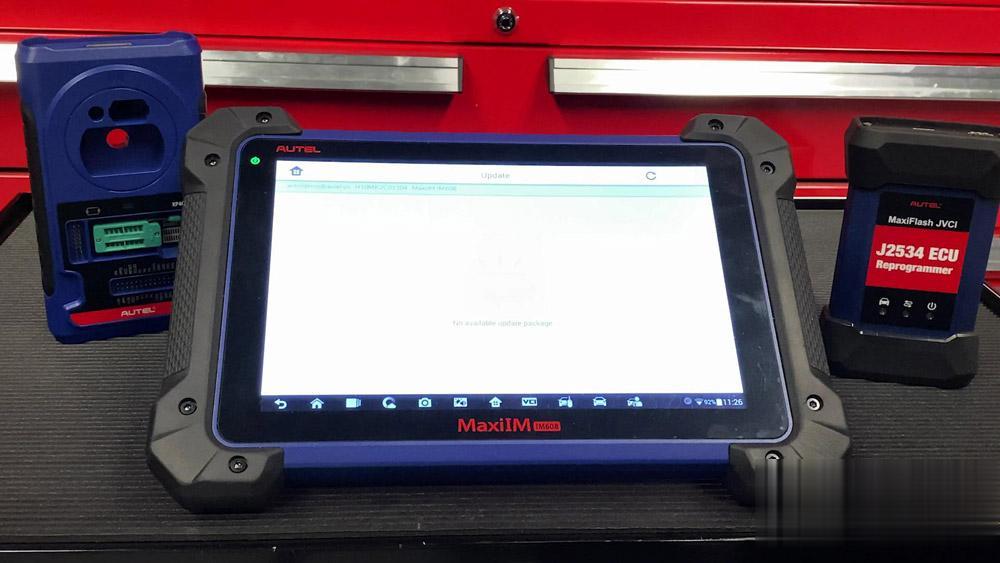
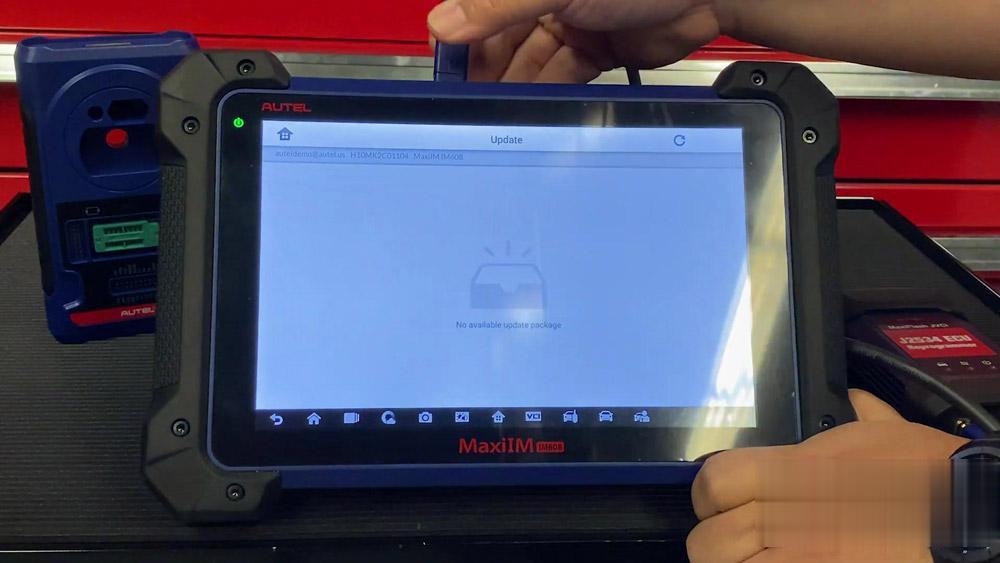
It’s very important to make sure our Autel MaxiIM IM608 are fully updated. Here is the guide about how to update the Autel IM608 tablet vehicle software, the J2534 VCI andXP400 one by one.
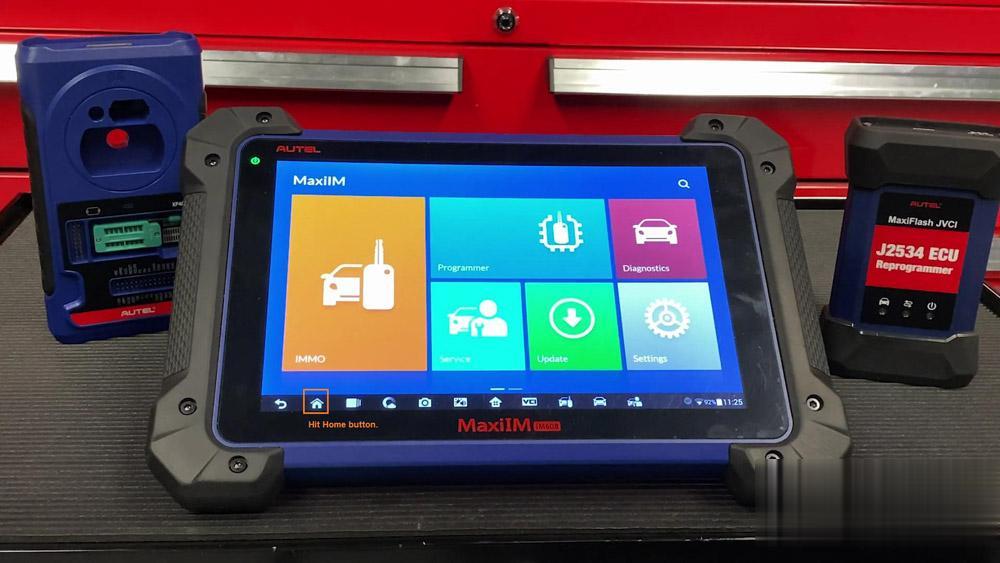
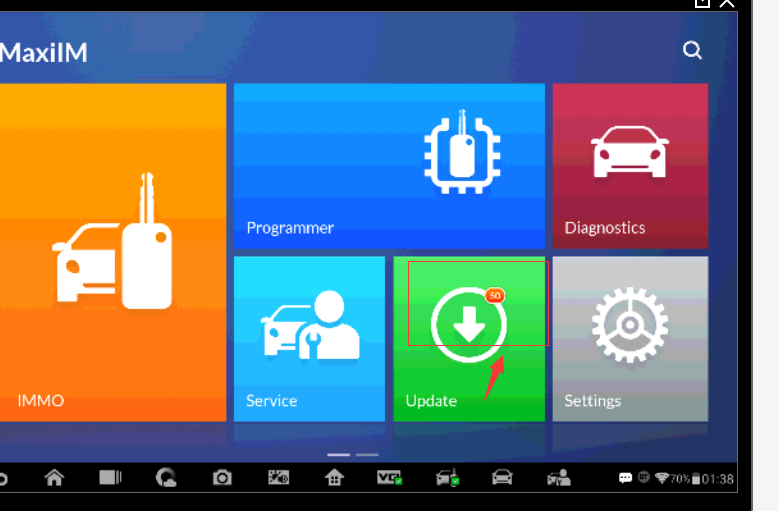
Firstly, tap the IM608 home button on your machine screen.
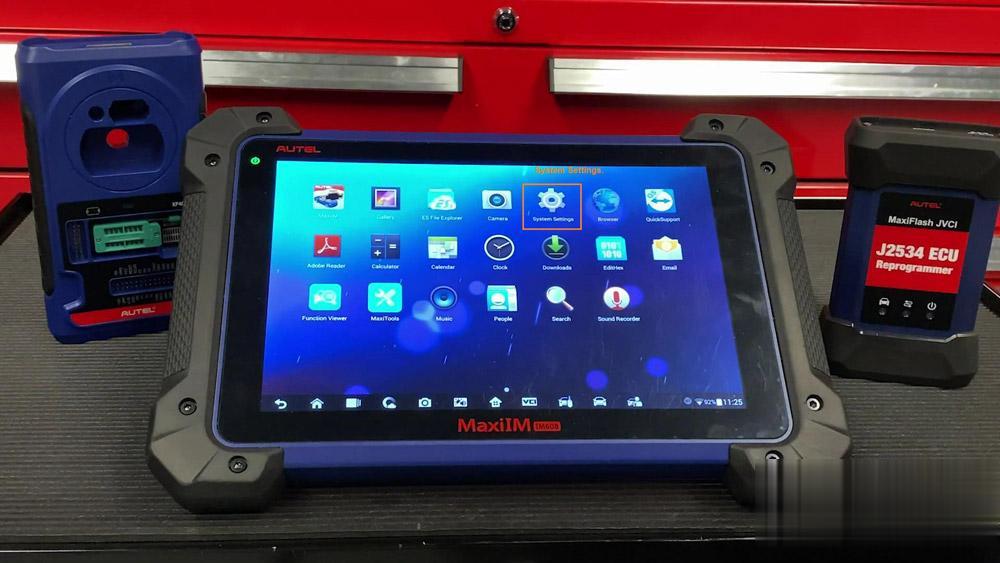
Then , select "System Settingsâ€.
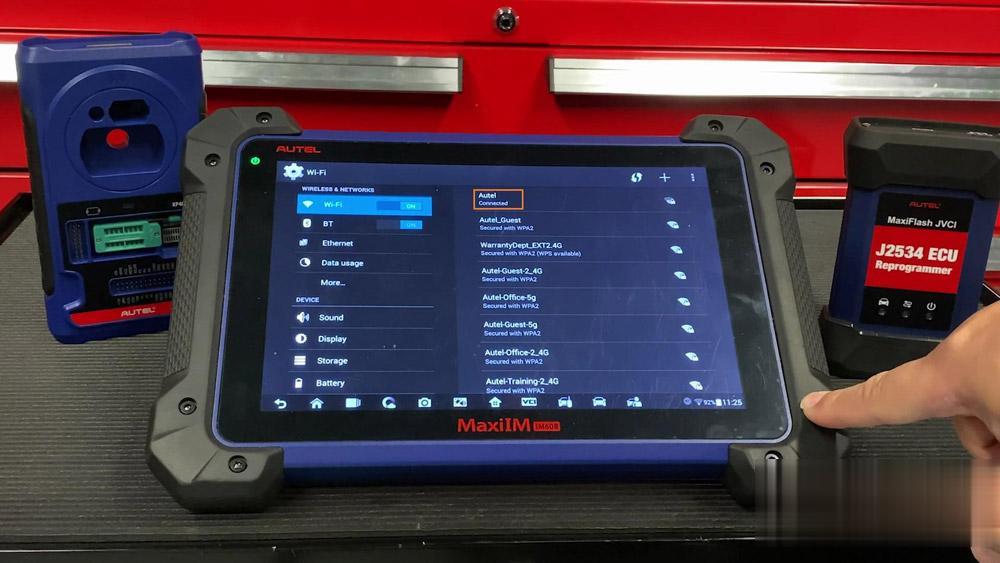
It’s automatically highlight the WiFi option, please make sure you’re connected to your wireless router or any mobile device.
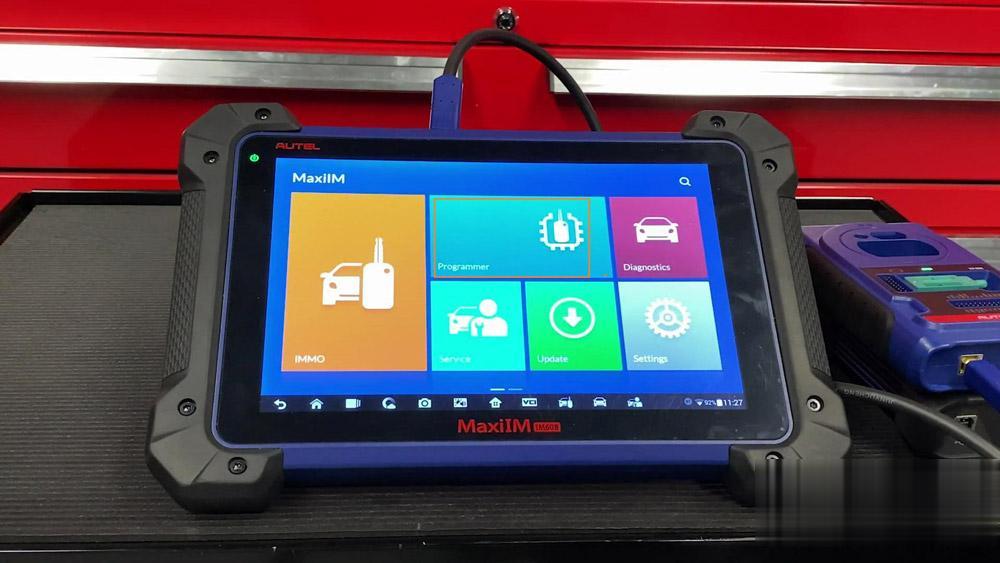
Then tap the home button and select "MaxiIMâ€.

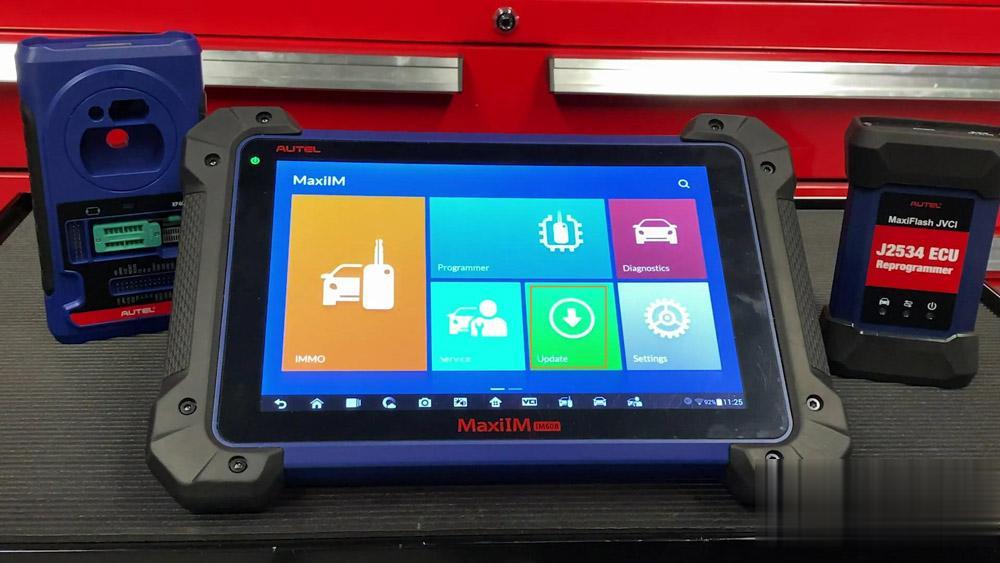
Gonna make sure that update is the tablet itself.
Tap "Updateâ€.
Then we will have a few moments to achieve the latest updates.
My tool is fully updated, your tool may be a little bit different, you may see some vehicles here that you may need to update.
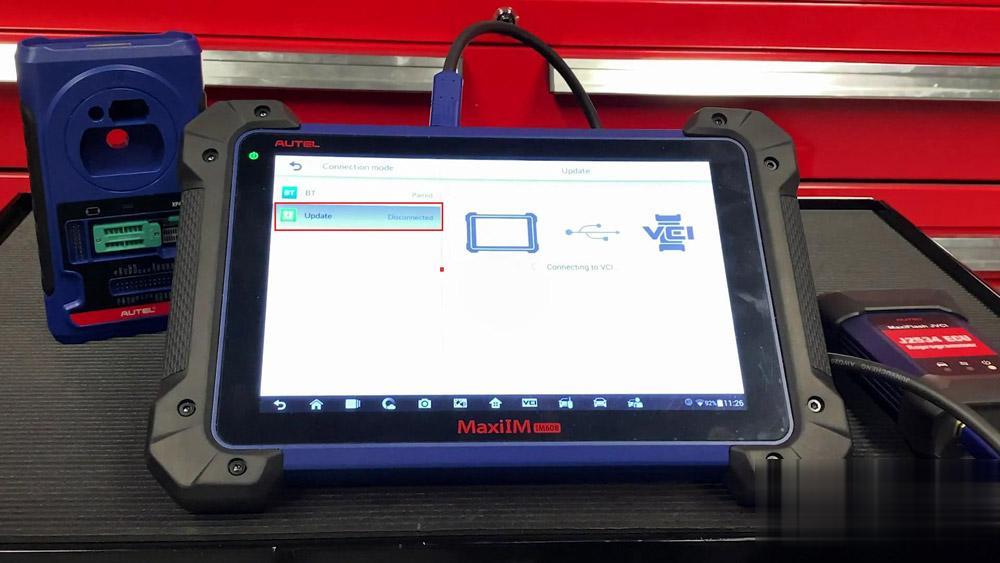
The next thing we need to update is our VCI.
To do this, please use the included USB able that comes with your IM608 kit. Connect one end of the cable to the bottom of the VCI, and another end to any of the USB ports located towards the top of your IM608 tablet.
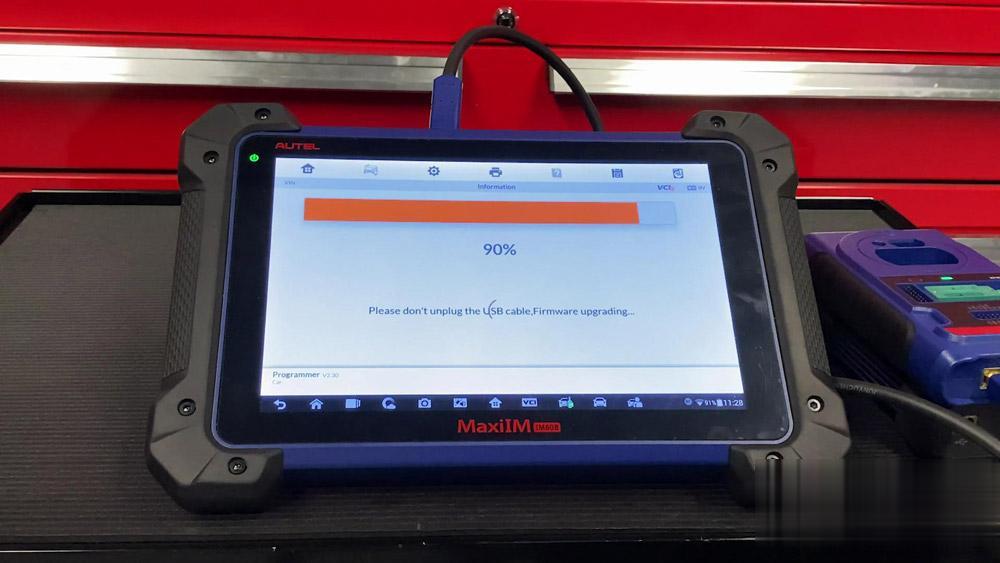
Once you’ve done that, select the "VCI†icon at the bottom of your screen, then at the left hand side tap "Updateâ€. The tool will automatically connect to the VCI and it archive the newest updates for your tool.
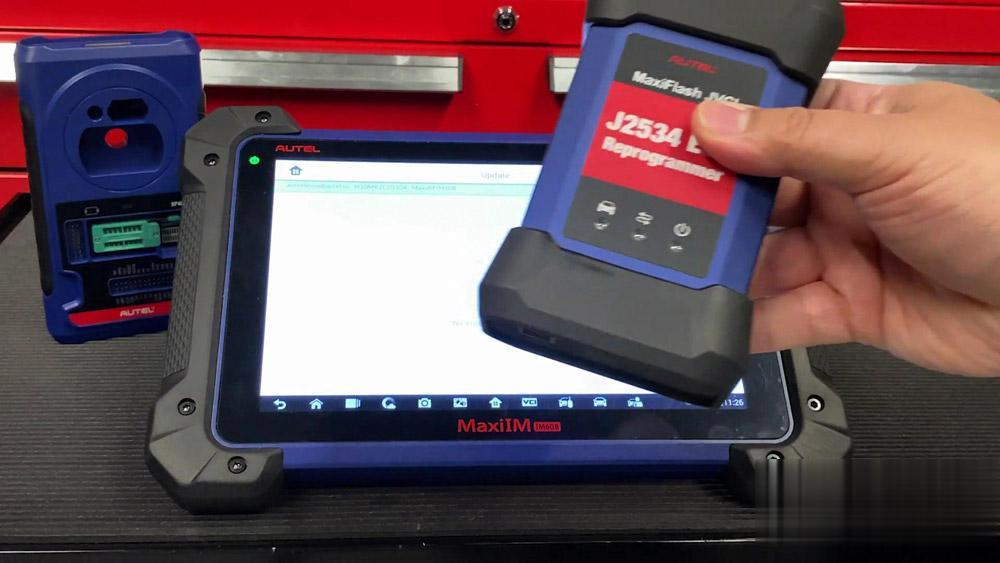
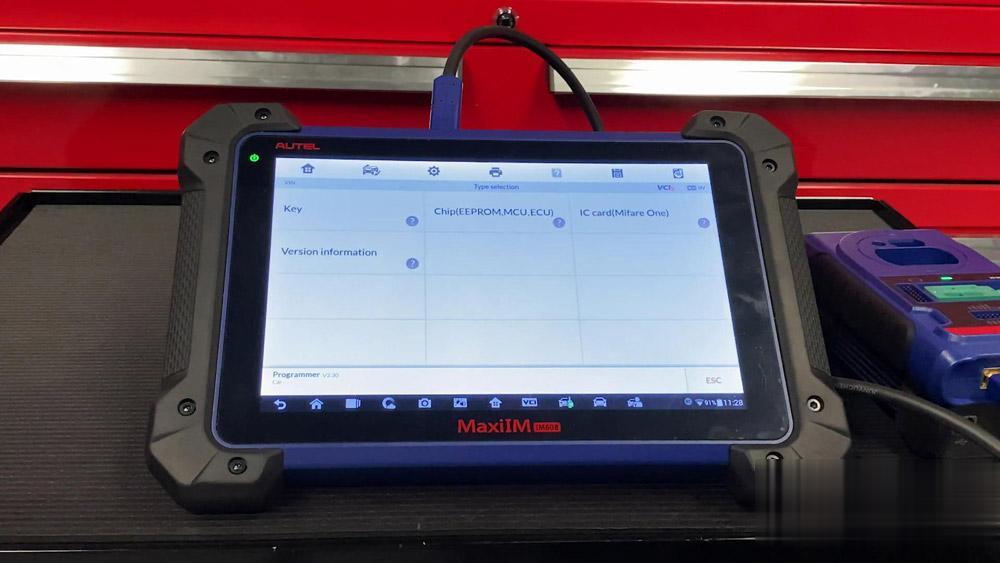
Our VCI is good to go, we’re not done just yet, we’re gonna make sure XP400 key programmer here is updated as well.
Take off the USB cable added your VCI and put it towards the bottom of the XP400.
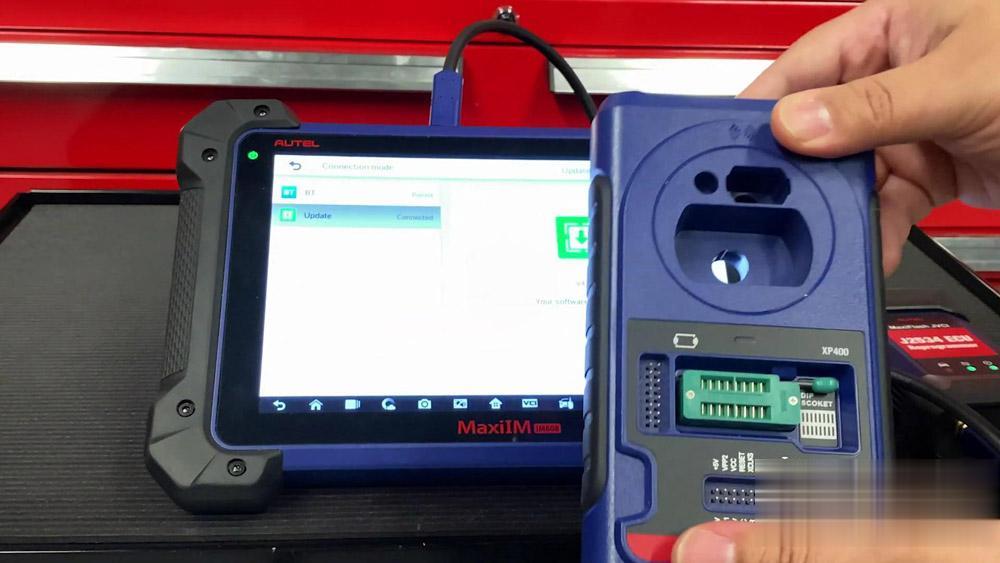
Tap back button. One you get to this screen here, tap "Programmerâ€. The tablet will automatically detect the XP400 and update the tool. Please note never connect your Xp400 to the OBD2 port of your vehicle.

All right, well it looks like we’re good to go IM608 update.
Posted by: obd2tool at
12:59 PM
| No Comments
| Add Comment
Post contains 429 words, total size 8 kb.
Some Autel MaxiIM IM608 customer is having trouble connecting the device to Autel update server.
Show error as follows (Network busy (#1).Please try again later:
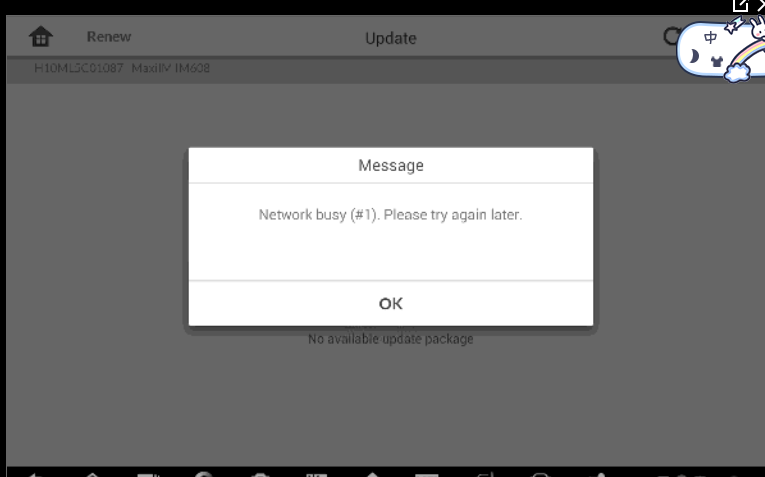
Or Failed to obtain the server address. Error code:10008 or Error code:10001
The reason why that happens is because customer network environment can’t access Autel server, the DNS domain IP address is not allowing it to access autel server.
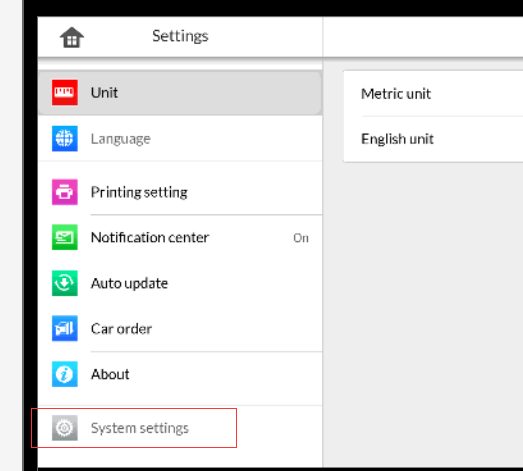
To fix this problem. You can do as follows:
Go to system settings:
autel im608 system setting
Then do as follows:
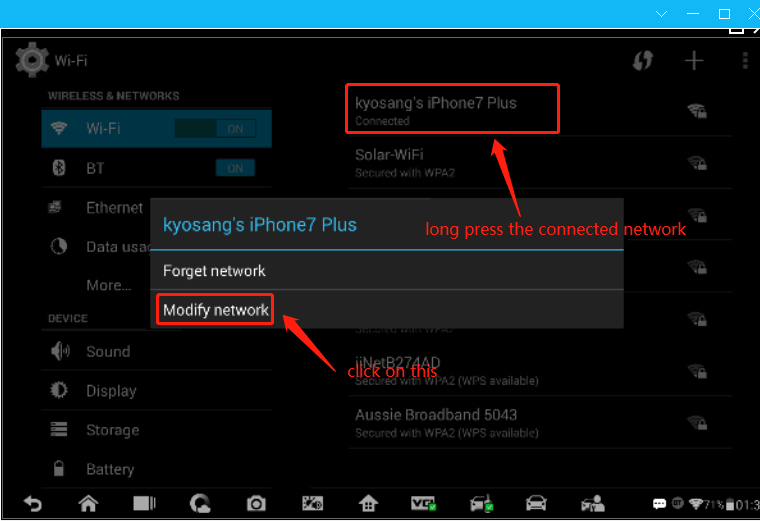
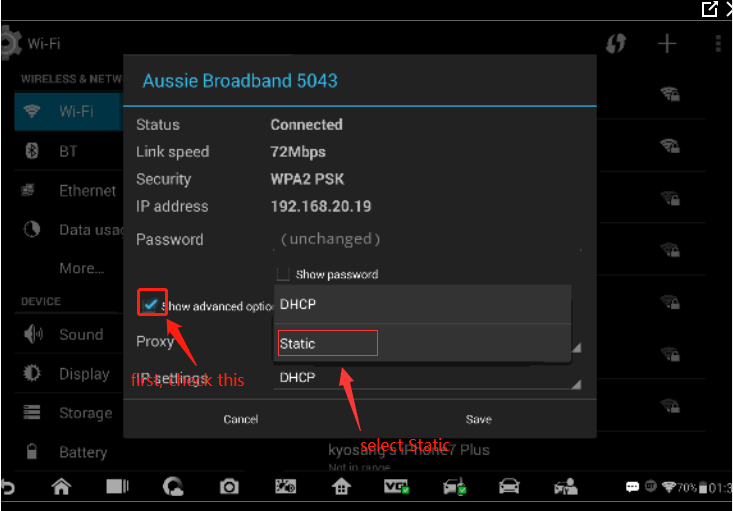

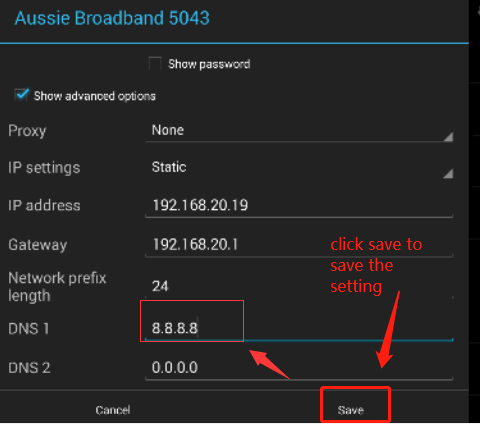
After that, you will see the device connect to the Autel update server normally and you can download the update normally now.
Posted by: obd2tool at
12:53 PM
| No Comments
| Add Comment
Post contains 114 words, total size 3 kb.
January 06, 2021
Received your new key programming table and before programming new keys, you must register it & update the new guys first. Then how to update? This post will give you the right guide.
Update Autel IM508/IM608 at times allows you to download the latest released software. The updates can improve the MaxiIM applications’ capabilities, typically by adding new tests, new models, or enhanced applications to the database.
Autel IM508/IM608 Tablet automatically searches for available updates for all of the MaxiIM software when it is connected to the Internet. Any updates that are found can be downloaded and installed on the device.
The following describes to you how to update to the MaxiIM IM508/IM608 System.
It’s very important to make sure our Autel MaxiIM IM608 are fully updated. Here is the guide about how to update the Autel IM608 tablet vehicle software, the J2534 VCI andXP400 one by one.
Firstly, tap the IM608 home button on your machine screen.
Then , select "System Settingsâ€.
It’s automatically highlight the WiFi option, please make sure you’re connected to your wireless router or any mobile device.
Then tap the home button and select "MaxiIMâ€.
Gonna make sure that update is the tablet itself.
Tap "Updateâ€.
Then we will have a few moments to achieve the latest updates.
My tool is fully updated, your tool may be a little bit different, you may see some vehicles here that you may need to update.
The next thing we need to update is our VCI.
To do this, please use the included USB able that comes with your IM608 kit. Connect one end of the cable to the bottom of the VCI, and another end to any of the USB ports located towards the top of your IM608 tablet.
Once you’ve done that, select the "VCI†icon at the bottom of your screen, then at the left hand side tap "Updateâ€. The tool will automatically connect to the VCI and it archive the newest updates for your tool.
Our VCI is good to go, we’re not done just yet, we’re gonna make sure XP400 key programmer here is updated as well.
Take off the USB cable added your VCI and put it towards the bottom of the XP400.
Tap back button. One you get to this screen here, tap "Programmerâ€. The tablet will automatically detect the XP400 and update the tool. Please note never connect your Xp400 to the OBD2 port of your vehicle.
All right, well it looks like we’re good to go IM608 update.
Posted by: obd2tool at
12:54 PM
| No Comments
| Add Comment
Post contains 429 words, total size 8 kb.
Some Autel MaxiIM IM608 customer is having trouble connecting the device to Autel update server.
Show error as follows (Network busy (#1).Please try again later:
Or Failed to obtain the server address. Error code:10008 or Error code:10001
The reason why that happens is because customer network environment can’t access Autel server, the DNS domain IP address is not allowing it to access autel server.
To fix this problem. You can do as follows:
Go to system settings:
autel im608 system setting
Then do as follows:
After that, you will see the device connect to the Autel update server normally and you can download the update normally now.
Posted by: obd2tool at
12:45 PM
| No Comments
| Add Comment
Post contains 114 words, total size 3 kb.
December 27, 2020
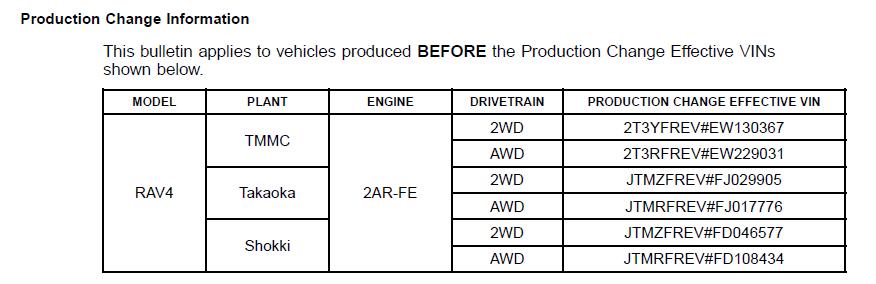
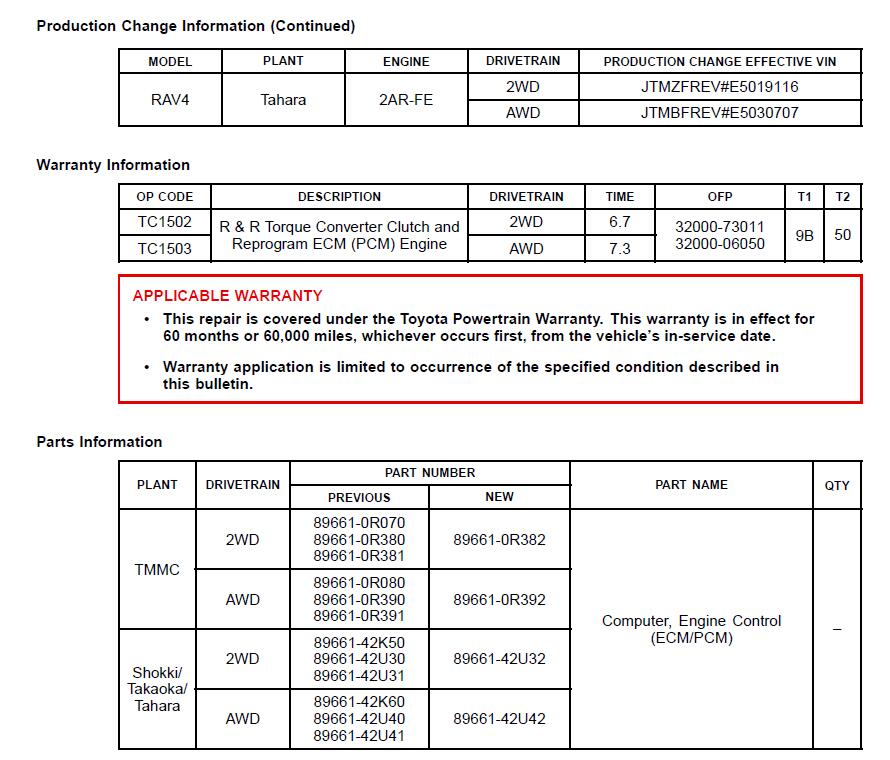
Some 2013 – 2015 model year RAV4 vehicles may exhibit a brief shudder intermittently while driving under light loads between approximately 25 and 50 mph. The torque converter and Engine Control Module/ECM (SAE term: Powertrain Control Module/PCM) logic have been modified to reduce the possibility of this condition from occurring. Follow the Repair Procedure below to address this condition.More repair Toyota case,please check it here:Toyota Trouble Repair
Repair Procedure
1.With the vehicle at operating temperature, confirm the condition described in the Introduction.
Is there a brief shudder intermittently present while driving under a light load between
25 – 50 mph?
NOTE
The condition will be most noticeable prior to an upshift.
* YES — Continue to step 2.
* NO—This bulletin does NOT apply. Continue diagnosis using the applicable Repair Manual.
NOTICE
Be sure to follow the procedure below in the order provided to prevent contamination of previously cleaned parts.
2.Drain the ATF from the transaxle by removing the drain plug.
Refer to the Technical Information System (TIS), applicable model and model year
Repair Manual:
* 2013 – 2015 RAV4:
Drivetrain – Automatic Transmission/Transaxle – "U760E / U760F Automatic
Transmission/Transaxle: Automatic Transaxle Fluid: Replacementâ€
* Remove and replace the torque converter.
Refer to TIS, applicable model and model year Repair Manual:
* 2013 – 2015 RAV4:
Drivetrain – Automatic Transmission/Transaxle – "U760E / U760F Automatic
Transmission/Transaxle: Automatic Transaxle Assembly: Removalâ€
* With the transaxle installed in the vehicle, remove the transaxle oil pan.
Refer to TIS, applicable model and model year Repair Manual:
* 2013 – 2015 RAV4:
Drivetrain – Automatic Transmission/Transaxle – "U760E / U760F Automatic
Transmission/Transaxle: Valve Body Assembly: Removalâ€
* Remove and discard the two oil pan magnets and clean the inside of the oil pan by wiping it off with a clean cloth ONLY.
NOTICE
Do NOT use ANY chemical cleaners to clean the inside of the oil pan.
6.Install four NEW magnets as shown.
6
7.Reinstall the oil pan using a NEW oil pan gasket.
Refer to TIS, applicable model and model year Repair Manual:
* 2013 – 2015 RAV4:
Drivetrain – Automatic Transmission/Transaxle – "U760E / U760F Automatic
Transmission/Transaxle: Valve Body Assembly: Installationâ€
8.Reinstall the drain plug using a NEW drain plug gasket and refill the transaxle with ATF.
Refer to TIS, applicable model and model year Repair Manual:
* 2013 – 2015 RAV4:
Drivetrain – Automatic Transmission/Transaxle – "U760E / U760F Automatic
Transmission/Transaxle: Automatic Transaxle Fluid: Replacementâ€
9.Check for the Authorized Modifications Label affixed to the vehicle in the locatio shown below. Confirm if the ECM (PCM) calibration has been updated.
Is the calibration ID listed the latest ECM (PCM) calibration?
* YES — Go to step 12.
* NO — Continue to step 10.
7
10.Flash reprogram the ECM (PCM).
NOTE
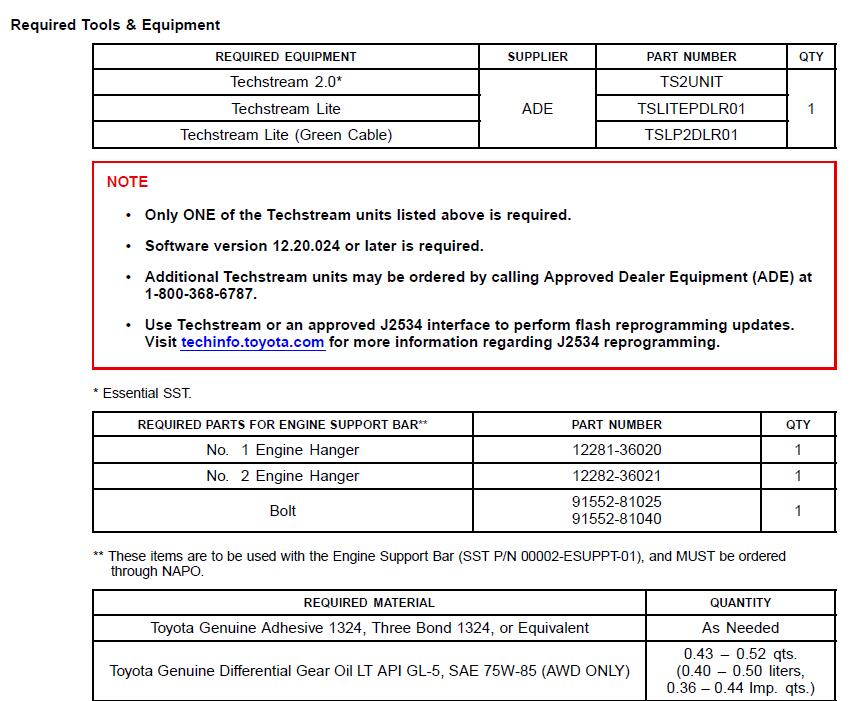
* The GR8 Battery Diagnostic Station MUST be used in Power Supply Mode to maintain battery voltage at 13.5V while flash reprogramming the vehicle.
* For details on how to use the GR8 Battery Diagnostic Station, refer to the
"GR8 Instruction Manual†located on TIS,
Diagnostics – Tools & Equipment – Battery Diagnostics.
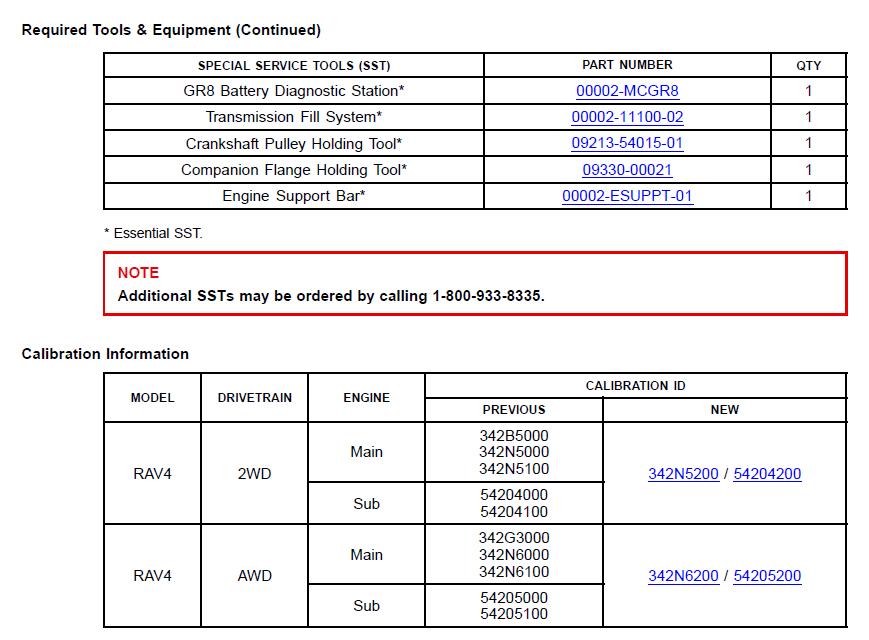
Follow the procedures outlined in Service Bulletin No. T-SB-0012-13, "Techstream ECU Flash
Reprogramming Procedure,†and flash the ECM (PCM) with the NEW calibration file update.
11.Install the Authorized Modifications Label.
Using a permanent marker, enter the following information on the label:
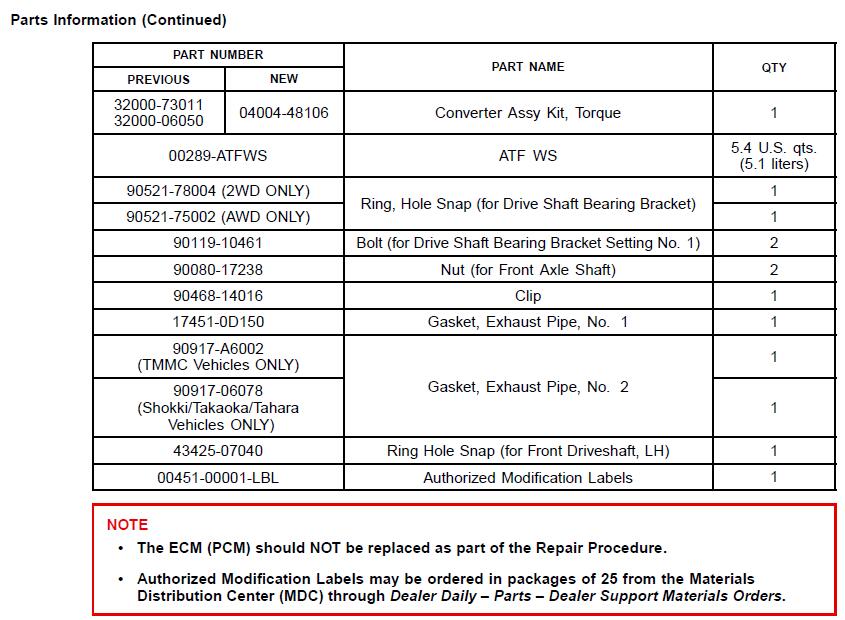
* ECM part number [Refer to the Parts Information section for the NEW PART NUMBER]
* Calibration ID(s) [Refer to the Calibration Information section for the NEWCALIBRATION ID]
* Dealer Code
* Repair Date
* Change Authority [This bulletin number]
B.Affix the Authorized Modifications Label to the vehicle at the location shown in Figure 2.
The Authorized Modifications Label is available through the MDC, P/N 00451-00001-LBL.
12.Perform the Techstream ECT Reset Memory Utility and test drive the vehicle to confirm the repair.
Posted by: obd2tool at
10:29 AM
| No Comments
| Add Comment
Post contains 621 words, total size 6 kb.
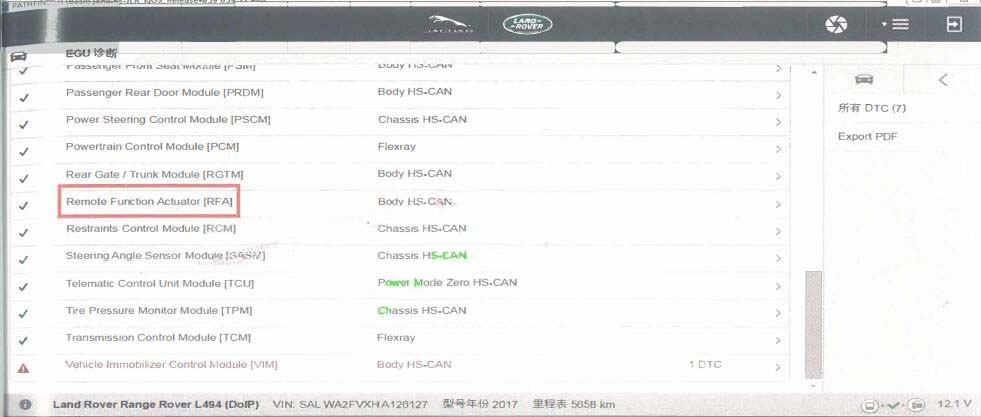
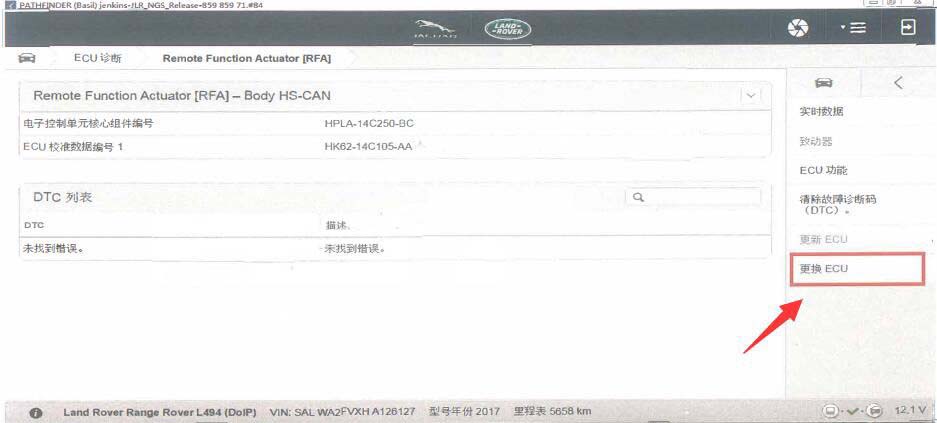
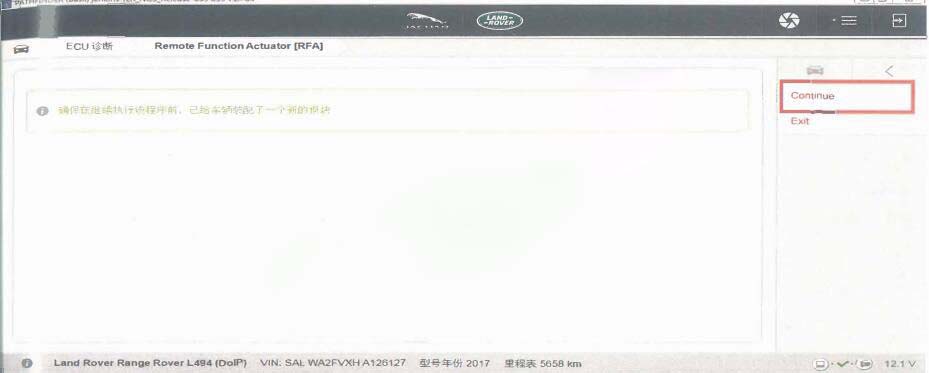
This instruction show you guide on how to use JLR PATHFINDER to code for Land Rover Range Rover L494 2017 keyless access retrofit.

Preparations:
JLR Pathfinder Free Download and Installation
How to Install Jaguar & Land Rover JLR Pathfinder on Win7 and Win 10
How to Register New JLR of Pathfinder Software
Procedures:
Connect JLR VCI DoIP to Range Rover L494,and run JLR PATHFINDER
After vehicle identification,click "ECU Diagnosticsâ€
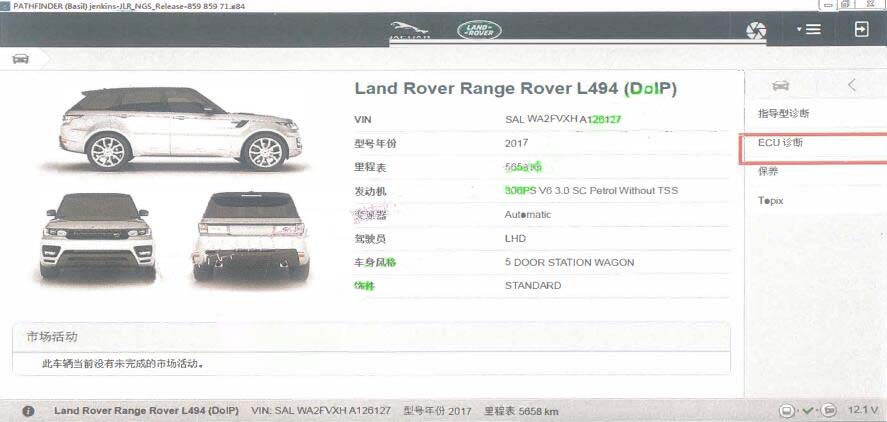
Select "Remote Function Actuator (RFA)â€
Click "ECU Replacementâ€
Follow the PATHFINDER prompt message to finish keys programming,after programming it will work.
Note:Keyless module recommend use new module,if used keyless module applied,please flash a new data for the used keyless module.
Posted by: obd2tool at
10:23 AM
| No Comments
| Add Comment
Post contains 119 words, total size 2 kb.
November 29, 2020
Customer problem: When I install ODIS V5.1.6 software by my VAS6154 diagnostic interface. An error pops up with the words "Framework start failed with "13†in the offboard Diag Launcher process. There is not file to select in the local directory.
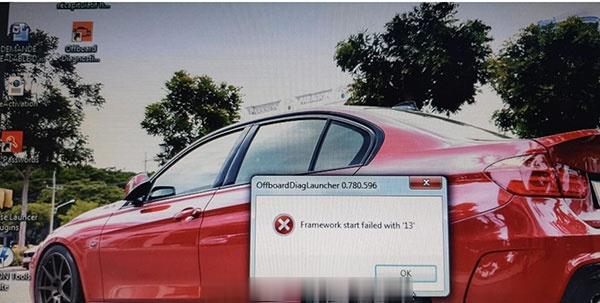
Solution offered byOBD2TOOL engineer:
You need to install a virtual optical drive, map the more 30 unzipped files into a CD.
And in the URL option, click "Select local directory†to select the corresponding drive.
Posted by: obd2tool at
09:37 AM
| No Comments
| Add Comment
Post contains 88 words, total size 1 kb.
In the Cayenne 958 Service Manual there is a procedure to check the engine oil level with the Piwis Tester. This is more accurate than the normal procedure with the instrument cluster screen and on top of that, it tells you how much oil you have to top to be at max level.
Here is the procedure:
WM 170101 CHECKING ENGINE-OIL LEVEL USING THE PIWIS TESTER (CAYENNE,
CAYENNE GTS, CAYENNE S HYBRID, CAYENNE S E, CAYENNE TURBO, CAYENNE
(3.0)) > CHECKING ENGINE-OIL LEVEL
Information
ThePiwis Tester II 9818 instructions take precedence and in the event of a discrepancy these are the
instructions that must be followed. Deviations may occur with later software versions.
1. PIWIS Tester II 9818 must be connected and ignition switched on.
2. Start the diagnostic program and select the required vehicle.
3. Select the DME control unit in the control unit overview. Press [F12] to continue.
4. Select the Maintenance/repairs menu. Press [F12] to continue.
5. Select the Oil filling function. Press [F12] to continue.
6. Start the engine and let it run until an engine oil temperature of
90° C is reached.Rev the engine if necessary to heat the engine oil to
the specified temperature.
7.The oil level measurement process starts automatically as soon as the engine oil temperature
of 90° C is reached.
8. Switch off engine.
9. Add the quantity of oil displayed on the PIWIS Tester II 9818 .
10. Disconnect the PIWIS Tester.
In the Cayenne 958 Service Manual there is a procedure to check the engine oil level with the Piwis Tester.
This is more accurate than the normal procedure with the instrument
cluster screen and on top of that, it tells you how much oil you have to
top to be at max level.
Here is the procedure:
WM 170101 CHECKING ENGINE-OIL LEVEL USING THE PIWIS TESTER (CAYENNE,
CAYENNE GTS, CAYENNE S HYBRID, CAYENNE S E, CAYENNE TURBO, CAYENNE
(3.0)) > CHECKING ENGINE-OIL LEVEL
Information
The Piwis Tester II 9818 instructions take precedence and in the event of a discrepancy these are the
instructions that must be followed. Deviations may occur with later software versions.
1. PIWIS Tester II 9818 must be connected and ignition switched on.
2. Start the diagnostic program and select the required vehicle.
3. Select the DME control unit in the control unit overview. Press [F12] to continue.
4. Select the Maintenance/repairs menu. Press [F12] to continue.
5. Select the Oil filling function. Press [F12] to continue.
6.
Start the engine and let it run until an engine oil temperature of 90° C
is reached.Rev the engine if necessary to heat the engine oil to the
specified temperature.
7.The oil level measurement process starts automatically as soon as the engine oil temperature
of 90° C is reached.
8. Switch off engine.
9. Add the quantity of oil displayed on the PIWIS Tester II 9818 .
10. Disconnect the PIWIS Tester.
Posted by: obd2tool at
09:26 AM
| No Comments
| Add Comment
Post contains 493 words, total size 4 kb.
November 18, 2020
Confirmed that Digimaster III can correct odometer for a 2010 Lincoln MKZ.
Procedure:
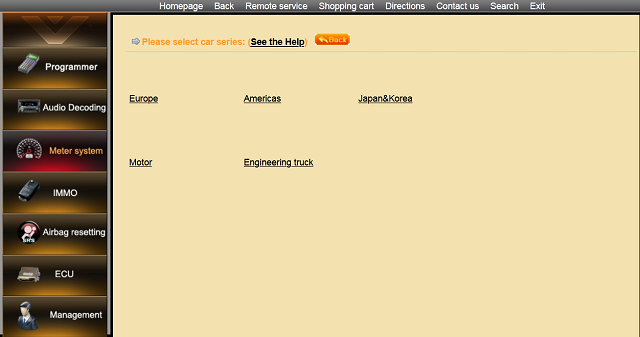
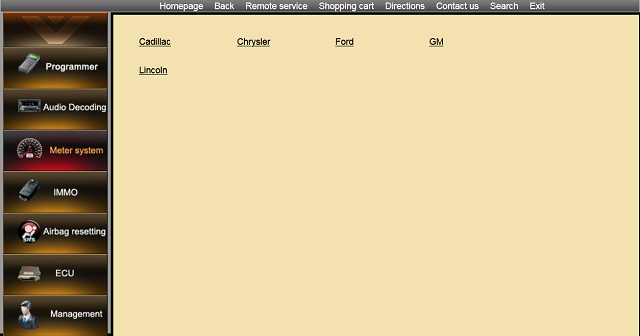
Select "Meter systemâ€, then "Americasâ€.
Select "Lincolnâ€.
Select "MKTâ€.

Select "93C86â€.

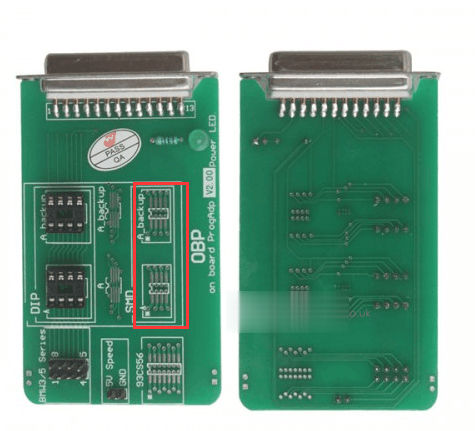
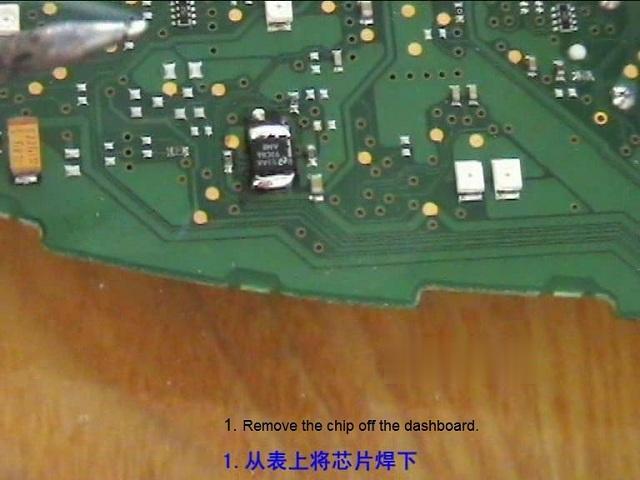
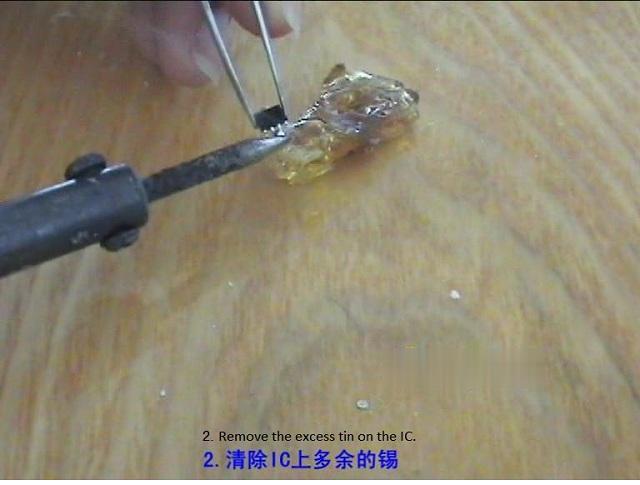
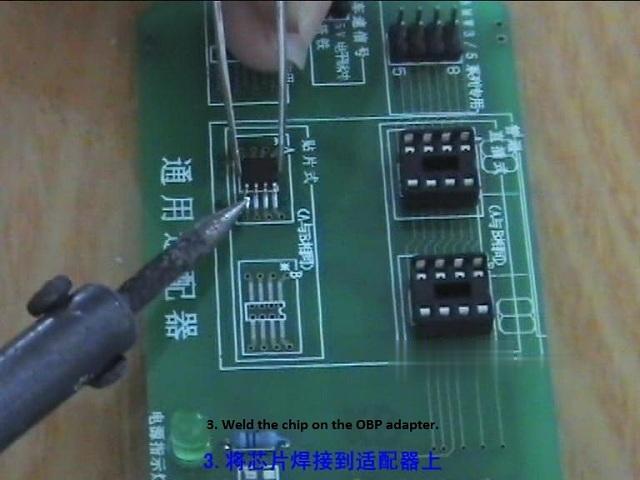
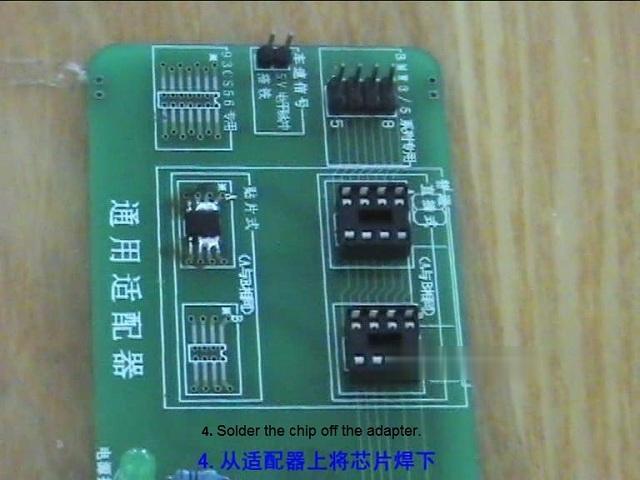
Remove the 93C86 chip from the dashboard, then weld it on the OBP adapter, connect the OBP adapter to the D3 main unit, read the original mileage value, write a new value.
Please follow the next steps to weld the IC.
This is OBP adapter.
Remove the chip off the dashboard.
Remove the excess tin on the IC.
Weld the chip on the OBP adapter packed in the Digimaster 3.
Solder the chip off the adapter.
Solder the chip back onto the adapter.
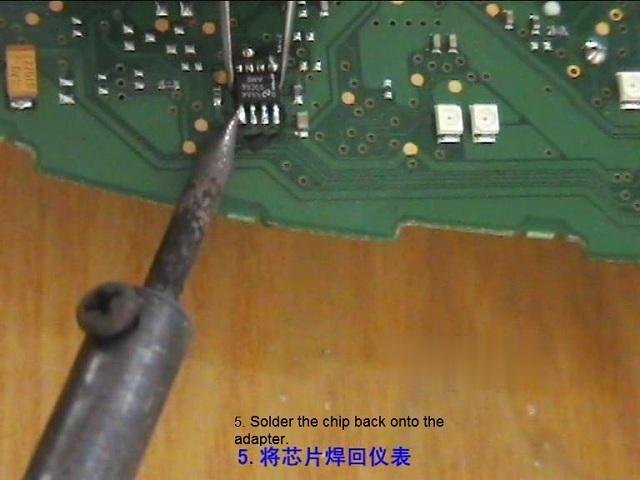
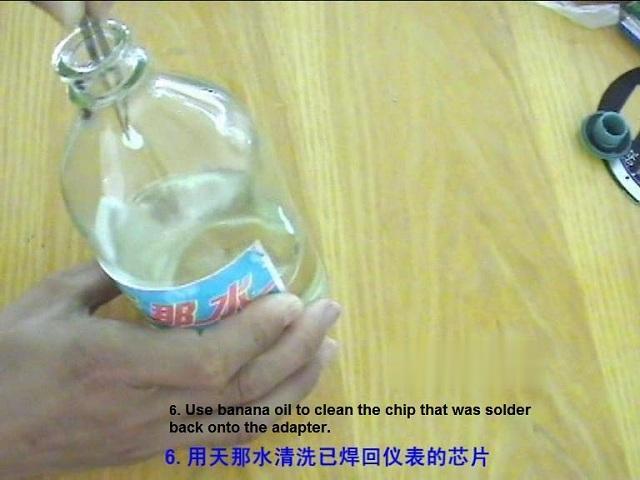
Use banana oil to clean the chip that was solder back onto the adapter.

Enjoy!
Posted by: obd2tool at
10:45 AM
| No Comments
| Add Comment
Post contains 131 words, total size 5 kb.
Yanhua Digimaster3 is able to adjust Nissan pathfinder mileage, here is the operate guide for you
Look at the images of Nissan pathfinder option:
Select "Meter system†then "Japan & Koreaâ€.

Select "Nissanâ€.
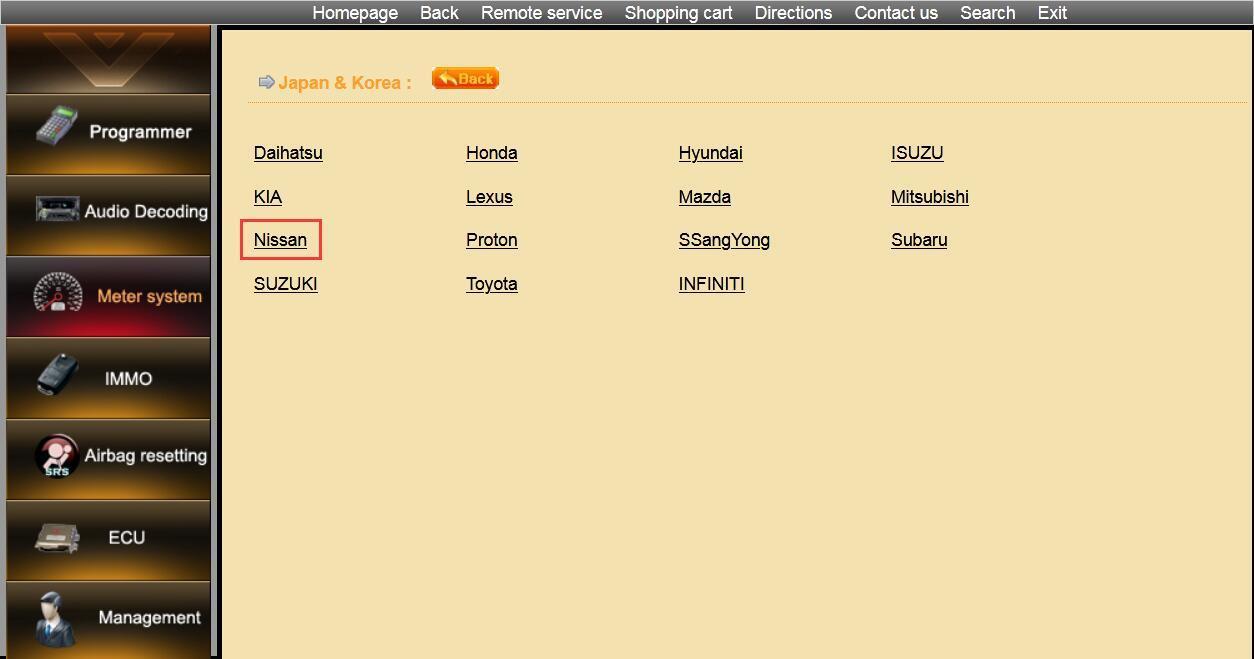
Select "Pathfinderâ€.

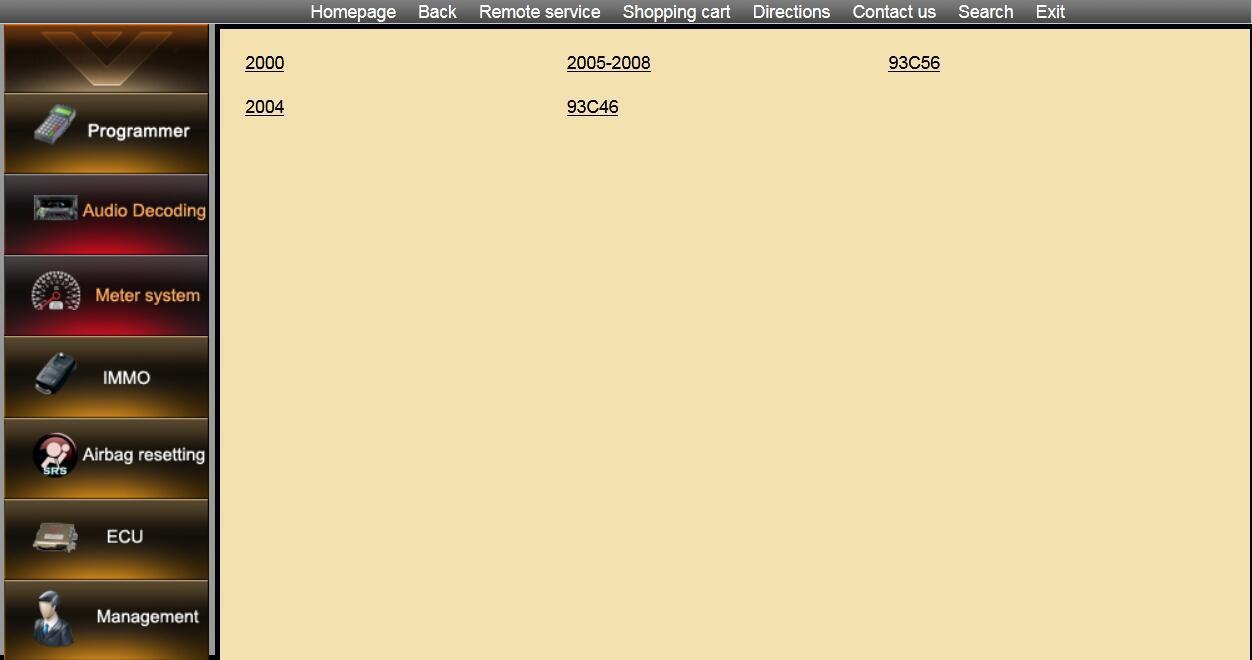
Have option: 2000, 2005-2008, 93C56, 2004, 93C46 etc.
Please firstly find out your dashboard chip type and the enter the above selection relatively.
For how to do next, Digimaster 3 machine will display the instruction.
Enjoy!
Posted by: obd2tool at
10:12 AM
| No Comments
| Add Comment
Post contains 78 words, total size 2 kb.
October 15, 2020
Tutorial: How to add a new smart key with Autel IM608 and XP400 on BMW 320i 2013
What will you learn?
1.Equipment you will need to execute this procedure
2.Defining what FEM/BDC means and identifying their differences
3.Review the location and components inside the FEM/BDC module
4.Precautions before attempting to add a key with IM608
5.Step-by-step procedures on how to add a key with IM608
What you need?
Autel MaxiIM IM608 auto key programmer
XP400 key programmer
BMW FEM/BDC test platform
One original BMW smart key
One new/blank smart key

What you should know?
-This is an advanced level procedure.
-Only F chassis are supported
-Check first to see if any keys have been added before via OBD
-Need to remove FEM (front Electronic module) /BDC (Body Domain Controller) module from vehicle
-Before we attempt to add a key, we need to "Jailbreak†the FEM or BDC only one time. After that you can add additional key by OBD.
-We will be using the "Smart mode†function that is a sequence of step by step guided instructions
-Adding the key can be done via Bench or OBD
Before we take out the module, disconnect the negative battery terminal that’s all you need to do. Not the positive, the negative battery terminal.
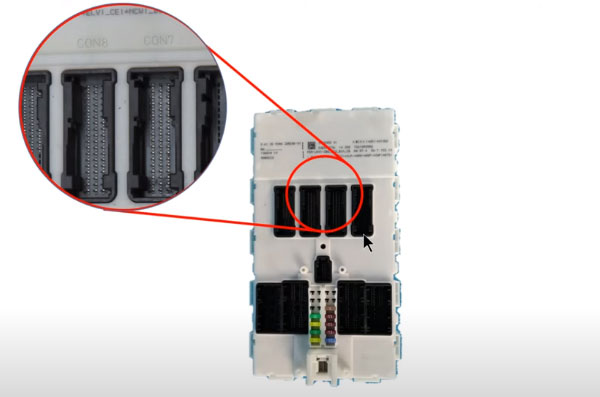
After that, you can see where the FDM is located on the right passenger side.
Pay attention to the location marked, that’s kind of embedded onto the cover, we’re going to need this later on we need to know it says connection seven connection eight, we’re gonna need to know this later to complete the connections with the test programmer.
Take a picture of the fuses, because once we take off everything we have to put it all back together and we have this we know exactly where to put it back
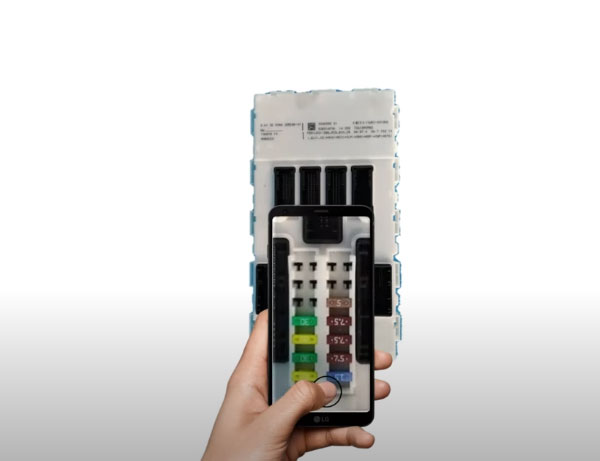
If it’s a FEM system, the chip will be labeled M95128
If it’s a BDC system, it’s going to be M95256
You can see the chip number using a varnish removal ointment with a fiberglass pin to clean it off, so you can get a good secure read.
Step-by-step guide to add a key with MaxiIM IM608:
Step 1: Connect all the devices according to the following wiring diagram
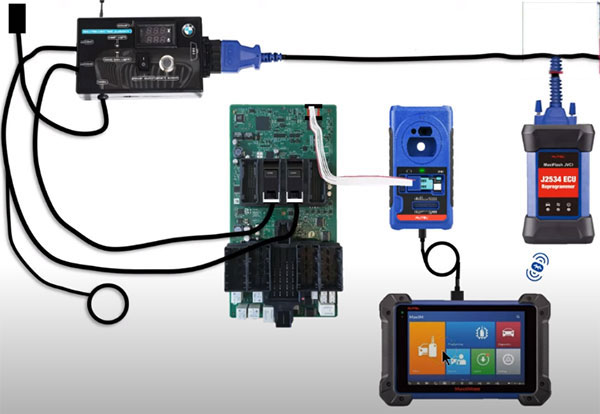
Note: Don’t connect Autel XP400 to the vehicle directly, otherwise it will cause the device to burn out. If damaged, you need to send it back to fix and pay for the fix cost.
Step 2: Enter IMMO function
Accept the disclaimer
Select [BMW]-> [Smart mode]
It will automatically scan the immobilizer system, engine system, transmission system.
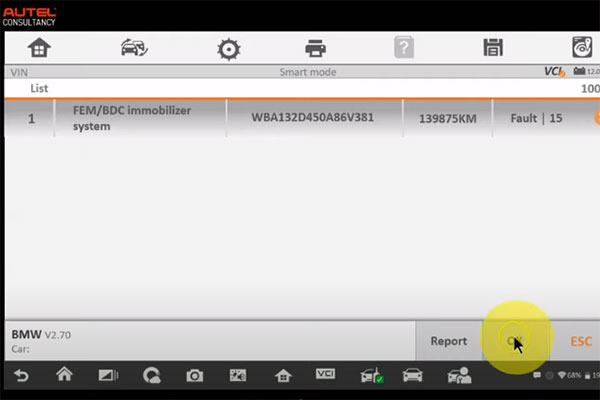
Step 3: Select [Key learning]
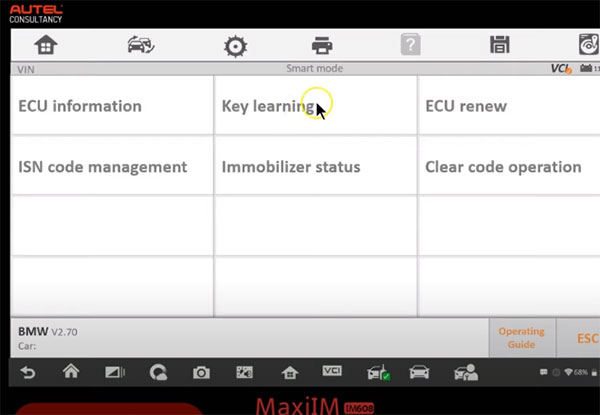
Note: This process requires networking to obtain data, please setup the network to ensure that it is connected to WiFi and keep this state during the whole process.
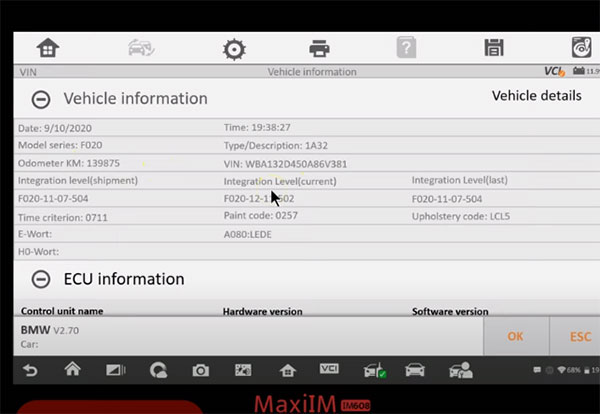
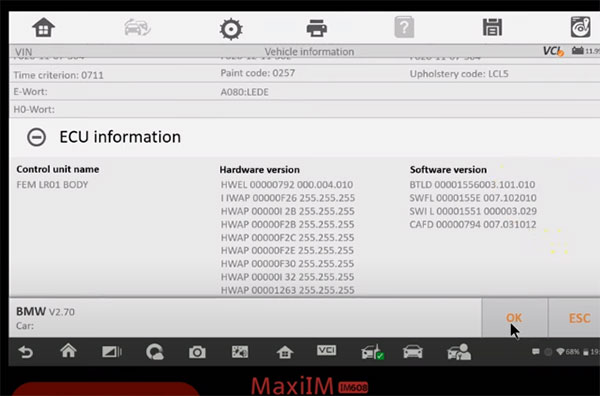
Detect vehicle and ECU info successfully
Step 4: It will backup coding files automatically.
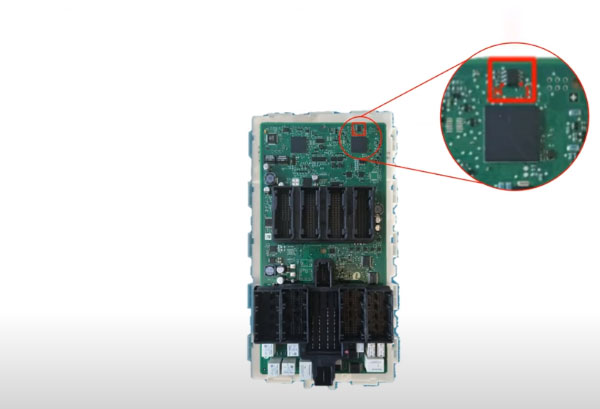
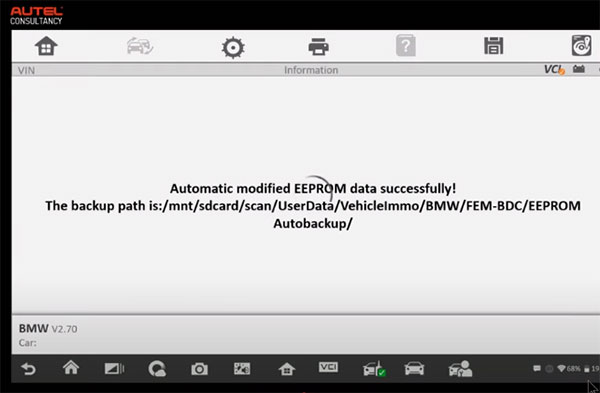
Step 5: Then going to modify EEPROM data automatically! Please pay attention the following prompts.
-Please disassemble the EEPROM chip and connect the programmer
-The FEM module is chip M95128 and the BDC module is M96256.
-If you operate the EEPROM with clamp, you should turn off the +12V power first.
Press "Diagram†to check EEPROM diagram or press "OK†to continue

Step 6: It will backup EEPROM data and write the modified EEPROM data automatically
Write EEPROM data successfully
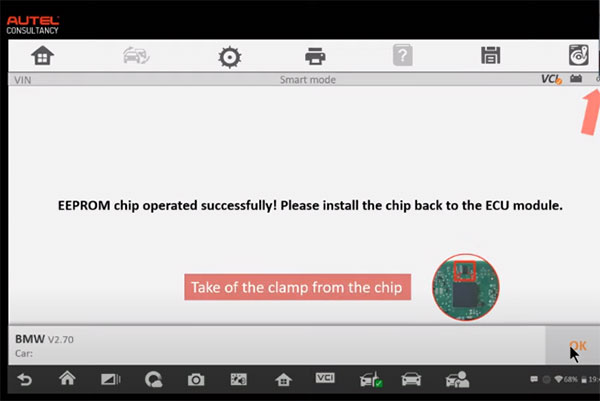
Step 7: EEPRM chip operated successfully, then you can install the chip back to the ECU module
-Take off the clamp from the chip
-Turn the power on
Step 8: Start to program the key, please make sure the supply voltage exceeds 13V and is stable.
-Make sure the vehicle power is OK.
-Make sure the OBD diagnostic cable is correctly connected.
-Make sure the power icon on the top right corner of the diagnostic tool correctly displays the voltage.
Downloading file…
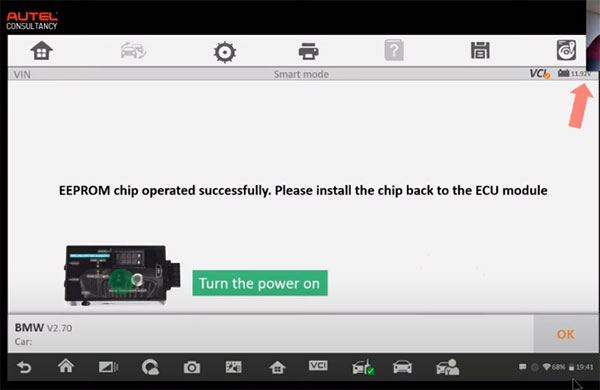
Step 9: Then restore EEPROM data automatically
-Put the clamp on the chip
Restore the EEPROM successfully
-Install the chip back to the ECU module
-Turn the power on
Step 10: Restore coding file
Step 11: Learn key
-Before the key can be written and cleared, the password must be read out and the corresponding key position must be selected firstly
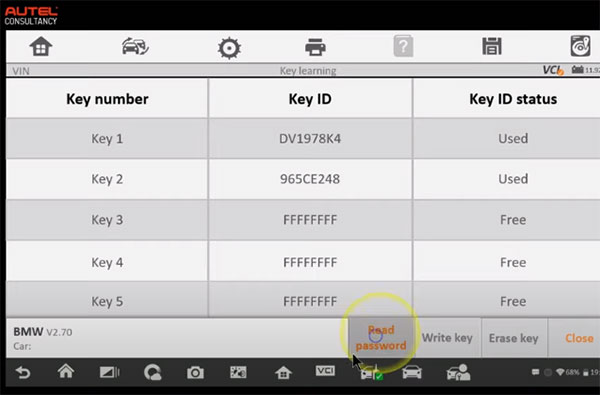
Put the working key to start coil as close as possible
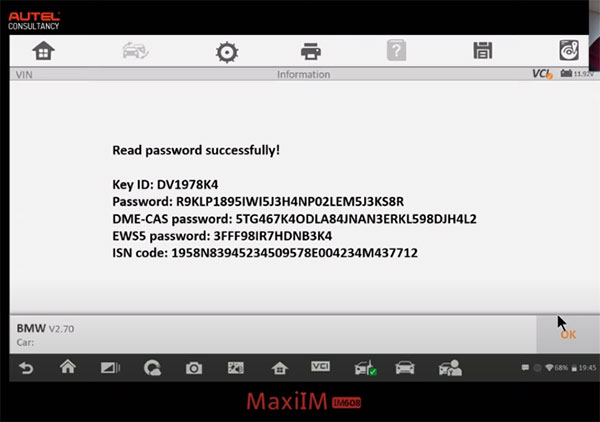
Read password successfully
Step 12: Back to key learning to select [Write key]
-Put the new key close to start coil. Key frequency 315Mhz
There are four steps to learn key:
-Authenticate key info
-Write data into key
-Reset ECU
-Verify key info
Write the key successfully
Finally, put the new key close to start induction coil, press and hold the ignition for 10s.
After the learning is completed, the key can be normally used.
Fyi…
Autel IM608 Pro is the upgrade version of Autel IM608. It comes with the same Touchscreen Android tablet and works with XP400 Pro and supports more functions and car models.
Posted by: obd2tool at
08:15 AM
| No Comments
| Add Comment
Post contains 819 words, total size 11 kb.
Here offer the newest Autel IM508/IM608 VAG IMMO function list.
Something important to know!
1.For VW IMMO IV:
Go to Volkswagen–>Advanced Mode–>IMMO 4 Instrument CAN pay per use, 10 dollars for key adding and all key lost by OBD.
As long as it is VAG IMMO IV, no matter what year and model of the vehicle are. (Note: except for illegal vehicle data)
2.IMMO IV+MQB key support key adding and all key lost. (support the latest PASSAT, Jetta, support latest Passat, Beetle after year 2017, Multivan, Tiguan, Sharan key adding and all key lost by OBD)(Note: Except for illegal vehicle data)
3."MQB Instrument for VW and Audi†support all Continental VDO, Johnson JCI instrument, full liquid crystal MQB instrument;MQB instrument all key lost (latest model with 49 or 5C key chip type is not supported.) Skoda supports all Continental VDO and full liquid crystal MQB instrument,Doesn’t support Johnson control instrument(JCI). Adding key for free, all key lost is not supported.
4."Fail to enter the service mode or fail to read IMMO data†normally this problem can be solved by going to "advanced modeâ€. If it can’t be solved, please contact the technical support.
| VAG Function lists (IMMO III, IMMO IV,IMMO IV+MQB key, IMMO V) | |||||
| Models | Instrument type | add key | all key lost | replace component | Remark |
| Lavida | VDO CDC32xx+24C32before 2013 IMMO III and half | read engine by OBD | Need engine to support this function, manually input cs code. | supported | Instrument type:VDO CDC32xx+24C32. If cannot read instrument, select expert mode—>CAN instrument—>auto detection—> read engine IMMO data—>search for 7th byte |
| 2013-2014IMMO IV | read instrument by OBD | dump mode with instrument/modify the vehicle IMMO data by OBD | engine/instrument | 1.After 2015 VDO NEC+24C64 2014 instrument can be done with smart mode, expert mode and manual selection.2.Go to "advanced modeâ€â€“>â€IMMO 4 Instrument CAN†to perform key adding and all key lost by OBD. | |
| Lavida/Gran Lavida/Lang | year after 2015;IMMO 4 Instrument CAN | read instrument by OBD | (advanced mode pay-per-use)read instrument by OBD | engine/instrument | 1.After 2015 VDO NEC+24C64 2014 instrument can be done with smart mode, expert mode and manual selection. |
| Jetta | 1999~2006IMMO III | unsupported(remove immobilizer box) | unsupported(remove immobilizer box) | unsupported | |
| 2006~2010IMMO III | read instrument by OBD/engine | Same as key adding | engine/instrument | ||
| 2010~2013IMMO III and half | supported(need to get PIN code from dealer) | supported(need to get PIN code from dealer) | supported | Jumper wire connects engine to get IMMMO data.(direct method) | |
| 2013~2014 IMMO IV Instrument | read instrument by OBD | OBD modify the vehicle IMMO data by OBD | engine/instrument | ||
| year after 2013 IMMO IV Instrument CAN | read instrument by OBD | Go to "advanced modeâ€â€“>â€IMMO 4 Instrument CAN†to perform key adding and all key lost by OBD. | unsupported | ||
| SAGITAR | Before 2010 IMMO III and half | read instrument by OBD | read instrument by OBD | supported | Instrument type:VDO CDC32xx+24C32 if can not read instrument,select expert mode—>CAN instrument—>auto detection—> read engine IMMO data—>search for 7th byte |
| 2011~2014 IMMO IV | read instrument by OBD | dump mode with instrument/modify the vehicle IMMO data by OBD | engine/instrument | ||
| After 2015 IMMO 4 Instrument CAN | read instrument by OBD | Go to "advanced modeâ€â€“>â€IMMO 4 Instrument CAN†to perform all key lost by OBD. | unsupported | ||
| Santana 2000/3000 | Before 2009 IMMO III | 1.read immobilizerby OBD2.read engine by OBD(need engine to support this function) | Same as key adding | engine/instrument | |
| Santana | After 2009 IMMO III and half | 1.read immobilizer/engine(need immobilizer &engine to support this function)2.remove immobilizer (dump mode) | same as key adding | supported | |
| 2013~2014 IMMO IV | read instrument by OBD | Go to "advanced modeâ€â€“>â€IMMO 4 Instrument CAN†to perform key adding and all key lost by OBD or dump mode. | engine/instrument | ||
| After 2015 IMMO IV | read instrument by OBD | Go to "advanced modeâ€â€“>â€IMMO 4 Instrument CAN†to perform key adding and all key lost by OBD. | engine/instrument | ||
| Golf 4 | Before 2009 IMMO III | read instrument by OBD/engine | Same as key adding | engine/instrument | |
| Golf 6 | 2009~2013 IMMO IV | read instrument by OBD | Same as key adding | engine/instrument | 1.After 2015 VDO NEC+24C64 2014 instrument can be done with smart mode, expert mode and manual selection.2.Go to "advanced modeâ€â€“>â€IMMO 4 Instrument CAN†to perform key adding and all key lost by OBD. |
| POLO | Before 2011 IMMO III | 1.read immobilizerby OBD2.read engine by OBD | Same as key adding | supported | |
| 2011~2014 IMMO IV | read instrument by OBD | Go to "advanced modeâ€â€“>â€IMMO 4 Instrument CAN†to perform key adding and all key lost by OBD/dumpe mode with instrument | engine/instrument | ||
| After 2015 IMMO IV | read instrument by OBD | go to "advanced modeâ€â€“>â€IMMO 4 Instrument CAN†to perform key adding and all key lost by OBD. | unsupported | ||
| Passat | Before 2012 IMMO III | 1.read immobilizer by OBD2.read engine by OBD | Same as key adding | supported | |
| 2012~2015 IMMO IV | read instrument by OBD | dump mode with instrument/modify the vehicle IMMO data by OBD | engine/instrument | ||
| Bora | before 2008 IMMO III | 1.read immobilizerby OBD2.read engine by OBD | Same as key adding | supported | |
| 2009~2014 IMMO IV | read instrument by OBD | dump mode with instrument/Go to "advanced modeâ€â€“>â€IMMO 4 Instrument CAN†to perform key adding and all key lost by OBD. | engine/instrument | ||
| After 2015 IMMO IV | read instrument by OBD | Go to "advanced modeâ€â€“>â€IMMO 4 Instrument CAN†to perform key adding and all key lost by OBD. | engine/instrument | . | |
| Passat B6/CC | 2006~2016 Comfort module | 1.read engine by OBD2.connect to the gateway | dump mode with comfort module https://www.youtube.com/watch?v=Kamu0RN-qGE | engine/comfort module | For 46 key chip, only 6bytes are needed, the 7th byte can be replaced by FF.For 48 key chip, the 7 bytes are needed. |
| Tiguan | 2010~2013 IMMO IV | read instrument by OBD | dump mode with instrument/modify the vehicle IMMO data by OBD | engine/instrument | 1.After 2015 VDO NEC+24C64 2014 instrument can be done with smart mode, expert mode and manual selection.2.Go to "advanced modeâ€â€“>â€IMMO 4 Instrument CAN†to perform key adding and all key lost by OBD. |
| After 2013 IMMO IV | read instrument by OBD | (advanced mode pay-per-use)read instrument by OBD | before 2014 support engine/instrument | 1.After 2015 VDO NEC+24C64 2014 instrument can be done with smart mode, expert mode and manual selection.2.Go to "advanced modeâ€â€“>â€IMMO 4 Instrument CAN†to perform key adding and all key lost by OBD. | |
| Touran | VDO CDC32xx+24C32 Before 2011 IMMO III and half | 1.read instrument by OBD2.read engine by OBD(need engine to support this function)+search for 7th byte | 1.read instrument by OBD2.modify the vehicle IMMO data by OBD(need engine to support this function)
3.dump mode with instrument |
supported | |
| 2012~2015 IMMO IV | read instrument by OBD | dump mode with instrument/modify the vehicle IMMO data by OBD | engine/instrument | 1.After 2015 VDO NEC+24C64 2014 instrument can be done with smart mode, expert mode and manual selection.2.Go to "advanced modeâ€â€“>â€IMMO 4 Instrument CAN†to perform key adding and all key lost by OBD. | |
| Touareg | 2003~2010 KESSY | 1.read engine by OBD(need engine to support this function)+search for 7th byte2.dump mode with KESSY | dump mode with KESSY | engine/KESSY(some are unsupported) | |
| 2011~2017 IMMO V | Read BCM2 by OBD | currently unsupported | currently unsupported | ||
| Phaeton | Before 2012 KESSY | 1.read engine by OBD(need engine to support this function)+search for 7th byte2.dump mode with KESSY(some are unsupported) | remove the chip of KESSY(some are unsupported) | engine/KESSY(some are unsupported) | |
| Sharan | 2001~2010 IMMO III | 1.read instrument by OBD2.read engine by OBD(need engine to support this function) | same as key adding | supported | |
| 2011~2015 IMMO IV | read instrument by OBD | dump mode with instrument/modify the vehicle IMMO data by OBD(need engine to support this function) | engine/instrument | 1.After 2015 VDO NEC+24C64 2014 instrument can be done with smart mode, expert mode and manual selection.2.Go to "advanced modeâ€â€“>â€IMMO 4 Instrument CAN†to perform key adding and all key lost by OBD. | |
| Caddy | 2005~2009 IMMO III and half | 1.read instrument by OBD2.read engine by OBD(need engine to support this function)+search for 7th byte | 1.same as key adding2.dump mode with instrument
3.modify the vehicle IMMO data by OBD(need engine to support this function) |
supported | |
| Beetle | 2003~2011 IMMO III | read engine by OBD(some need to do with dump mode(Currently no supported)) | same as key adding | supported | |
| 2012~2015 IMMO IV | read instrument by OBD | Go to "advanced modeâ€â€“>â€IMMO 4 Instrument CAN†to perform key adding and all key lost by OBD. | engine/instrument | 1.After 2015 VDO NEC+24C64 2014 instrument can be done with smart mode, expert mode and manual selection.2.Go to "advanced modeâ€â€“>â€IMMO 4 Instrument CAN†to perform key adding and all key lost by OBD. | |
| Atlas | After 2016 IMMO V | Read BCM2 by OBD | After 2015, all key lost is unsupported | currently unsupported | |
| Multivan | 2014~2016 IMMO IV | read instrument by OBD | dump mode with instrument/modify the vehicle IMMO data by OBD | some are supported | 1.After 2015 VDO NEC+24C64 2014 instrument can be done with smart mode, expert mode and manual selection.2.Go to "advanced modeâ€â€“>â€IMMO 4 Instrument CAN†to perform key adding and all key lost by OBD. |
| after 2017 IMMO IV+MQB key | read instrument by OBD | Same as key adding | unsupported | Go to "advanced modeâ€â€“>â€IMMO 4+MQB Key†to perform key adding and all key lost by OBD. | |
| Sharan | after 2017 IMMO IV+MQB key | read instrument by OBD | Same as key adding | unsupported | Go to "advanced modeâ€â€“>â€IMMO 4+MQB Key†to perform key adding and all key lost by OBD. |
| Tiguan | after 2016 IMMO IV IMMO IV+MQB key | read instrument by OBD | Same as key adding | unsupported | Go to "advanced modeâ€â€“>â€IMMO 4 Instrument CAN†or "IMMO 4+ MQB Keyâ€to perform key adding and all key lost by OBD. |
| Passat | after 2016 IMMO IV IMMO IV+MQB key | read instrument by OBD | Same as key adding | unsupported | 1.After 2015 VDO NEC+24C64 2014 instrument, can be done with smart mode, expert mode and manual selection.2.Go to "advanced modeâ€â€“>â€IMMO 4 Instrument CAN†or "IMMO 4+ MQB Keyâ€to perform key adding and all key lost by OBD. |
| Beetle | After 2015 IMMO IV IMMO IV+MQB key | read instrument by OBD | Same as key adding | unsupported | 1.After 2015 VDO NEC+24C64 2014 instrument can be done with smart mode, expert mode and manual selection.2.go to advanced mode–>â€IMMO 4 Instrument CAN†or "IMMO 4+MQB key†to perform key adding and all key lost by OBD. |
Posted by: obd2tool at
07:53 AM
| No Comments
| Add Comment
Post contains 1644 words, total size 20 kb.
October 07, 2020
Electronic Data Link(EDL) is the dealer diagnostic PC-to-vehicle interface compatible with Service ADVISOR software. With Service ADVISOR you can view service manuals, use DTAC (Technical Assistance Center) data, make diagnostics, readings, tests and calibrations, re-program controllers
Topic 1: John deere SA possible with NEXIQ USB Link?
It is possible to install John Deere Service Advisor on your laptop, though the installation is really complicated. If you have a Lenovo Thinkpad laptop, the easiest way is to restore the main partition from the image of my computers’ c: drive. And every time i change my laptop, i just restore it.
Win7 installed and fully updated. It takes hours.
The image will not work on xp, but SA works fine. My suggestion, buy used Lenovo T400 or T500. it’s more or less 250eur in europe. Install windows 7 and then can put my image. Takes 10 minutes and u have SA working.
Topic 2: How to get Nexiq usb link china worked?
I spent a month doing research on this and i managed my Chinese XTruck
USB Link to work 90%. The thing is that Nexiq has only 2 channels while
EDL has 3. The 3rd one is Powertrain and it is used very seldom. E.g. I
reprogrammed all the controllers on 6690 premium except two, but found a
way around it opening the pld file with pldeditor and changing
Powertrain channel to Vehicle (channel 1). Lots of machines don’t even
have a 3rd Powetrain channel. Like all 5R; 6115R, 6125R, 7280R….. From
my experience only the older machines have it and still can be
programmed most of the time. Programming controllers is easy, but
diagnostics is a bit annoying. Every time you establish the connection u
have to remove the usb plug and plug it again for the readings to
appear. Connection establishment is taking a long long time and you
never see the ECU. Only all the other controllers. So all the time
something doesn’t work. If you are prepared for this here is what you
have to do:

I switched places channel 1 with channel 2 (see the pic) with my Chinese version and now it works fine, probably it was possible to do it adjusting the software settings as mentioned above, but i tried a lot, and nothing helped. Now i can connect, tried with 6125R and 5070M. Works fine!!! Except one very important thingy. After i establish the connection, all the reading give the same meaningless number. Then, I discovered accidentally, I pull out the USB cable, get the message "Connection interrupted†I put it back in, get the message "Connection resumed†and wuolla, all the readings show up immediately.
b) You don’t have to change the firmware. Both will work pretty much the same but with different issues.
P.S. For diagnostics only, there is a subprogram of SA that works
without any cable rewiring, it doesn’t have a Program Controller option,
and you still need to reinsert the usb after connection has been
established. You just need to select the right port (which is usually
1939ImplementAutoboud or 1939AppAutoboud depending on the machine) and
model. If you have SA, you will find the software at c:\Program
Files\Service ADVISOR\xvds\XJDET.exe
Just to let you know, after a year working like that, i bought anotherHeavy Duty Truck Scanner Tool EDL (recommended by a folk in the forum, much much much more than the old one)
Posted by: obd2tool at
04:11 AM
| No Comments
| Add Comment
Post contains 577 words, total size 4 kb.
The EDL3 Explorer utility opened automatically when you installed the John Deere Service Advisor EDL V3 drivers and utilities To re-open the EDL3 Explorer once it has been closed, click on the Show Hidden
Icons arrow in your PC’s System Tray.
Then, double-click on the EDL3 icon 7 .
NOTE:You can also access theHeavy Duty Truck Scanner EDL3 Explorer from your PC’s Start menu. Click Start and then select All ProgramsDeere EDL3 EDL3 Explorer.
The EDL3 Explorer opens.
The following menu options are provided:
• File
• Tools
• Help
Each menu option includes a number of features. Each of the menu options
are discussed in the following sub-sections. When you click on a EDL3
in the list in the left pane, the Configuration tab is
The Configuration Tab
The Configuration tab provides the following information:
• Device:
—Name
— MAC Address
• Wireless Settings
• Internet Protocol (TCP/IP) Settings
This information can be useful when troubleshooting network connection
problems. You also use the Configuration tab when switching between the
two wireless Connection Types (i.e., Wireless and Bluetooth), or when
setting up a Wi-Fi connection in Infrastructure Mode.
To access the Configuration tab:
(1)Click on an EDL3_xxxxxx in the list in the left pane of the Explorer.
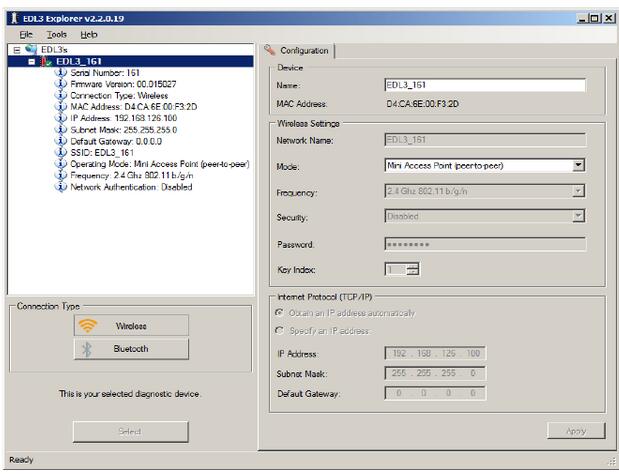
Switching Modes: Mini Access Point and Infrastructure
From the EDL3 Explorer Configuration tab, you can use the Mode drop-down
menu under Wireless Settings to switch between Mini Access Point and
Infrastructure modes.
NOTE:For a graphic depiction of a typical Infrastructure Mode setup, see

Settings: Mode Drop-down Menu
NOTE:You can also use the Reset Button to switch from Infrastructure
Mode back to Mini Access Point Mode (the Wi-Fi default). Just push and
hold the button until the wireless LED changes color from orange to
white (about 3 seconds).Once, you have selected Infrastructure from the
drop-down menu, additional fields in the Wireless Settings portion of
the screen are available.
The following Wireless Settings fields are available:
• Network Name
• Frequency (used to switch between 2.4 and 5 GHz)
• Security (WEP, WPA/WPA2)
• Password
• Key Index (only available with the WEP security selection)
NOTE:The settings for connecting to your company network may differ from
one installation to another. To ensure network security, your
Information Technology (IT) administrator will need to oversee the
installation and specify the appropriate configuration parameters.
The Internet Protocol (TCP/IP) portion of the screen is also available
to you to enter the required settings. There are two options:
• Obtain an IP address automatically (i.e., a dynamic IP address)
• Specify an IP address (i.e., a static IP address that does not change)
— IP Address
— Subnet Mask
— Default Gateway
NOTE:You will need to obtain this information (i.e., IP Address, Subnet
Mask) from the designated IT person or network administrator for your
location. Depending on how your local network is configured, you may
also need to enter Default Gateway information.
The File Menu
The File menu has one feature, Exit. You use the Exit feature to close the EDL3 Explorer.
To exit the EDL3 Explorer:
(1)Select File from the EDL3 Explorer menu bar.

(2)Select Exit.
The EDL3 Explorer closes.
The Tools Menu
The Tools menu provides the following features:
•Ping
•Options
Ping
The Ping feature uses the PING protocol to check for the presence of a device on the network.
To check for a device:
(1)Select Tools from the EDL3 Explorer menu bar.
(2)Select Ping.

(3)Enter the IP address of the device you want to locate (e.g., 192.168.123.107).
(4)Click Start.
The EDL3 Explorer searches for the device and, if found, displays the reply.
(5)Click Stop.
(6)Click the Close button on the dialog box.
Options
The Options feature provides the following features, which are presented as check boxes:
• Start EDL3 Explorer when Windows starts (pg. 50)
• Show New EDL3 Notification (pg. 51)
Start EDL3 Explorer when Windows Starts
You use this feature to manage when the EDL3 Explorer opens.
The default is to not open the EDL3 Explorer when Windows starts.
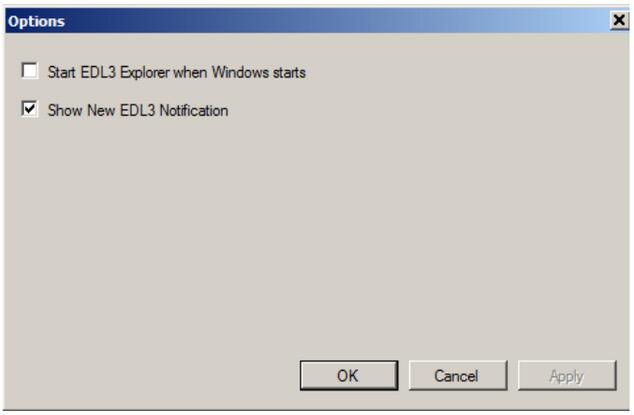
To change the default, click on the check box to add the check mark. Then click OK.
Show New EDL3 Notification
You use this feature to manage when to display the New INLINE7 notification message box.
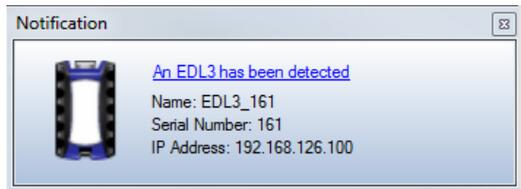
The default is to display the notification message box whenever a new EDL3 is detected.
To change the default, click the box to remove the check mark. Then click OK.
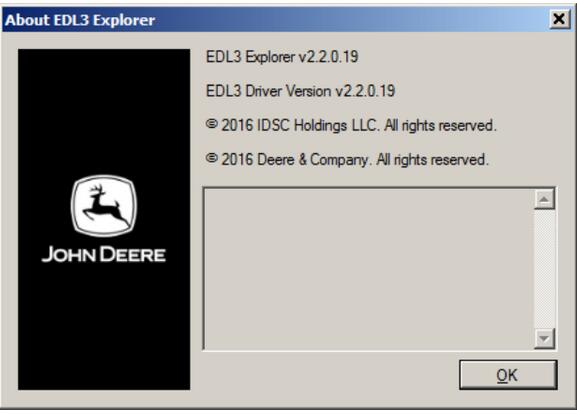
The Help Menu
The Help menu has one feature, About. You use the About feature to display information about the EDL3 Explorer.
To access the Help menu:
(1)Select Help from the EDL3 Explorer menu bar.
(2)Select About.
Posted by: obd2tool at
04:02 AM
| No Comments
| Add Comment
Post contains 772 words, total size 9 kb.
September 13, 2020
One month ago, i had a OBDSTAR X300M. it had been used for a long time, and cannot use effectively. So i wanted to buy a new one, but i found another obdstar mileage correction tool same as x300m, that’s Odo Master.Here share my experience with you.
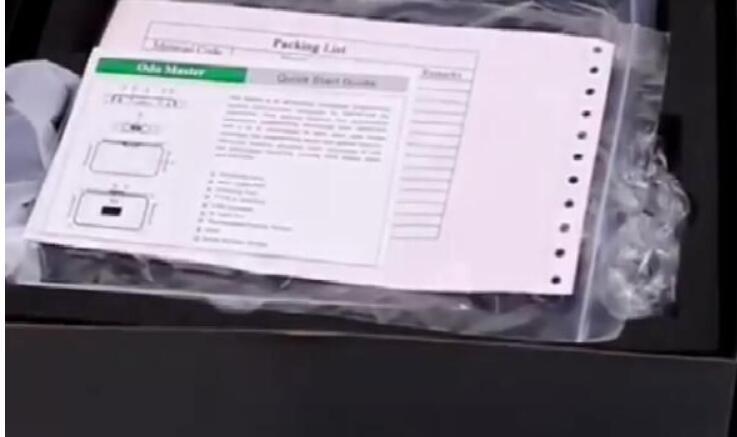
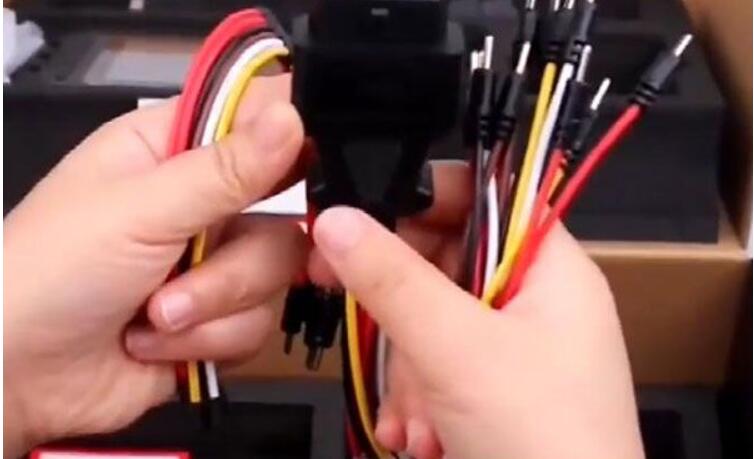
After comprehensive comparison, i purchased a new odo master at eobdtool.co.uk.i received it after 5 working days from the time i paid by PayPal. All is packed in a plastic box incl. ODO master main unit, main cable, charger, multi-functional jumper and Configuration List.

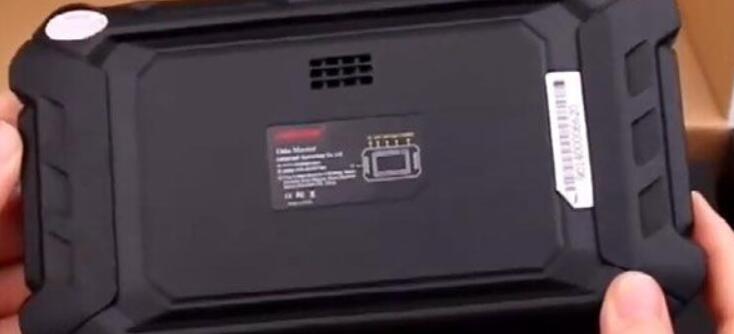
This is odo master main unit
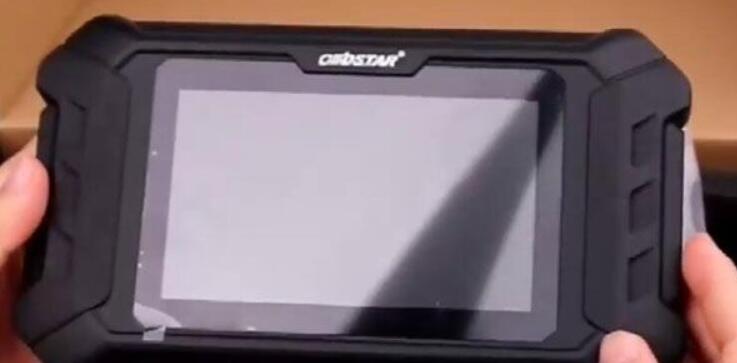
Advantage:
1.Rugged appearance, easy to use
2.The update cycle is short and fast (updated every 2-3 days)
3. Free upgrade within one year
4.Add a new help function for some models
Can’t wait to take a photo for full kit, i tried to correct odometer for some cars.
Firstly, connect odo master to the vehicle well

Then enter odo master main menu to select car model
Test on Land Rover
The original meter is 17309km, the final meter has been adjusted to 17412km


Test on Jeep
Correct the odometer from 6272 km to 5800km


So satisfied!!! these two cars i tested by obdstar odo master both works perfectly. I know the info from Obd2tool.com, odo master can support more car models than x300m. i hope it can give me more surprises in later tests.
Posted by: obd2tool at
03:44 AM
| No Comments
| Add Comment
Post contains 238 words, total size 7 kb.
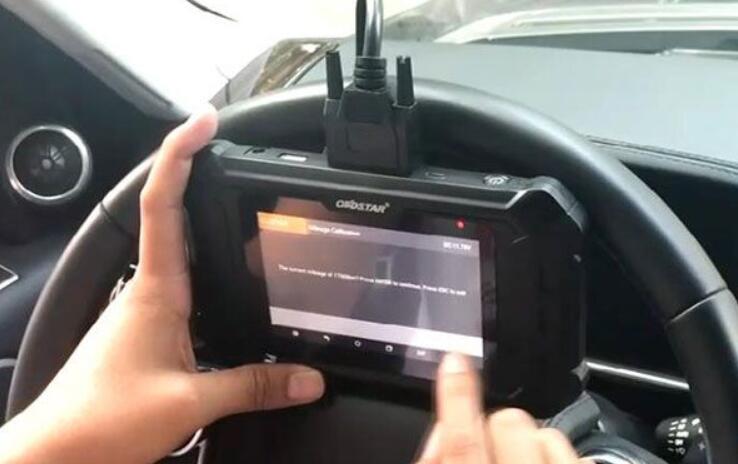
Here share two Odo Master VW mileage adjustment test reports which have been confirmed by OBDIITOOL.CO.UK engineer.
Purpose:
Check if ODOMaster can adjust mileage for 2008 VW PASSAT and 2013 VW NEC24C64 or not
All need:
Device: OBDSTAR ODO Master mileage programmer
Car dashboard: 2008 VW PASSAT VDO K line, 2013 VW NEC24C64 color screen type
Preparation:
Record the original mileage
2008 VW PASSAT is 250000km
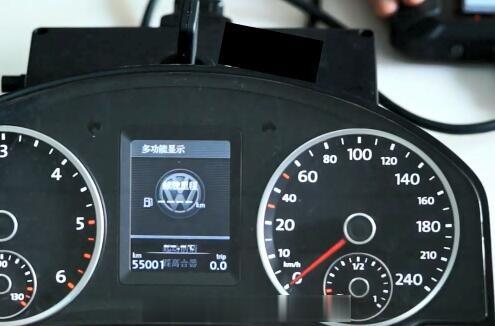
2013 VW NEC24C64 is 60000km
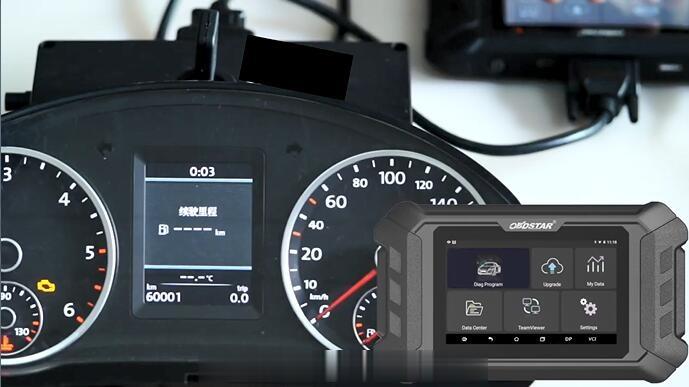
Connect ODO Master to car dashboard
Enter ODO Master main interface
Procedure:
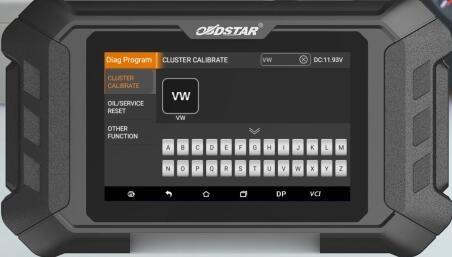
Test 1: ODO Master correct odometer for VW PASSAT 2008
Select "Diag Programâ€-> Cluster Calibrate†-> "VWâ€-> "VW V31.99â€
-> "Select from vehicleâ€-> "Passatâ€-> "VDO K lineâ€
Reading mileage…
Read out the mileage is correct

Input new mileage: 230000km
Confirm the value just enter is right
Then start to adjust mileage
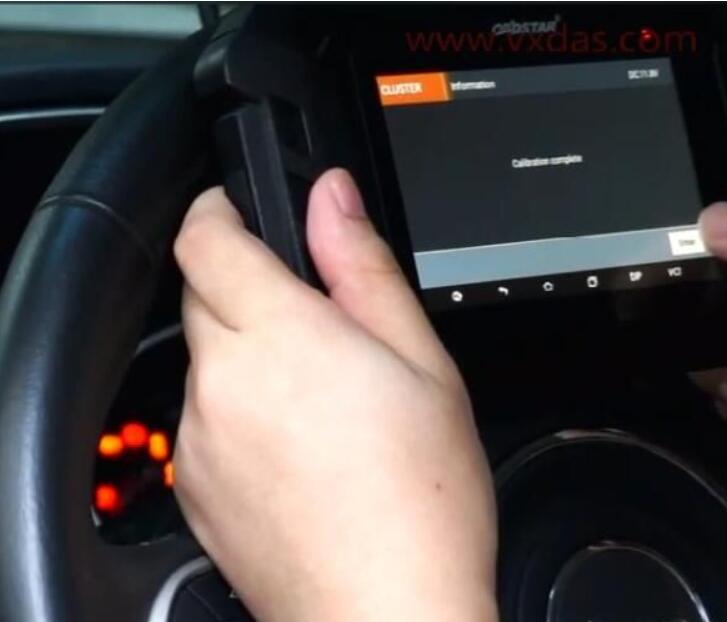
Finish adjustment
The new mileage shows on the car dashboard successfully
Test 2: ODO Master correct odometer for VW NEC24C64 2013:
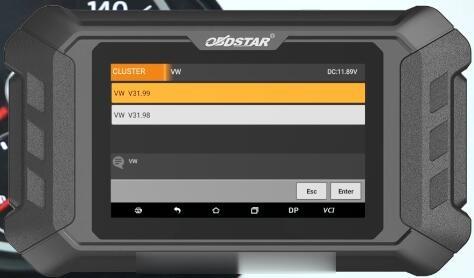
Select "Diag Programâ€-> "Cluster Calibrateâ€-> "VWâ€-> "VW V31.99â€
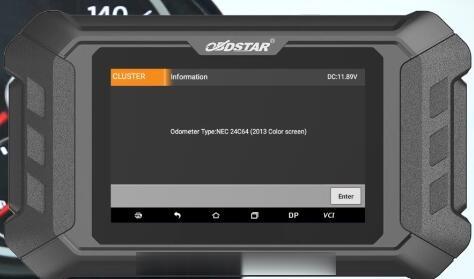
-> "Select from typeâ€-> "Identify Odometer Typesâ€

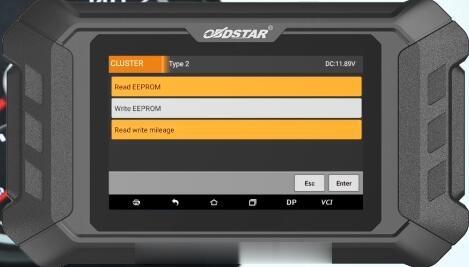
Indentify the odometer type is NEC+ 24C64 (2013 Color screen)
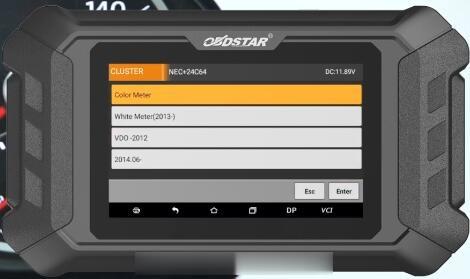
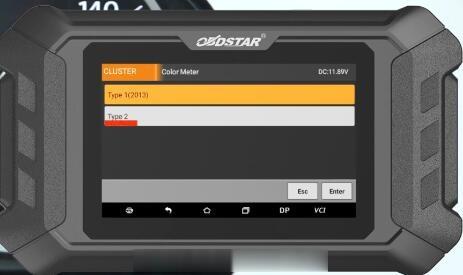
Then select "NEC+ 24C64â€-> "Color Meterâ€-> "Type 2â€
Click "Read EEPROM

Follow the prompt to turn on ignition first. If it is a smart key, please turn off ignition and then turn it on, press [Enter] key continue
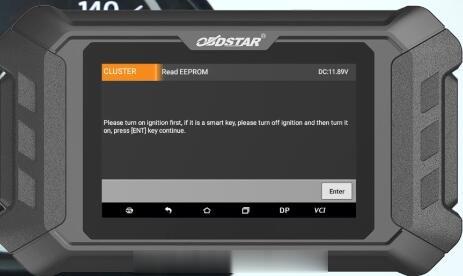
Ensure the instrument in the black state
Reading data…
Save data with a filename

Save EEPROM data successfully
Select "Read write mileageâ€
Pay attention to the prompt "Adjustment mileage may cause the EEPROM data to be destroyed, please backup the EEPROM data first…â€
We have backed up the original data in the previous steps, then go to turn on ignition
Input the new mileage: 55000km

Confirm the value is correct
Adjust mileage successfully and the new mileage appears on the dashboard
Result: OBDSTAR ODO Master correct odometer for 2008 VW PASSAT VDO K line and 2013 VW NEC24C64 color screen type successfully.
Posted by: obd2tool at
03:27 AM
| No Comments
| Add Comment
Post contains 330 words, total size 9 kb.
30 queries taking 0.1543 seconds, 178 records returned.
Powered by Minx 1.1.6c-pink.

